How to create a custom Datepicker to set time range in Grafana 11


Thank you orosolido for sharing incredible solutions for a Datepicker on Grafana Community Forum. Volkov Labs wanted to ensure more people were aware of the described solutions. We are excited that the author permitted us to post this material on our blog. Thank you!
Shoutout to Vitaliy Pinchuk for updating the original post for Grafana 11 and the latest version of Business Text plugin.
Greetings
Hi everyone, it is me again ;-)
I still see posts on a regular basis regarding help/requests for an easy datepicker solution. As I was once in a similar situation and found out there were not that many options, I started looking for other options within the possibilities that Grafana (plus open-source plugins) offers. These are some of the solutions I came up with.
So, here is the Part 02 to help you on your way!
Notes before we start
Before we continue, I would like to mention three things:
If you are NOT familiar with this topic yet I would strongly advise you to read my other post Part 01 : Make your own custom Datepicker (use/set your own timerange). Here is how to first!
To get a better understanding of how Grafana's basic principle of changing the time range works, and how to set up and use the Business Text plugin (previously known as Dynamic Text). The plugin is required for all solutions mentioned in this article.
I would like to emphasize that it is not, in any way, an official solution but more a guide with creative suggestions to make your daily life with Grafana easier.
My previous post focused on a more styled time selector. In this topic, I will be using a more traditional picker/picklist-style Datepicker, which is more compact and can accommodate a larger data selection.
Lets get to business
Below you will find 4 different use cases to copy/paste and implement for your own project.
- Specify (static) timeranges manually.
- Single day Datepicker with range [from: today -- to: past x days] using relative ranges.
- Single week Datepicker [from: this week -- to: past x week] using relative ranges.
- [Advanced] Custom Datepicker genereated using the InfluxDb datasource + extra mapping.
![[Advanced] Custom Datepicker genereated using the InfluxDb datasource + extra mapping.](/img/blog/2024-09-05-datepicker/image4.jpeg)
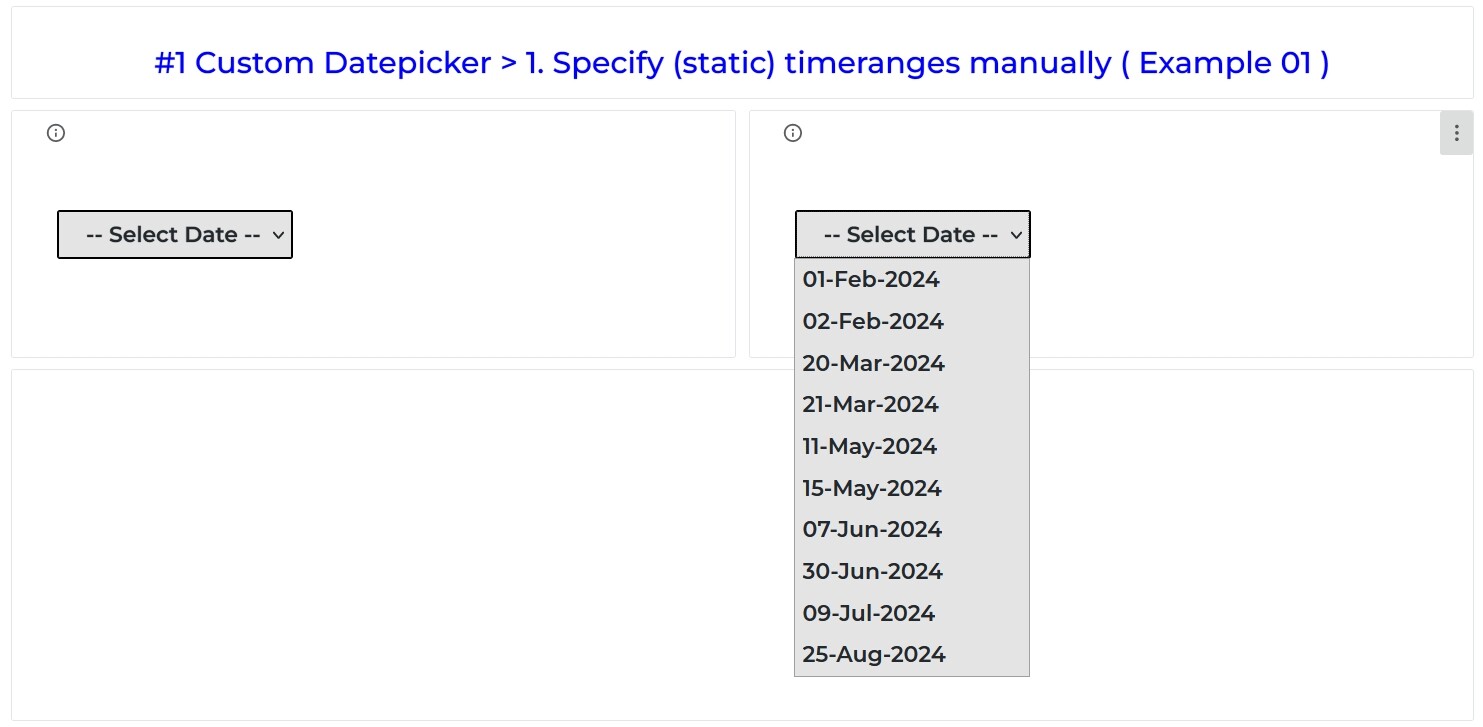
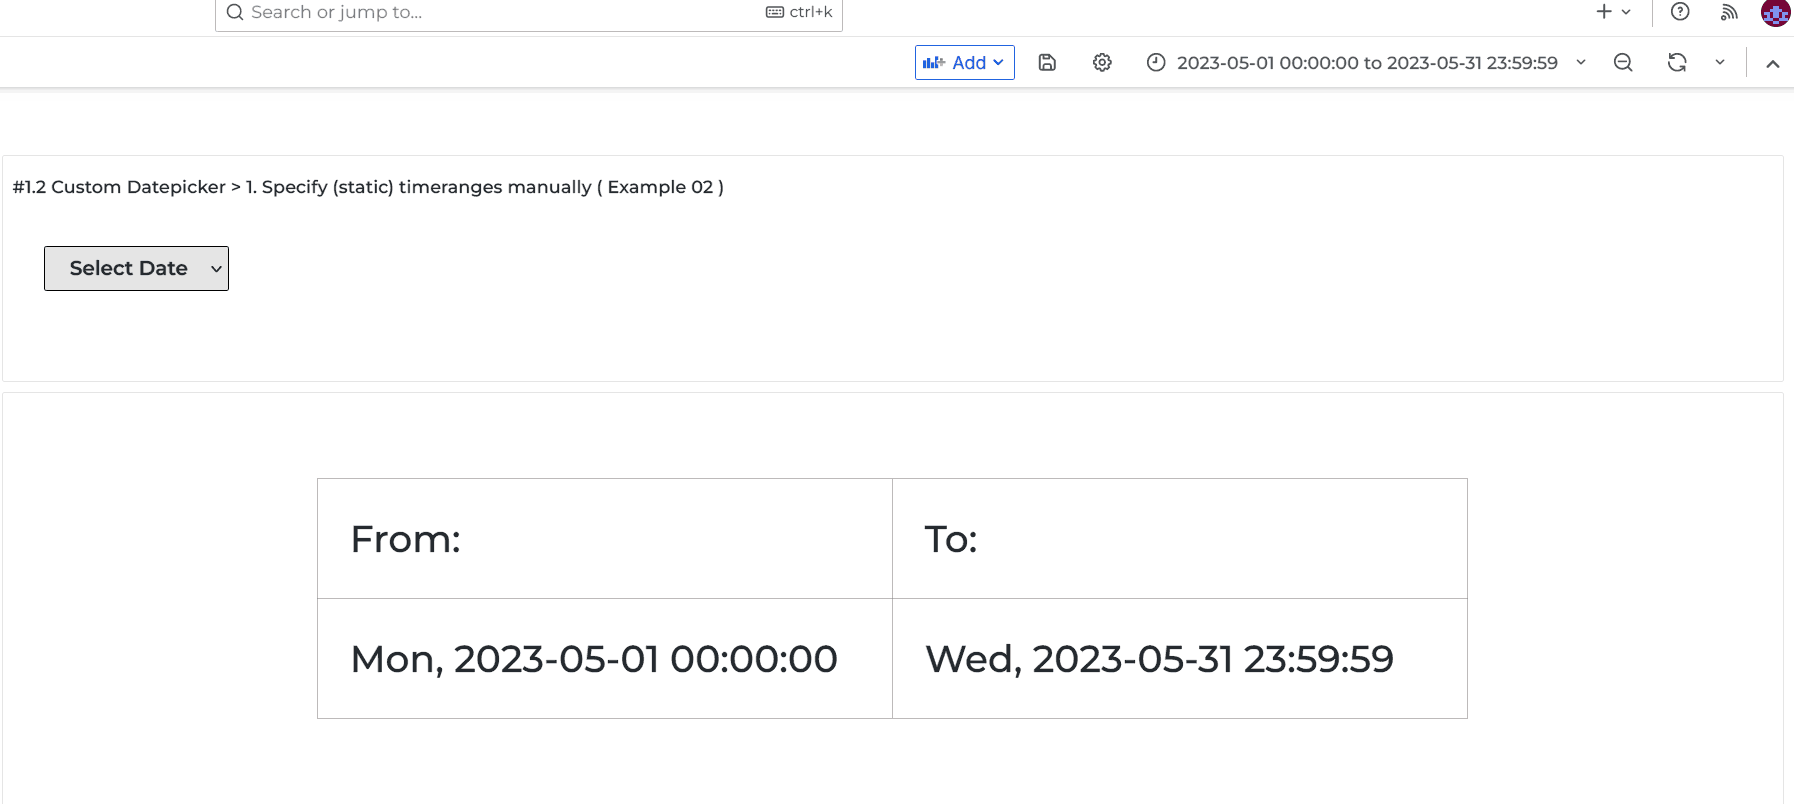
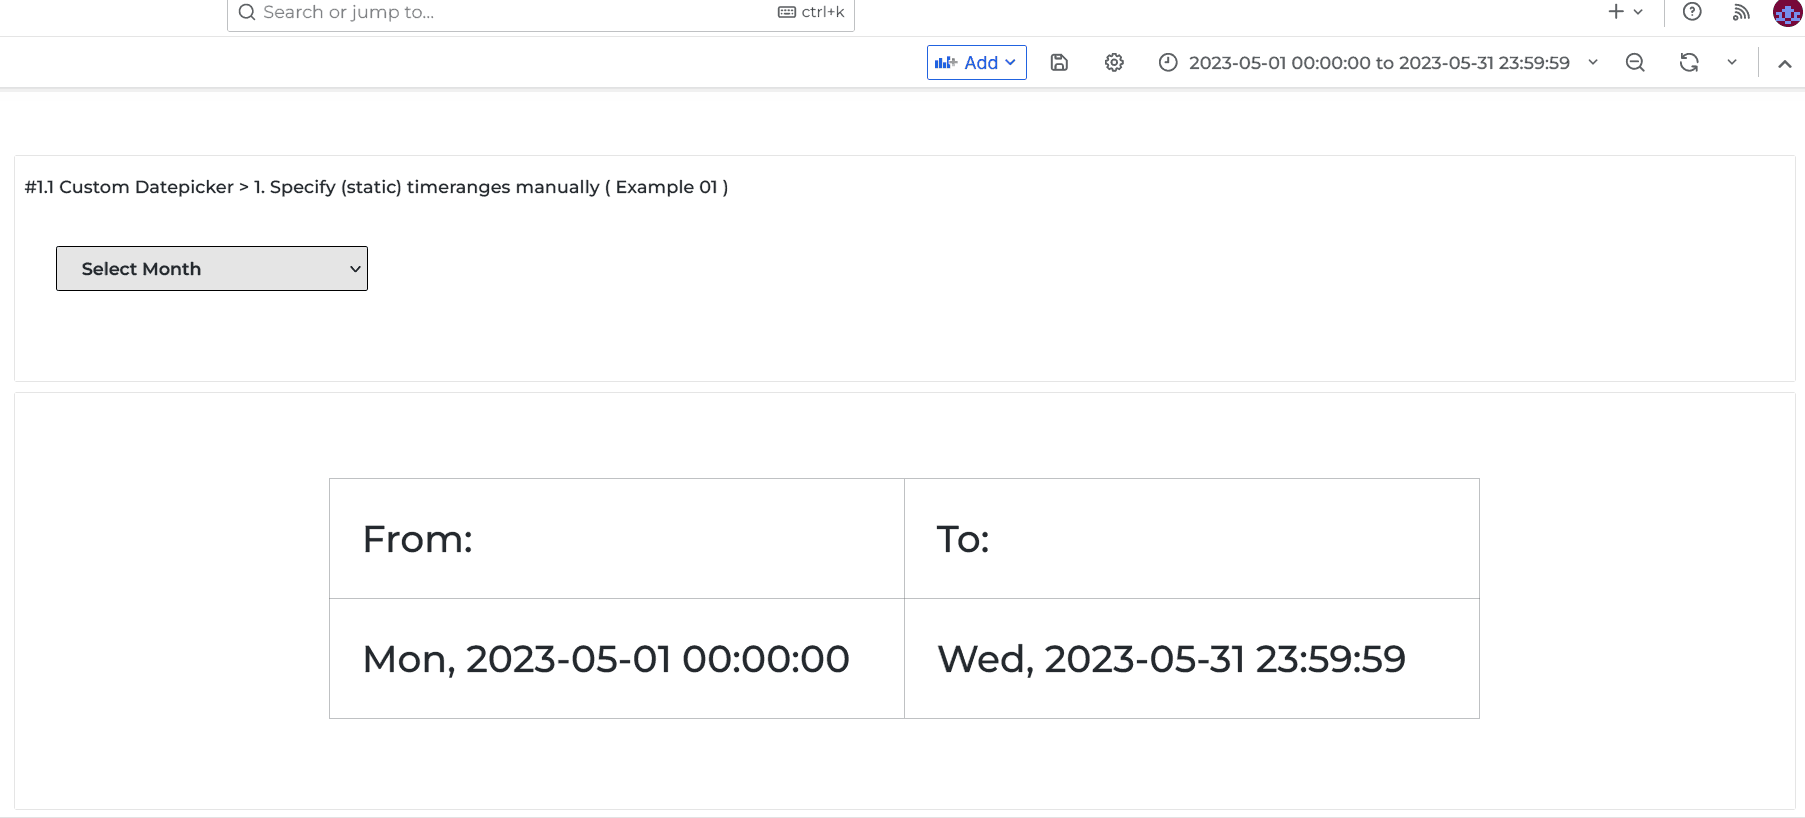
Specify (static) timeranges manually
This is the easiest way to make a custom Datepicker. All you have to do is to copy my example from below and in the Content plugin option specify two dates in the following line.
<option value='{"start":"startDateHere", "end":"endDateHere"}'>
  Custom text here will appear in your Datepicker
</option>
To add another item to the picklist, simply copy and paste the <option> line from above below the last item in my example (ensure it is placed above the </select> tag at the bottom). Then, specify a different from and to range, along with a new custom text/date. (Note: the format of from and to dates are: YYYY-MM-DD).


Copy/paste in the Content option:
For single dates:
<select placeholder="SelectDate" onchange="changeToSelectedRange(event)">
  <option value="" style="display:none;">-- Select Date --</option>
  <!-- change/add items below this line -->
  <option value='{"start":"2024-02-01", "end":"2024-02-01"}'>
    01-Feb-2024
  </option>
  <option value='{"start":"2024-02-02", "end":"2024-02-02"}'>
    02-Feb-2024
  </option>
  <option value='{"start":"2024-03-20", "end":"2024-03-20"}'>
    20-Mar-2024
  </option>
  <option value='{"start":"2024-03-21", "end":"2024-03-21"}'>
    21-Mar-2024
  </option>
  <option value='{"start":"2024-05-11", "end":"2024-05-11"}'>
    11-May-2024
  </option>
  <option value='{"start":"2024-05-15", "end":"2024-05-15"}'>
    15-May-2024
  </option>
  <option value='{"start":"2024-06-07", "end":"2024-06-07"}'>
    07-Jun-2024
  </option>
  <option value='{"start":"2024-06-30", "end":"2024-06-30"}'>
    30-Jun-2024
  </option>
  <option value='{"start":"2024-07-09", "end":"2024-07-09"}'>
    09-Jul-2024
  </option>
  <option value='{"start":"2024-08-25", "end":"2024-08-25"}'>
    25-Aug-2024
  </option>
  <!-- change/add items above this line -->
</select>
For ranges of different months:
<select placeholder="SelectMonth" onchange="changeToSelectedRange(event)">
  <option value="" style="display:none;">-- Select Range --</option>
  <!-- change/add items below this line -->
  <option value='{"start":"2023-01-01", "end":"2023-01-31"}'>
    January 2023
  </option>
  <option value='{"start":"2023-02-01", "end":"2023-02-28"}'>
    February 2023
  </option>
  <option value='{"start":"2023-03-01", "end":"2023-03-31"}'>March 2023</option>
  <option value='{"start":"2023-04-01", "end":"2023-04-30"}'>April 2023</option>
  <option value='{"start":"2023-05-01", "end":"2023-05-31"}'>May 2023</option>
  <option value='{"start":"2023-06-01", "end":"2023-06-30"}'>June 2023</option>
  <option value='{"start":"2023-07-01", "end":"2023-07-31"}'>July 2023</option>
  <option value='{"start":"2023-08-01", "end":"2023-08-31"}'>
    August 2023
  </option>
  <option value='{"start":"2023-09-01", "end":"2023-09-30"}'>
    September 2023
  </option>
  <option value='{"start":"2023-10-01", "end":"2023-10-31"}'>
    October 2023
  </option>
  <option value='{"start":"2023-11-01", "end":"2023-11-30"}'>
    November 2023
  </option>
  <option value='{"start":"2023-12-01", "end":"2023-12-31"}'>
    December 2023
  </option>
  <option value='{"start":"2024-01-01", "end":"2024-01-31"}'>
    January 2024
  </option>
  <option value='{"start":"2024-02-01", "end":"2024-02-28"}'>
    February 2024
  </option>
  <option value='{"start":"2024-03-01", "end":"2024-03-31"}'>March 2024</option>
  <option value='{"start":"2024-04-01", "end":"2024-04-30"}'>April 2024</option>
  <option value='{"start":"2024-05-01", "end":"2024-05-31"}'>May 2024</option>
  <option value='{"start":"2024-06-01", "end":"2024-06-30"}'>June 2024</option>
  <option value='{"start":"2024-07-01", "end":"2024-07-31"}'>July 2024</option>
  <option value='{"start":"2024-08-01", "end":"2024-08-31"}'>
    August 2024
  </option>
  <!-- change/add items above this line -->
</select>
Copy/paste in the JavaScript option:
/**
 * Handle dates
 */
handleSelectedDate = (start, end) => {
  /**
   * Start end dates
   */
  const timeStart = "T00:00:00"; //<<-- Change 'start' time here of the range
  const timeEnd = "T23:59:59"; //<<-- Change 'end' time of the range

  const rangeStartMerged = start + timeStart;
  const rangeEndMerged = end + timeEnd;

  /**
   * Return Date
   */
  const date1 = new Date(rangeStartMerged);
  const date2 = new Date(rangeEndMerged);

  /**
   * Change date `from` and `to`
   */
  context.grafana.locationService.partial(
    { from: date1.getTime(), to: date2.getTime() },
    true
  );
};

changeToSelectedRange = (event) => {
  /**
   * Handle event
   */
  const selectedOption = event.target.value;

  /**
   * Parse value from option
   */
  const dateRange = JSON.parse(selectedOption);

  handleSelectedDate(dateRange.start, dateRange.end);

  return;
};
Copy/paste in the CSS Styling option:
select {
  height: 36px;
  width: 425px;
  font-size: 14px;
  font-weight: 600;
  padding-left: 20px;
  border: 1.5px solid black;
  border-radius: 2px;
  background: #e4e4e4;
  margin-left: 25px;
  margin-top: 15px;
}
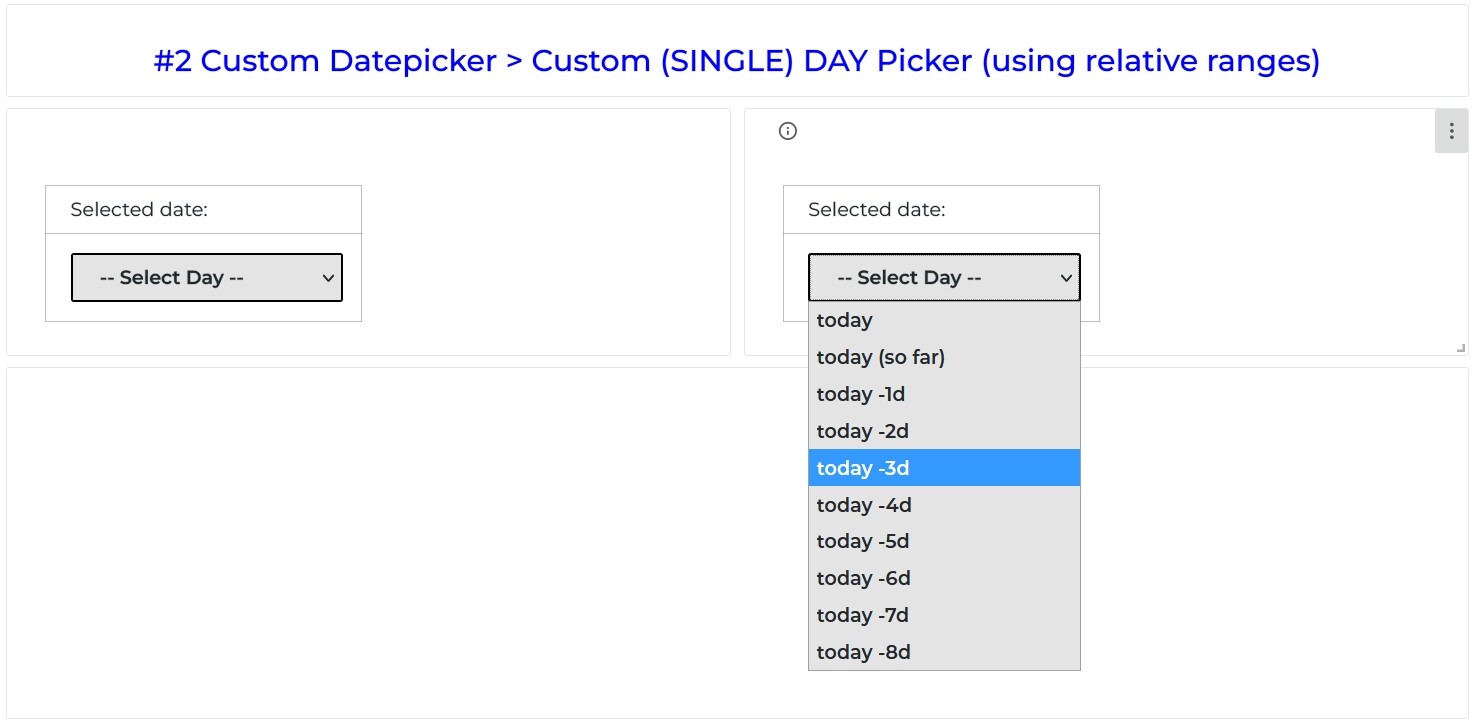
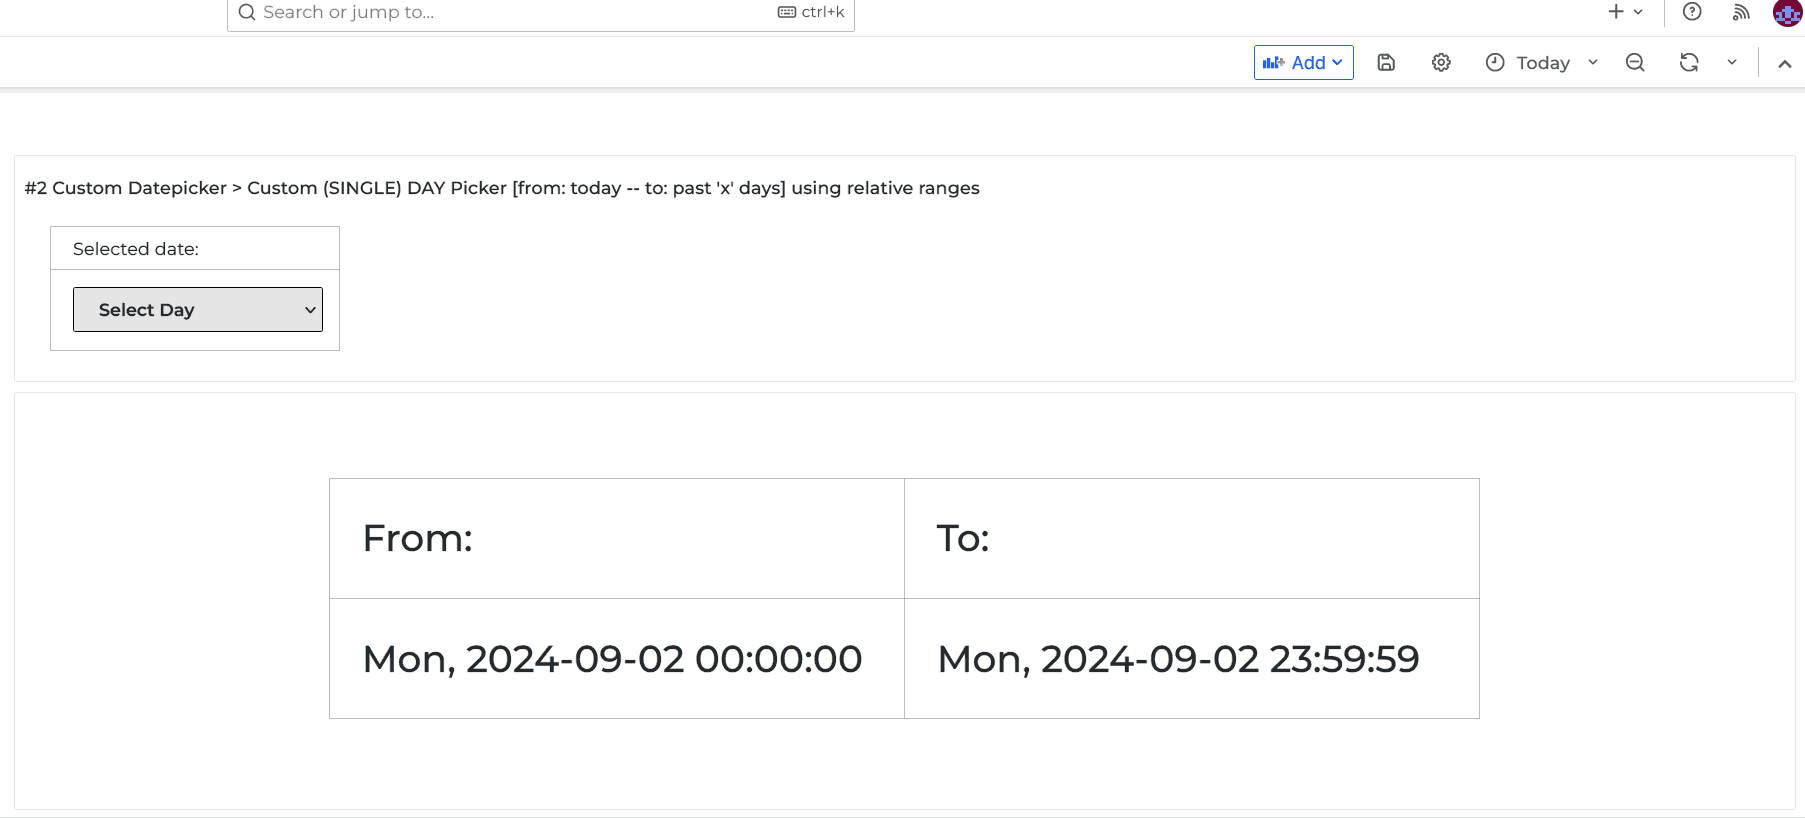
Custom (single) day Datepicker using relative ranges
This is for users who primarily use the dashboard and data from the past several days and easily want to see data from one specific day in that range. Grafana has a list of predefined time ranges called quick ranges, but these are limited and cannot be customized.
This method allows you to create your own list of frequently used quick ranges. For this example I will use range (start: -8 days back) TO (end: 'today').

As specified in the header, this approach does not use the actual dates like '2024-08-01' (static date) but is using the relative range/time (-> Section -> Time units and relative ranges) indication. So,
- today is indicated as
now/d(range would beFrom:now/d To: now/d). - yesterday is indicated as
now-1d/d(range would beFrom:now-1d/d To: now-1d/d). - day before yesterday is indicated as
now-2d/d(range would beFrom:now-2d/d To: now-2d/d). - etc.
Because of relative time indication I added an extra date field to see what date you actually have selected above the Datepicker.
Copy/paste in the Content option:
<table height="100px">
  <tr valign="middle">
    <td>
      <div class="text01">
        Selected date:
        <div class="text02" id="insertDate2"></div>
      </div>
    </td>
  </tr>
  <tr valign="middle">
    <td>
      <select placeholder="SelectDay" onchange="changeToSelectedDay(event)">
        <option value="" style="display:none;">-- Select Day --</option>
        <!-- change/add items below this line -->
        <option
          value='{"rangeStart":"now/d", "rangeEnd":"now/d", "selected": 0}'
        >
          today
        </option>
        <option value='{"rangeStart":"now/d", "rangeEnd":"now", "selected": 0}'>
          today (so far)
        </option>
        <option
          value='{"rangeStart":"now-1d/d", "rangeEnd":"now-1d/d", "selected": 1}'
        >
          today -1d
        </option>
        <option
          value='{"rangeStart":"now-2d/d", "rangeEnd":"now-2d/d", "selected": 2}'
        >
          today -2d
        </option>
        <option
          value='{"rangeStart":"now-3d/d", "rangeEnd":"now-3d/d", "selected": 3}'
        >
          today -3d
        </option>
        <option
          value='{"rangeStart":"now-4d/d", "rangeEnd":"now-4d/d", "selected": 4}'
        >
          today -4d
        </option>
        <option
          value='{"rangeStart":"now-5d/d", "rangeEnd":"now-5d/d", "selected": 5}'
        >
          today -5d
        </option>
        <option
          value='{"rangeStart":"now-6d/d", "rangeEnd":"now-6d/d", "selected": 6}'
        >
          today -6d
        </option>
        <option
          value='{"rangeStart":"now-7d/d", "rangeEnd":"now-7d/d", "selected": 7}'
        >
          today -7d
        </option>
        <option
          value='{"rangeStart":"now-8d/d", "rangeEnd":"now-8d/d", "selected": 8}'
        >
          today -8d
        </option>
        <!-- change/add items above this line -->
      </select>
    </td>
  </tr>
</table>
Copy/paste in the JavaScript option:
/**
 * Handle dates
 */
handleSelectedDate = (start, end) => {
  /**
   * Change date `from` and `to`
   */
  context.grafana.locationService.partial({ from: start, to: end }, true);
};

/**
 * Show selected date in above custom Datepicker
 */
getDateSelectedV2 = (date) => {
  let year = new Intl.DateTimeFormat("en", { year: "numeric" }).format(date);
  let month = new Intl.DateTimeFormat("en", { month: "short" }).format(date);
  let day = new Intl.DateTimeFormat("en", { day: "2-digit" }).format(date);
  let weekday = new Intl.DateTimeFormat("en", { weekday: "short" }).format(
    date
  );

  let dateCustom = `${weekday}, ${day}-${month}-${year}`;

  document.getElementById("insertDate2").innerHTML = dateCustom;

  //alert(dateCustom);
};

changeToSelectedDay = (event) => {
  /**
   * Handle event
   */
  const selectedOption = event.target.value;

  /**
   * Parse value from option
   */
  const dateRange = JSON.parse(selectedOption);

  const fromDate = new Date();
  fromDate.setDate(fromDate.getDate() - dateRange.selected);

  handleSelectedDate(dateRange.rangeStart, dateRange.rangeEnd);
  getDateSelectedV2(fromDate);
  return;
};
Copy/paste in the CSS Styling option:
.text01 {
  font-size: 14px;
  font-weight: 400;
  padding-left: 5px;
  padding-right: 15px;
  margin-left: 5px;
}

.text02 {
  font-size: 14px;
  font-weight: 600;
}

select {
  height: 36px;
  width: 225px;
  font-size: 14px;
  font-weight: 600;
  padding-left: 20px;
  border: 1.5px solid black;
  border-radius: 2px;
  background: #e4e4e4;
  margin-left: 5px;
  margin-right: 5px;
  margin-top: 5px;
  margin-bottom: 5px;
}

table {
  margin-left: 5px;
  width: 100px;
}
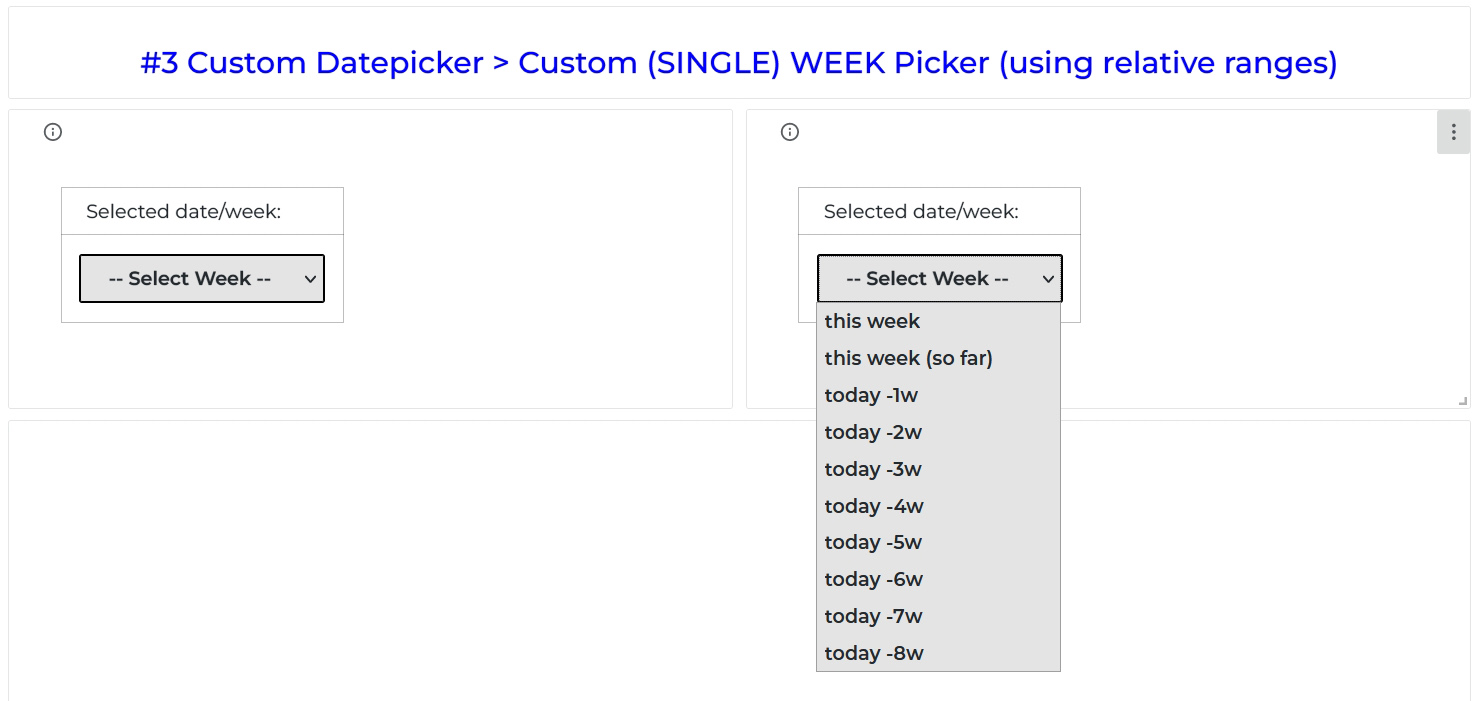
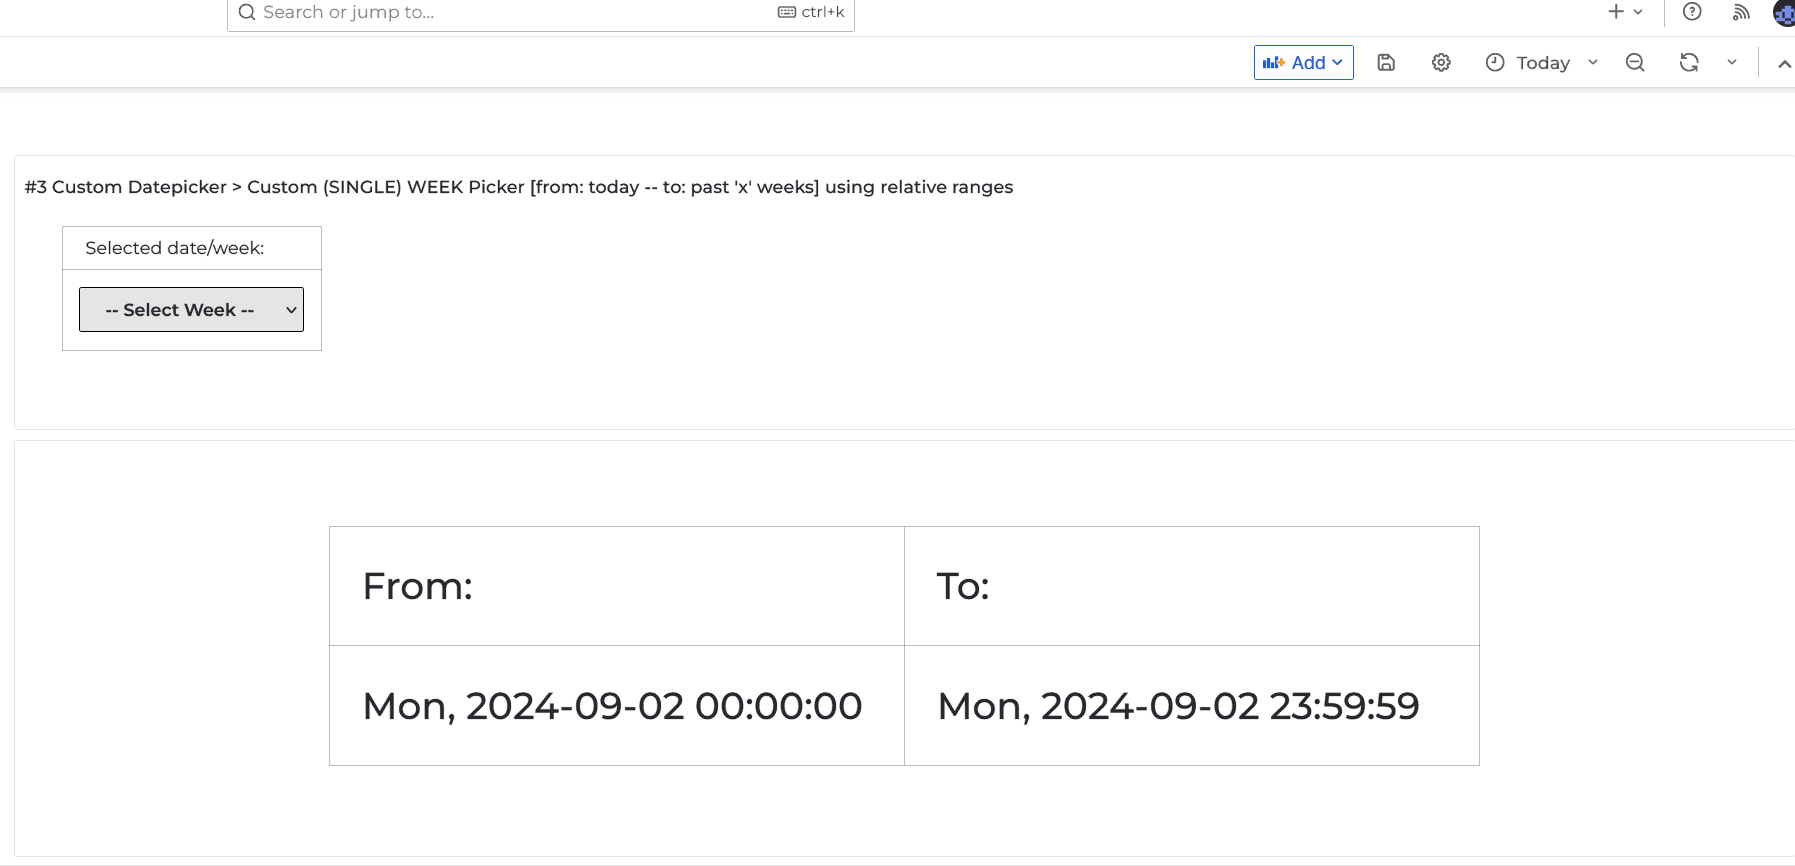
Custom (single) week Datepicker using relative ranges
This is for users who mainly use the dashboard and data from the past weeks and easily want to see/change data from one specific week x in that range. Grafana has a list of predefined time ranges called quick ranges, but these are limited and cannot be customized.
This method allows you to create your own list of frequently used ranges. For this example I will use range (start: -8 weeks back) TO (end: 'today').

As specified in the header this approach does not use the actual dates like '2024-08-01' (static date) but is using the relative range/time (-> Section -> Time units and relative ranges ) indication. So,
- this week is indicated as
now/w(range would beFrom:now/w To: now/w). - previous week is indicated as
now-1w/w(range would beFrom:now-1w/w To: now-1w/w). - going 2 weeks back from today is indicated as
now-2w/w(range would beFrom:now-2w/w To: now-2w/w). - etc.
Because of relative time use/indication I added an extra date field to see what date/week you selected above the Datepicker.
Copy/paste in the Content option:
<table height="100px">
  <tr valign="middle">
    <td>
      <div class="text01">
        Selected date/week:
        <div class="text02" id="insertWeek"></div>
        <div class="text02" id="insertWeekNr"></div>
      </div>
    </td>
  </tr>
  <tr valign="middle">
    <td>
      <select
        name="pickerWeek"
        placeholder="SelectDay"
        onchange="changeToSelectedDay(event)"
      >
        <option value="" style="display:none;">-- Select Week --</option>
        <!-- change/add items below this line -->
        <option
          value='{"rangeStart":"now/w", "rangeEnd":"now/w", "selected": 0, "week": 0}'
        >
          this week
        </option>
        <option
          value='{"rangeStart":"now/w", "rangeEnd":"now", "selected": 0, "week": 0}'
        >
          this week (so far)
        </option>
        <option
          value='{"rangeStart":"now-1w/w", "rangeEnd":"now-1w/w", "selected": 1, "week": 1}'
        >
          today -1w
        </option>
        <option
          value='{"rangeStart":"now-2w/w", "rangeEnd":"now-2w/w", "selected": 2, "week": 2}'
        >
          today -2w
        </option>
        <option
          value='{"rangeStart":"now-3w/w", "rangeEnd":"now-3w/w", "selected": 3, "week": 3}'
        >
          today -3w
        </option>
        <option
          value='{"rangeStart":"now-4w/w", "rangeEnd":"now-4w/w", "selected": 4, "week": 4}'
        >
          today -4w
        </option>
        <option
          value='{"rangeStart":"now-5w/w", "rangeEnd":"now-5w/w", "selected": 5, "week": 5}'
        >
          today -5w
        </option>
        <option
          value='{"rangeStart":"now-6w/w", "rangeEnd":"now-6w/w", "selected": 6, "week": 6}'
        >
          today -6w
        </option>
        <option
          value='{"rangeStart":"now-7w/w", "rangeEnd":"now-7w/w", "selected": 7, "week": 7}'
        >
          today -7w
        </option>
        <option
          value='{"rangeStart":"now-8w/w", "rangeEnd":"now-8w/w", "selected": 8, "week": 8}'
        >
          today -8w
        </option>
        <!-- change/add items above this line -->
      </select>
    </td>
  </tr>
</table>
Copy/paste in the JavaScript option:
/**
 * Handle dates
 */
handleSelectedDate = (start, end) => {
  /**
   * Change date `from` and `to`
   */
  context.grafana.locationService.partial({ from: start, to: end }, true);
};

/**
 * Show selected date in above custom Datepicker
 */
getDateSelectedV2 = (date) => {
  const year = new Intl.DateTimeFormat("en", { year: "numeric" }).format(date);
  const month = new Intl.DateTimeFormat("en", { month: "short" }).format(date);
  const day = new Intl.DateTimeFormat("en", { day: "2-digit" }).format(date);
  const weekday = new Intl.DateTimeFormat("en", { weekday: "short" }).format(
    date
  );

  const dateCustom = `${weekday}, ${day}-${month}-${year}`;
  const element = document.getElementById("insertWeek");
  element.innerText = dateCustom;

  //alert(dateCustom);
};

/**
 * get week
 */
getWeek = (date) => {
  const yearStart = new Date(date.getFullYear(), 0, 1);
  const today = new Date(date.getFullYear(), date.getMonth(), date.getDate());
  const dayOfYear = (today - yearStart + 1) / 86400000;
  const week = Math.ceil(dayOfYear / 7);
  document.getElementById("insertWeekNr").innerHTML = "weekNr : " + week;
};

changeToSelectedDay = (event) => {
  /**
   * Handle event
   */
  const selectedOption = event.target.value;

  /**
   * Parse value from option
   */
  const dateRange = JSON.parse(selectedOption);

  const fromDate = new Date(Date.now() - 6.048e8 * dateRange.selected);

  handleSelectedDate(dateRange.rangeStart, dateRange.rangeEnd);
  getDateSelectedV2(fromDate);
  getWeek(fromDate);
  return;
};
Copy/paste in the CSS Styling option:
.text01 {
  font-size: 14px;
  font-weight: 400;
  padding-left: 5px;
  padding-right: 15px;

  margin-left: 5px;
}

.text02 {
  font-size: 14px;
  font-weight: 600;
}

select {
  height: 36px;
  width: 225px;
  font-size: 14px;
  font-weight: 600;
  padding-left: 20px;
  border: 1.5px solid black;
  border-radius: 2px;
  background: #e4e4e4;
  margin-left: 5px;
  margin-right: 5px;
  margin-top: 5px;
  margin-bottom: 5px;
}

table {
  margin-left: 15px;
  width: 100px;
}
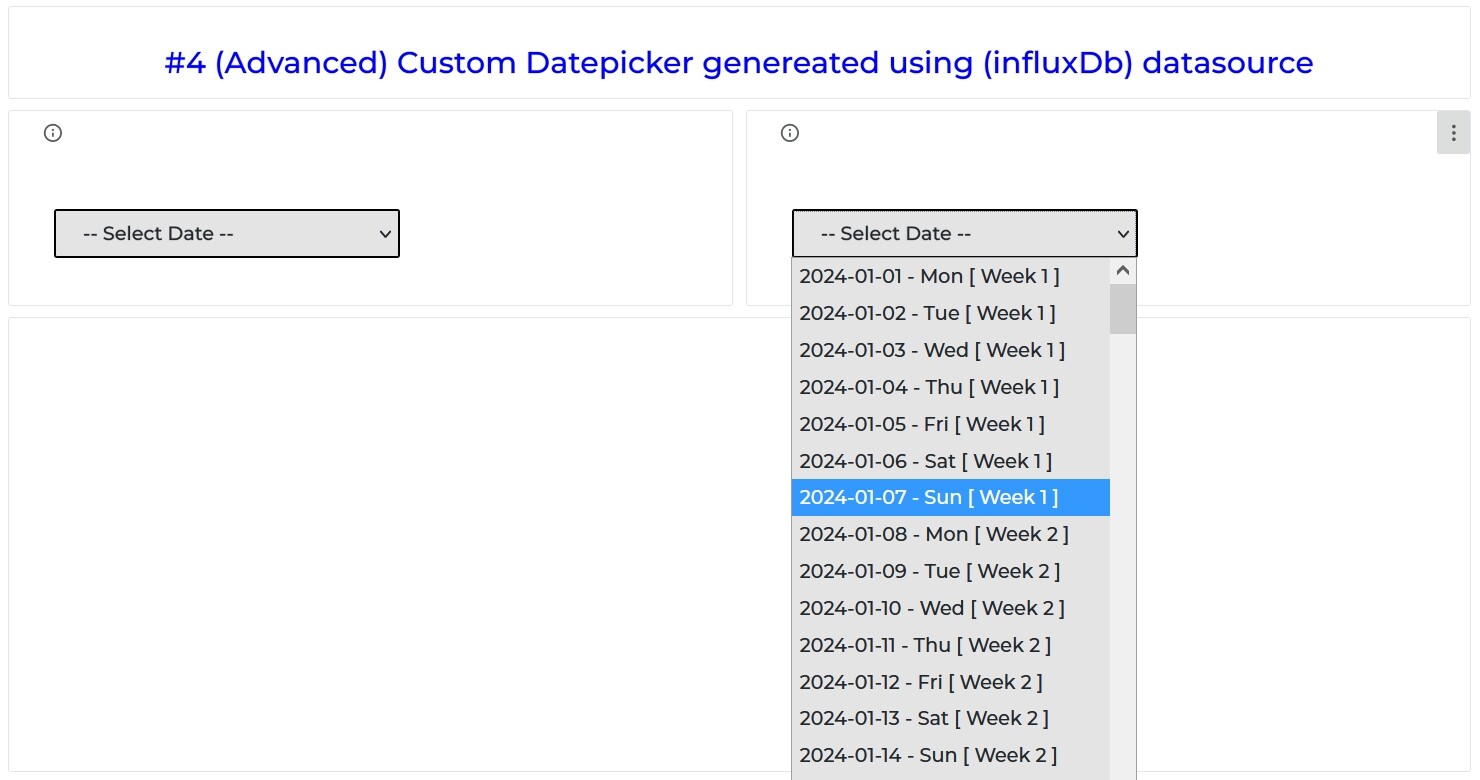
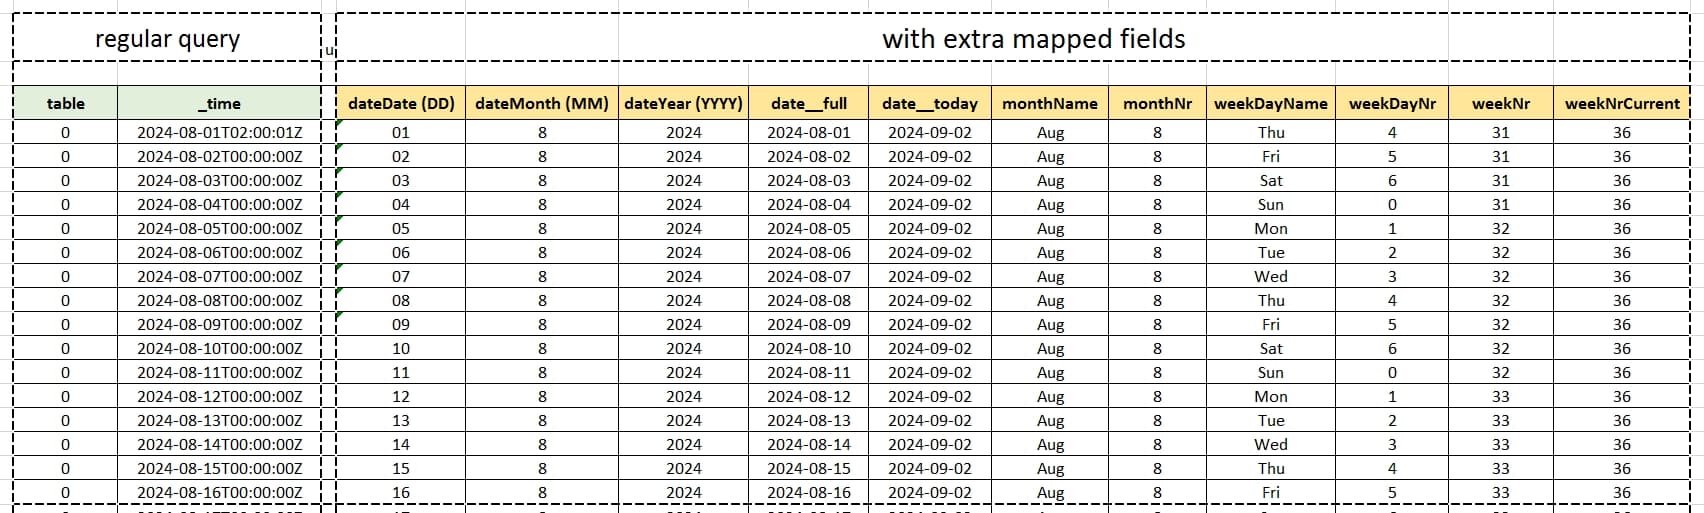
[Advanced] Custom Datepicker genereated using The InfluxDb datasource and extra mapping
The principle behind this method is as follow.
-
Create a dummy query using your own datasource (influxDb / MySQL) with timerange
xtoy. -
The focus will be on the '_time' column
(my example is based on dateTime:RFC3339 | YYYY-MM-DDThh:mm:ssZ | 2020-06-18T17:24:53Z format). -
Mapping! Extract elements like (DAY (DD) - MONTH (MM) - YEAR (YYYY) - WEEKDAY - WEEKNR - ETC..) from '_time' as a
stringand map them to seperate columns (using strings.substring() function).
Adding these extra mapped fields in general allows you to easily filter and sort by specific days of the week, week numbers, months, and more.
- Generate/create Custom Datepicker with prefered data.
So how to achieve this?
- Start with a basic (dummy) query with one or two columns (a
'_time'column is required). - Add 'Part 01' of my mapping code to your query.
- Add 'Part 02' of my mapping code to your query.
- Copy/paste in the Content option.
- Copy/paste in the JavaScript option.
- Copy/paste in the CSS Styling option.
Your query
Your query should look something like this:
from(bucket: "your_bucket_here")
 |> range(start: 2024-01-01T02:00:01Z , stop: now())
 |> filter(fn: (r) => r["_measurement"] == "reservation_status")
 |> group(columns: ["_measurement"])
 |> unique()
 |> aggregateWindow(every: 1d, fn: count, createEmpty: true, timeSrc: "_start")
 |> yield(name: "with_mapping")
A few extra notes for your own query part
-
I am using a static timerange from date
x(from) untilltoday(to), so this works independantly from the Grafana Datepicker. Change startdatexto your own date with one of the options below:
For my example I will use option 1- option 1
|> range(start: 2024-01-01T02:00:01Z , stop: now())use static date/time. - option 2
|> range(start: -8d, stop: now())use relative amount of days back as starting point of range. - option 3
|> range(start: -8w, stop: now())use relative amount of weeks back as starting time of range.
- option 1
-
aggregate
\_timeby '1d' in your query like example , so you get only one value for each date.
Part 01
Copy part 01.
// <--- [A] copy/paste this on top of your dummy query above from(bucket: "") line --
import "join"
import "strings"
import "array"
import "system"
import "date"
import "dict"

weekdayName = [0:"Sun",1:"Mon",2:"Tue",3:"Wed",4:"Thu",5:"Fri",6:"Sat"]
monthName = [1:"Jan",2:"Feb",3:"Mar",4:"Apr",5:"May",6:"Jun",7:"Jul",8:"Aug",9:"Sep",10:"Oct",11:"Nov",12:"Dec"]
// -- end of copy part [A] ---/>
Part 02
Copy this below your own query, make sure its above the yield field if you are using that.
// <-- [B] copy this below your dummy query , make sure its above the 'yield' field --
|> map(fn: (r) => ({
    _time: r._time,
    weekDayNr: date.weekDay(t: r._time),
    weekDayName: dict.get(dict: weekdayName, key:date.weekDay(t: r._time), default: ""),
    weekNr: date.week(t: r._time),
    weekNrCurrent: date.week(t: now()),
    monthNr: date.month(t: r._time) ,
    monthName: dict.get(dict: monthName, key:date.month(t: r._time), default: ""),
    dateDate: "${strings.substring(end: 10, start: 8, v: string(v: r._time))}",
    dateMonth: "${strings.substring(end: 7, start: 5, v: string(v: r._time))}",
    dateYear: "${strings.substring(end: 4, start: 0, v: string(v: r._time))}",
    date__full: "${strings.substring(end: 10, start: 0, v: string(v: r._time))}",
    date__today: "${strings.substring(end: 4, start: 0, v: string(v: system.time()))}-${strings.substring(end: 7, start: 5, v: string(v: system.time()))}-${strings.substring(end: 10, start: 8, v: string(v: system.time()))}"
    }))
// -- end of copy part [B] should be above 'yield' field ---/>

|> yield(name: "with_mapping")
Your full query
Your full query should look something like this:
// <-- copy part [01] --
import "join"
import "strings"
import "array"
import "system"
import "date"
import "dict"

weekdayName = [0:"Sun",1:"Mon",2:"Tue",3:"Wed",4:"Thu",5:"Fri",6:"Sat"]
monthName = [1:"Jan",2:"Feb",3:"Mar",4:"Apr",5:"May",6:"Jun",7:"Jul",8:"Aug",9:"Sep",10:"Oct",11:"Nov",12:"Dec"]
// -- end of copy part [01] ---/>

// <-- Your query here --
from(bucket: "your_dB_here")
  |> range(start: 2024-01-01T02:00:01Z , stop: now())
  |> filter(fn: (r) => r["_measurement"] == "reservation_status")
  |> group(columns: ["_measurement"])
  |> unique()
  |> aggregateWindow(every: 1d, fn: count, createEmpty: true, timeSrc: "_start")

// <-- copy part [02] --
|> map(fn: (r) => ({
    _time: r._time,
    weekDayNr: date.weekDay(t: r._time),
    weekDayName: dict.get(dict: weekdayName, key:date.weekDay(t: r._time), default: ""),
    weekNr: date.week(t: r._time),
    weekNrCurrent: date.week(t: now()),
    monthNr: date.month(t: r._time) ,
    monthName: dict.get(dict: monthName, key:date.month(t: r._time), default: ""),
    dateDate: "${strings.substring(end: 10, start: 8, v: string(v: r._time))}",
    dateMonth: "${strings.substring(end: 7, start: 5, v: string(v: r._time))}",
    dateYear: "${strings.substring(end: 4, start: 0, v: string(v: r._time))}",
    date__full: "${strings.substring(end: 10, start: 0, v: string(v: r._time))}",
    date__today: "${strings.substring(end: 4, start: 0, v: string(v: system.time()))}-${strings.substring(end: 7, start: 5, v: string(v: system.time()))}-${strings.substring(end: 10, start: 8, v: string(v: system.time()))}"
    }))
// -- end of copy part [02] ---/>

|> yield(name: "with_mapping")
So, now you have a table with x results from your query with additional mapped fields.
You can use this data in combination with the Business Text plugin (previously known as Dynamic Text) to generate a picklist.
Content
Copy/paste in the Content option:
<select placeholder="SelectDate" onchange="changeToSelectedDay(event)">
  <option name="" value="" style="display:none;">-- Select Date --</option>
  {{#each data}} {{#if (eq date__full date__today) }}
  <option
    name="week{{weekNr}}"
    value='{"rangeStart":"now/d", "rangeEnd":"now/d", "week": "{{weekNr}}"}'
  >
    {{date__today}} - [ TODAY ]
  </option>
  {{else}}
  <option
    name="week{{weekNr}}"
    value='{"rangeStart":"{{date__full}}", "rangeEnd":"{{date__full}}", "week": "{{weekNr}}"}'
  >
    {{date__full}} - {{weekDayName}} [ Week {{weekNr}} ]
  </option>
  {{/if}} {{/each}}
</select>
JavaScript
Copy/paste in the JavaScript option:
changeToSelectedDay = (event) => {
  /**
   * Handle event
   */
  const selectedOption = event.target.value;

  /**
   * Parse value from option
   */
  const dateRange = JSON.parse(selectedOption);

  const { rangeStart, rangeEnd, week } = dateRange;

  if (rangeStart === "now/d" || rangeEnd === "now/d") {
    /**
     * Change date `from` and `to`
     */
    context.grafana.locationService.partial({ from: start, to: end }, true);

    return;
  }

  const dateStartOne = rangeStart + " 00:00:00";
  const dateStartSecond = rangeEnd + " 23:59:00";

  /**
   * Return Date
   */
  const date1 = new Date(dateStartOne);
  const date2 = new Date(dateStartSecond);

  /**
   * Change date `from` and `to`
   */
  context.grafana.locationService.partial(
    { from: date1.getTime(), to: date2.getTime() },
    true
  );

  return;
};
CSS Styling
Copy/paste in the CSS Styling option:
select {
  height: 36px;
  width: auto;
  font-size: 14px;
  font-weight: 500;
  padding-left: 20px;
  border: 1.5px solid black;
  border-radius: 2px;
  background: #e4e4e4;

  margin-left: 25px;
  margin-top: 15px;
}
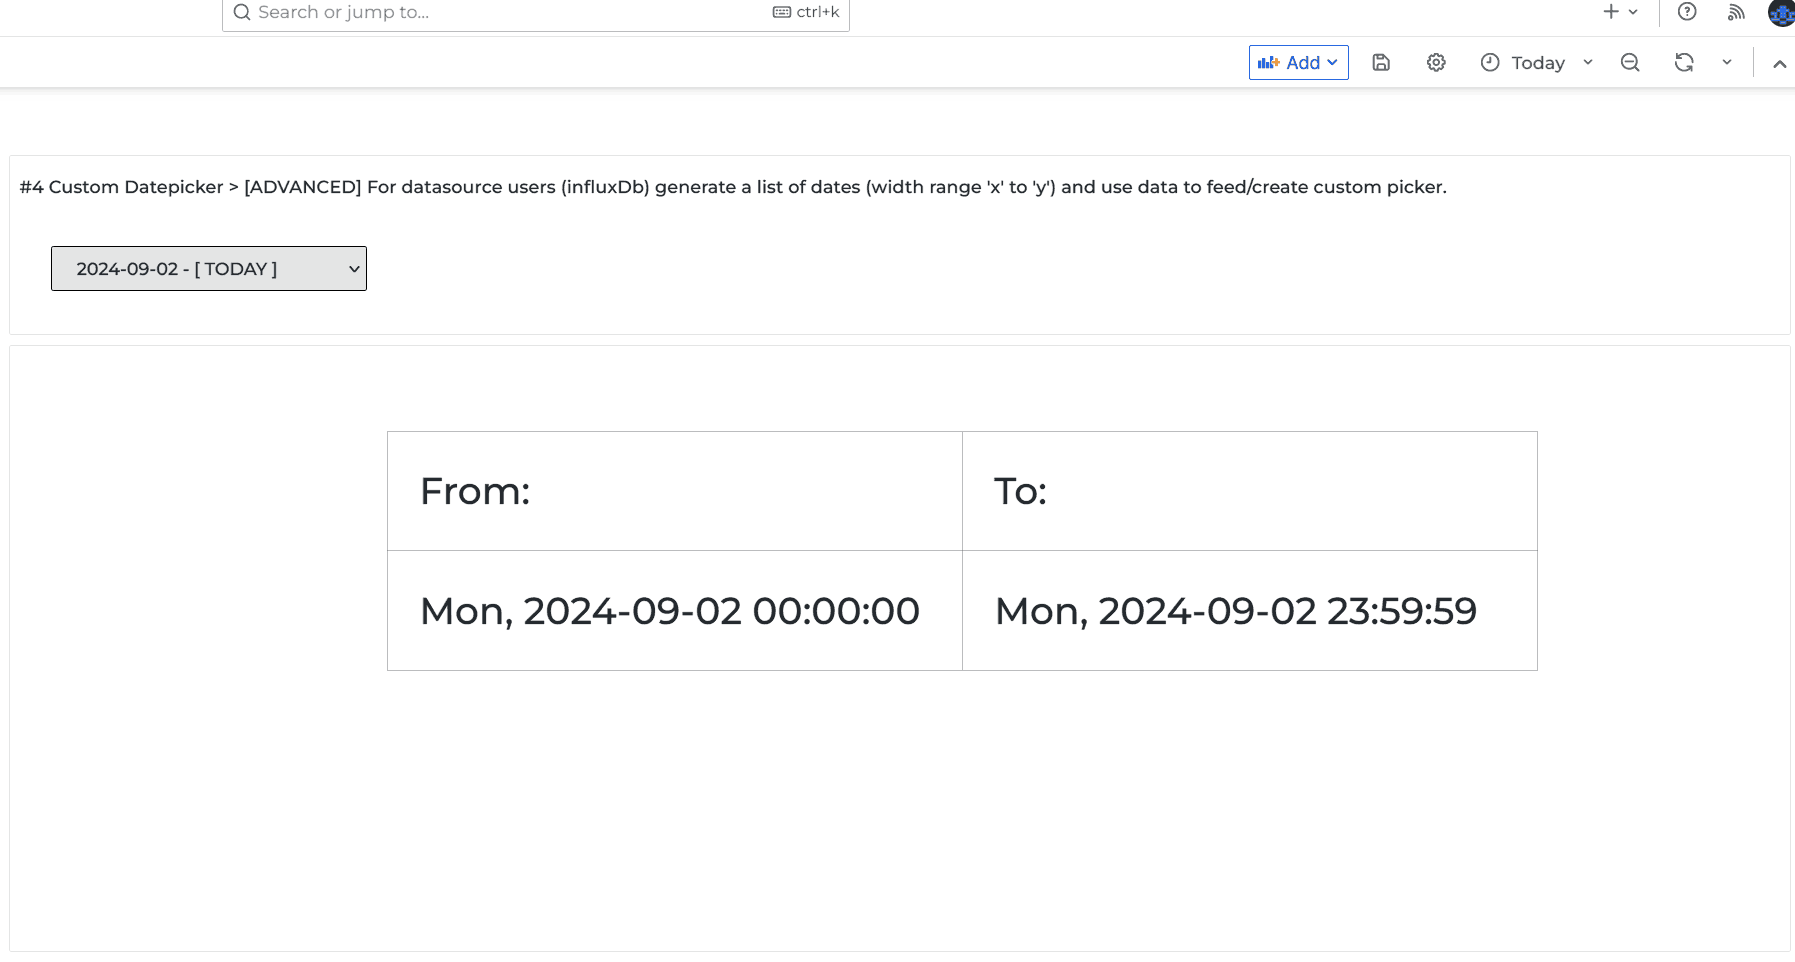
Result
If done correctly, you have now created a picklist with x number of dates based on your specified range.
For this example I used the range |> range(start: 2024-01-01T02:00:01Z , stop: now()) . Your Grafana dashboard timerange will change accordingly after selecting one of these dates with the picklist ;-)
P.S. I assume this method can also be applied by the MySQL datasource users to achieve the same but with slightly different query commands to extract/map data. If anyone knows how to do so send me a DM please and I will add that to this post.
Once again I hope this helps you on your way. For now I will leave other creative solutions for Datepickers to you again.
See you at the next post!