JavaScript Code
The Business Text panel supports the integration of JavaScript code snippets that can add Handlebars helpers and event handlers.
Parameters
The Business Text panel supports context starting from version 4.3.0.
Starting from release 4.3.0, we provide access to the panel data panelData and selected data frame data via a new object context.
Start typing the context word in the Before Content Rendering or After Content Ready boxes and see the latest list of all available features.

| Parameter | Description | Before Render | After Render |
|---|---|---|---|
context.data | Data from data sources. The display of one or multiple data rows from the selected data frame or from all data frames is determined by the Render template option. It can be one of three values: Every Row, All Rows, and All data. | ✔️ | ✔️ |
context.element | Current html element. | ✔️ | |
context.dataFrame | Selected Data Frame for Every Row, All Rows templates. | ✔️ | ✔️ |
context.handlebars | Handlebars library. | ✔️ | ✔️ |
context.panelData | Panel data. | ✔️ | ✔️ |
context.grafana.eventBus | Publish and subscribe to application events. | ✔️ | ✔️ |
context.grafana.getLocale() | Returns the user's locale: 'en', 'fr', 'es', and so on. | ✔️ | ✔️ |
context.grafana.locationService | The locationService works with the browser location and history. | ✔️ | ✔️ |
context.grafana.replaceVariables() | The replaceVariables() function to interpolate variables. | ✔️ | ✔️ |
context.grafana.timeRange | Time range of the current dashboard. | ✔️ | ✔️ |
context.grafana.timeZone | Time zone of the current dashboard. | ✔️ | ✔️ |
context.grafana.notifyError(['Header', 'Message']) | Displays an error. | ✔️ | ✔️ |
context.grafana.notifySuccess(['Header', 'Message']) | Displays a success notification. | ✔️ | ✔️ |
context.grafana.theme | Contains grafana theme object. | ✔️ | ✔️ |
context.grafana.refresh() | Function to refresh dashboard panels using application events. | ✔️ | ✔️ |
Custom Handlebars helper
You can add a custom Handlebars helper to replace the field's value according to some pattern.
Handlebars are not available in the After Content Render.
Handlebars should be created in the Before content Render, because they are used during the rendering process to convert Handlebars -> Markdown -> HTML.
The After Content Render works with already created HTML elements and handlebars are not available at this point.
JavaScript Code
Here we register a function with the replace helper that takes three arguments:
contextis an object that contains the data for the template.patternis the text to be searched for.replacementis the text to be used to replace the pattern.
Then we call this function and pass the pattern and replacement arguments to it.
context.handlebars.registerHelper("replace", (context, pattern, replacement) =>
  context.replace(pattern, replacement)
);

Event Handler
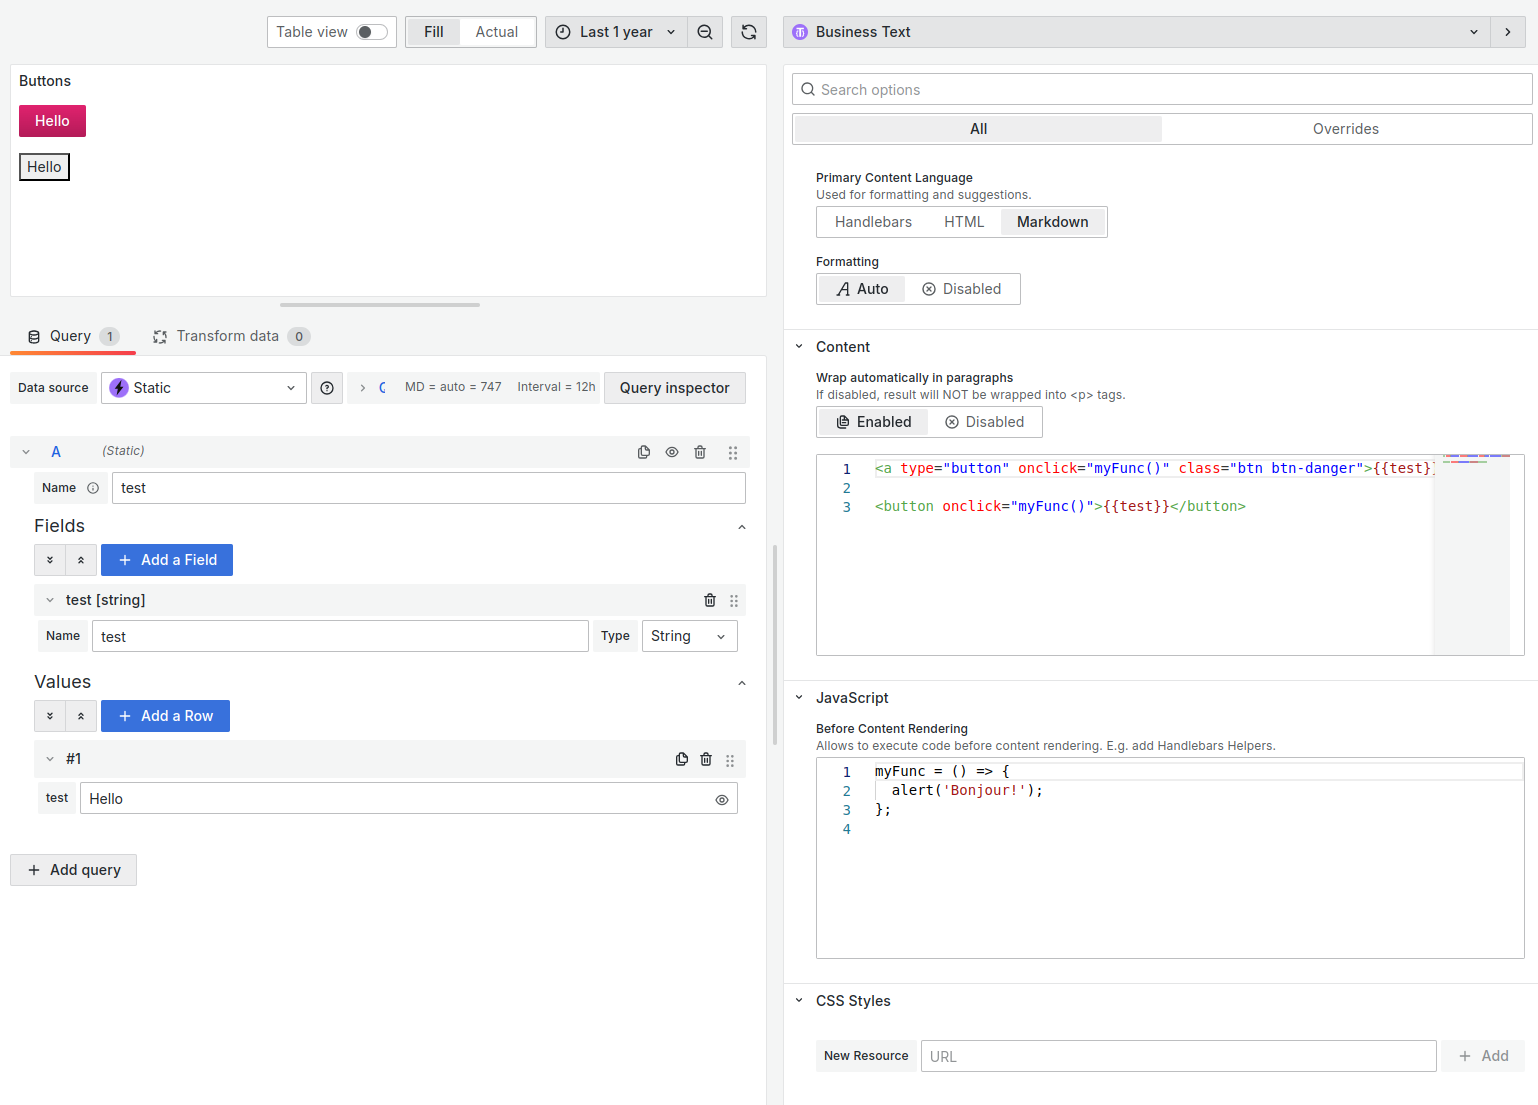
To respond to a button click, you can add a custom event handler.
<button onclick="myFunc()">{{test}}</button>
JavaScript Code
This code snippet defines a function called myFunc. The function takes no arguments and returns no value. The body of the function calls the alert() function to display the text "Bonjour!" in a dialog box.
myFunc = () => {
  alert("Bonjour!");
};

Internationalization
Grafana 9 and up offers internationalization, which most of the plugins do not yet have full access to.
Meanwhile, you can use the getLocale() method to get a value for the chosen locale and display terms from a defined dictionary.
Content
This code snippet uses the translate helper to translate the text "Hello" to the current language. Text translation will be performed if the translate helper is defined, otherwise the text "Hello" will be displayed.
Default content
This code snippet uses the translate helper to show the translation of a default message if the query does not return any results.
JavaScript Code
const messages = {
  Hello: {
    en: "Hello",
    fr: "Salut",
    es: "Hola",
  },
  Default: {
    en: "The query didn't return any results.",
    fr: "La requête n'a renvoyé aucun résultat.",
    es: "La consulta no arrojó ningún resultado.",
  },
};

const locale = getLocale();

context.handlebars.registerHelper(
  "translate",
  (message) => messages[message][locale] ?? messages[message]["en"]
);
Time Zone and Range
You can display the selected dashboard, browser's time zone, and time ranges in Grafana.

Content
Use the following for the Content
<h1>Dashboard {{tz}}</h1>
<h2>Browser {{browser}}</h2>

```json
{{{json (range)}}}
```
JavaScript Code
Use the following for the JavaScript->Before Content Rendering
const dashboardTimeZone = context.panelData.timeZone
const dashboardTimeRange = context.panelData.timeRange

context.handlebars.registerHelper('tz', () => dashboardTimeZone);
context.handlebars.registerHelper('range', () => dashboardTimeRange);
context.handlebars.registerHelper('browser', () => Intl.DateTimeFormat().resolvedOptions().timeZone);
Automatic scrolling
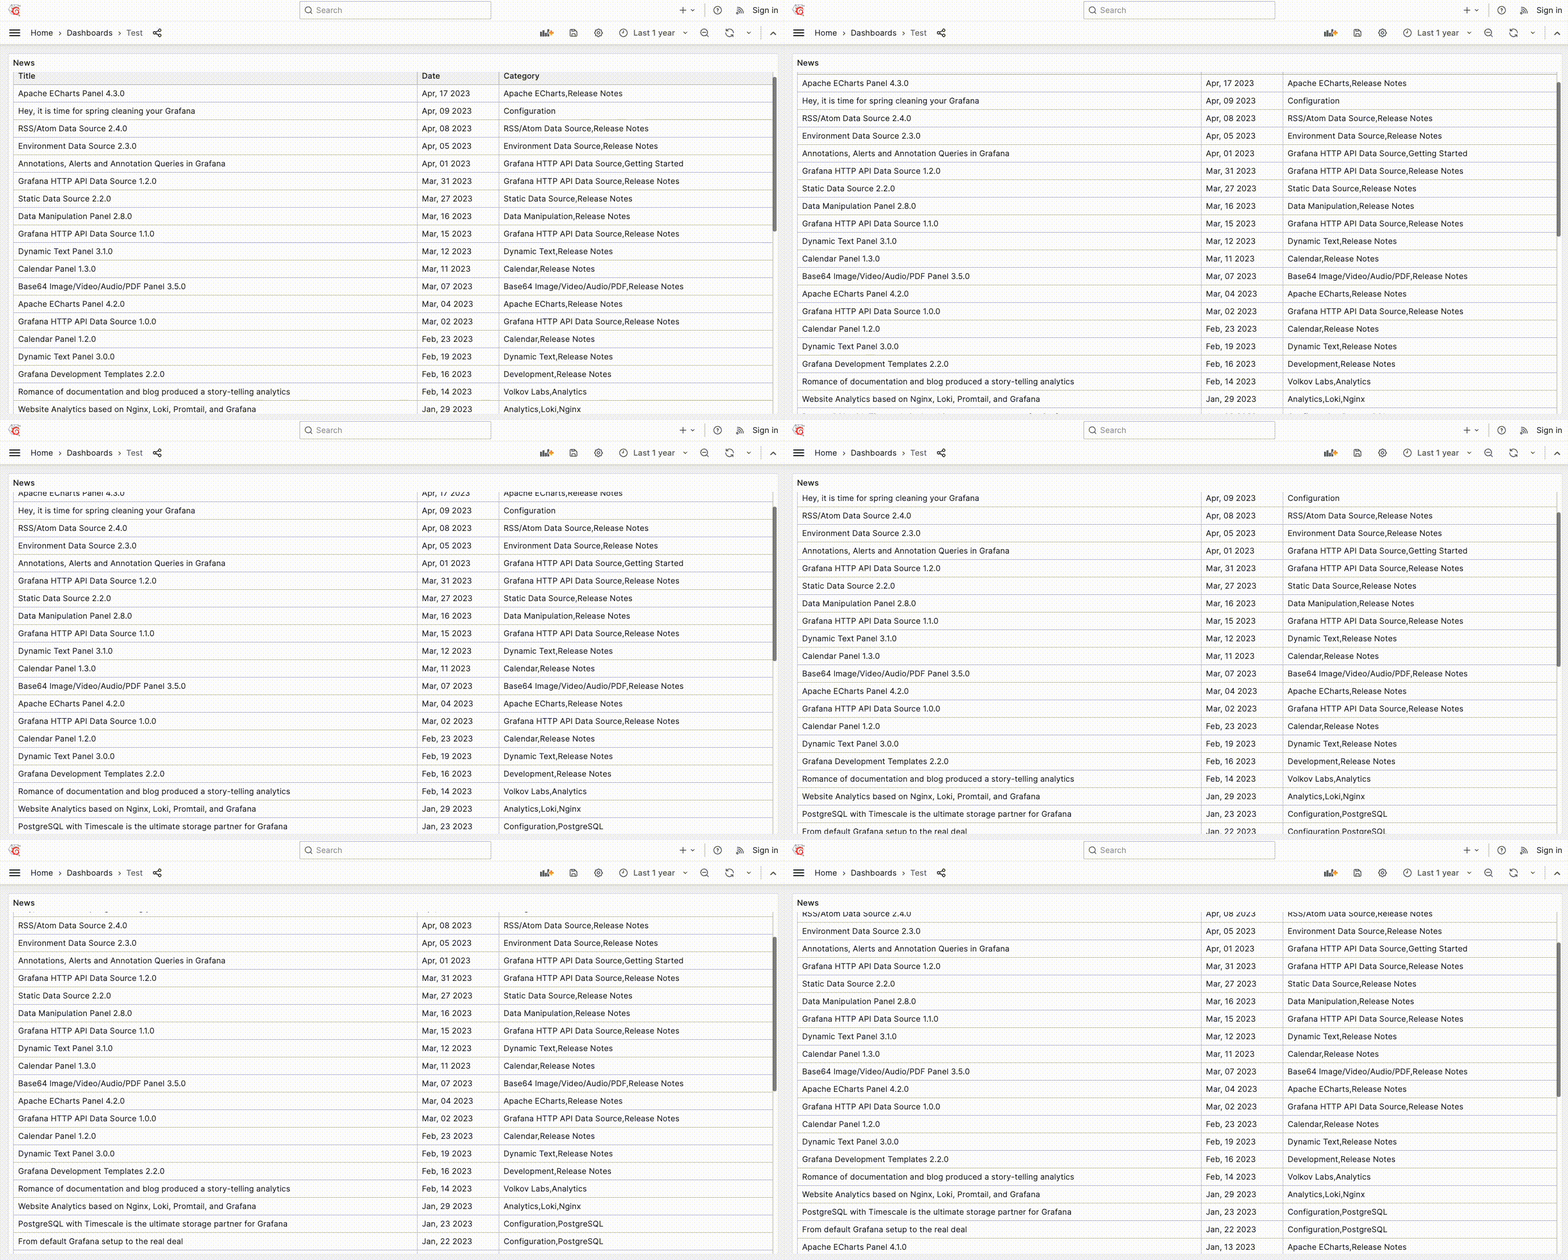
If the table does not fit into the allocated panel area, you can add automatic scrolling using JavaScript with an adjustable interval.

Content
Use the following for the Content:
<table id="dataTable">
  <tr>
    <th>Title</th>
    <th>Date</th>
    <th>Category</th>
  </tr>
  {{#each data}}
  <tr>
    <td>{{title}}</td>
    <td>{{date pubDate 'MMM, DD YYYY'}}</td>
    <td>{{category}}</td>
  </tr>
  {{/each}}
</table>
JavaScript Code
Use the following for the JavaScript->Before Content Rendering:
JavaScript for autoscrolling
const scrollWindow = () => {
  parentWindow =
    document.getElementById("dataTable").parentElement.parentElement;
  bottomOfWindow = parentWindow.scrollHeight - parentWindow.offsetHeight;

  /**
   * Scroll
   */
  if (parentWindow.scrollTop < bottomOfWindow) {
    parentWindow.scrollBy(0, 1);
    setTimeout(scrollWindow, 50);
    return;
  }

  /**
   * Scroll to the Top
   */
  setTimeout(function () {
    parentWindow.scrollTo({ top: 0, behavior: "smooth" });
  }, 1000);

  /**
   * Start scrolling again
   */
  setTimeout(scrollWindow, 1000);
};

$(() => {
  dataTable = document.getElementById("dataTable");

  /**
   * Avoid scrolling for short tables
   */
  if (
    dataTable.parentElement.scrollHeight <
    dataTable.parentElement.parentElement.offsetHeight
  ) {
    return;
  }

  /**
   * Already set to scroll
   */
  if (dataTable.parentElement.parentElement.getAttribute("listener")) {
    return;
  }

  dataTable.parentElement.parentElement.setAttribute("listener", true);
  scrollWindow();
});
Unique values
You can sort out unique values from the data object using the unique helper that was implemented by the community member goncalobsantos.
Content
Use the following for the Content:
<div>{{#each (unique data "hostname.keyword")}}{{this}}; {{/each}}</div>
JavaScript Code
Use the following for the JavaScript->Before Content Rendering:
context.handlebars.registerHelper("unique", (context, key) => {
  return [...new Set(context.map((item) => item[key]))];
});
Dashboard Variables
You can use the context.grafana.replaceVariables function to replace dashboard variables in the JavaScript code.
const bonjour = context.grafana.replaceVariables("${variable}");
console.log(bonjour.toUpperCase())
REST API
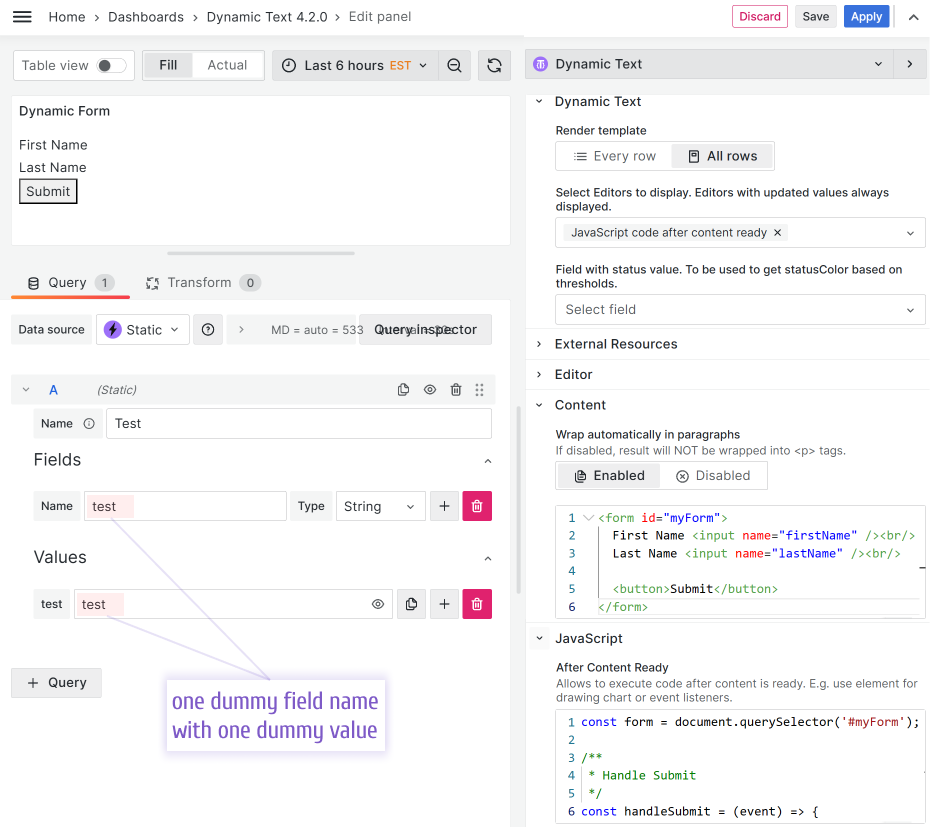
The Business Text plugin submits REST API requests.

Content
Into the Content:
<form id="myForm">
  <input name="firstName" />
  <input name="lastName" />

  <button>submit</button>
</form>
JavaScript Code
Into the JavaScript->After Content Ready
JavaScript to submit REST request
/**
 * Form Element
 */
const form = document.querySelector("#myForm");

/**
 * Handle Submit
 */
const handleSubmit = (event) => {
  /**
   * Prevent Default submition
   */
  event.preventDefault();

  const formData = new FormData(event.target);
  const data = Object.fromEntries(formData);

  console.log(data);
  /**
   * Result: { firstName: '', lastName: '' }
   */

  /**
   * Your request to send form
   */
  fetch("url", {
    method: "POST",
    body: JSON.stringify(data),
  });
};

form.addEventListener("submit", handleSubmit);

return () => {
  form.removeEventListener("submit", handleSubmit);
};
JSON parsing
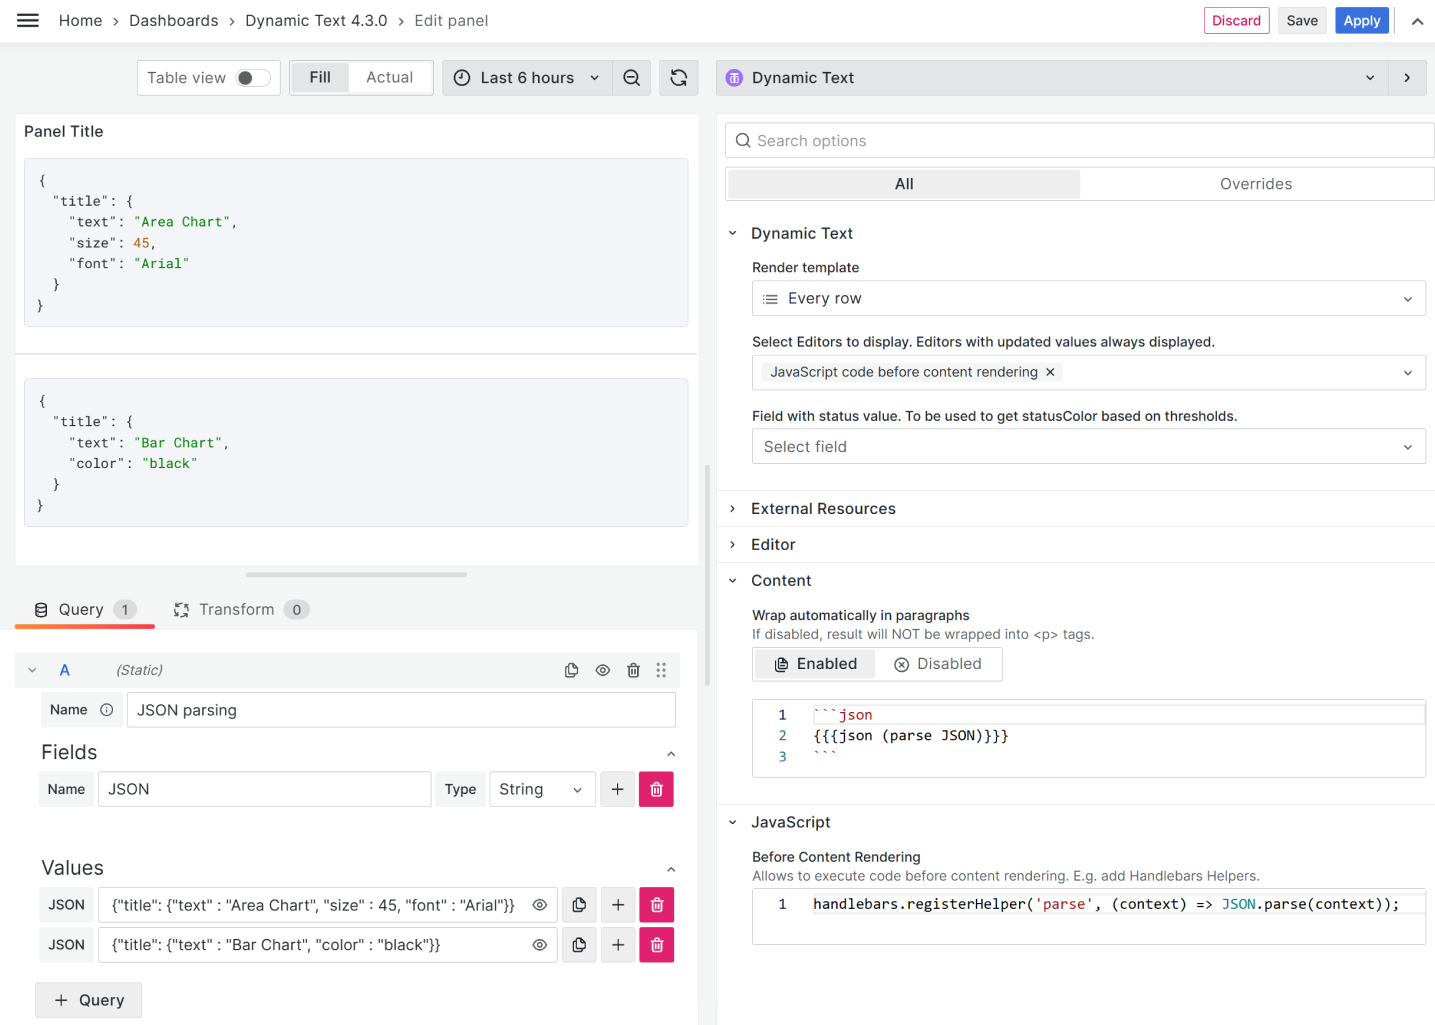
The community member havedill asked how to parse a JSON data format in the case when the transformation Convert field type is not available.
We believe the solution might be helpful for many, so here is how you can do it.

JSON example
{ "title": { "text": "Area Chart", "size": 45, "font": "Arial" } }
{ "title": { "text": "Bar Chart", "color": "black" } }
Content
{{{json (parse JSON)}}}
JavaScript
context.handlebars.registerHelper("parse", (context) => JSON.parse(context));
Anonymizer
Anonymizer is the tool we created for internal purposes of converting real production data into dummy values in order to have our dashboards demo-ready. Anonymizer is another great example of how embedded JavaScript can simplify tedious and repetitive tasks.
You can find all you need in the following blog post:

If you are a visual style learner, you can watch the video. It covers the same ground.