Nested objects, pagination, and standard options updates in Business Table 1.5.0

We are excited to announce the release of the Business Table panel 1.5.0. This feature release includes the following updates:
- Nested objects (add, edit, delete rows in a cell). Experimental feature.
- Show and hide columns
- Support of the Standard options
- Added E2E tests
We are surprised by the Grafana community's interest in this plugin. We received a record number of feature requests and questions. Thank you for your feedback; it undoubtedly indicates that this plugin closes a wide functionality gap. It gives us even more inspiration to innovate and improve.
Nested objects
What is the Nested objects feature
Simply put, this feature allows an end-user to add, edit, and delete rows associated with a table cell. Until we have a better name, we call it the nested objects or comments.
Developed to meet the specific requirements of our sponsor, this feature, even in its current form, holds significant potential for the broader open-source community.
In the case of good feedback, we might expand the nested objects/comments feature to make it more flexible and configurable. For now, you are welcome to experiment within the existing limits.
Highlights
- The nested objects/comments can be stored in any data source, the same as a table or completely different.
- An end user can add, edit, and delete nested objects/comments.
- Access to each action is configured separately and can follow Grafana roles or backend configuration.
- The card displaying nested objects/comments supports Markdown.
Example requirements
I will explain the feature using the following example.
Picture a table visualization used to display orders. Each order is associated with numerous events, and it's the responsibility of the system users to input each event via the dashboard.
In this system, events follow a specific sequence: a status change from received to shipped to delivered, each accompanied by user notes, the event date, and the name of the user who recorded it.
There are two types of users in the system:
- Operators are only allowed to add new events.
- Supervisors, in addition to the operator privileges, are allowed to modify and delete the events.
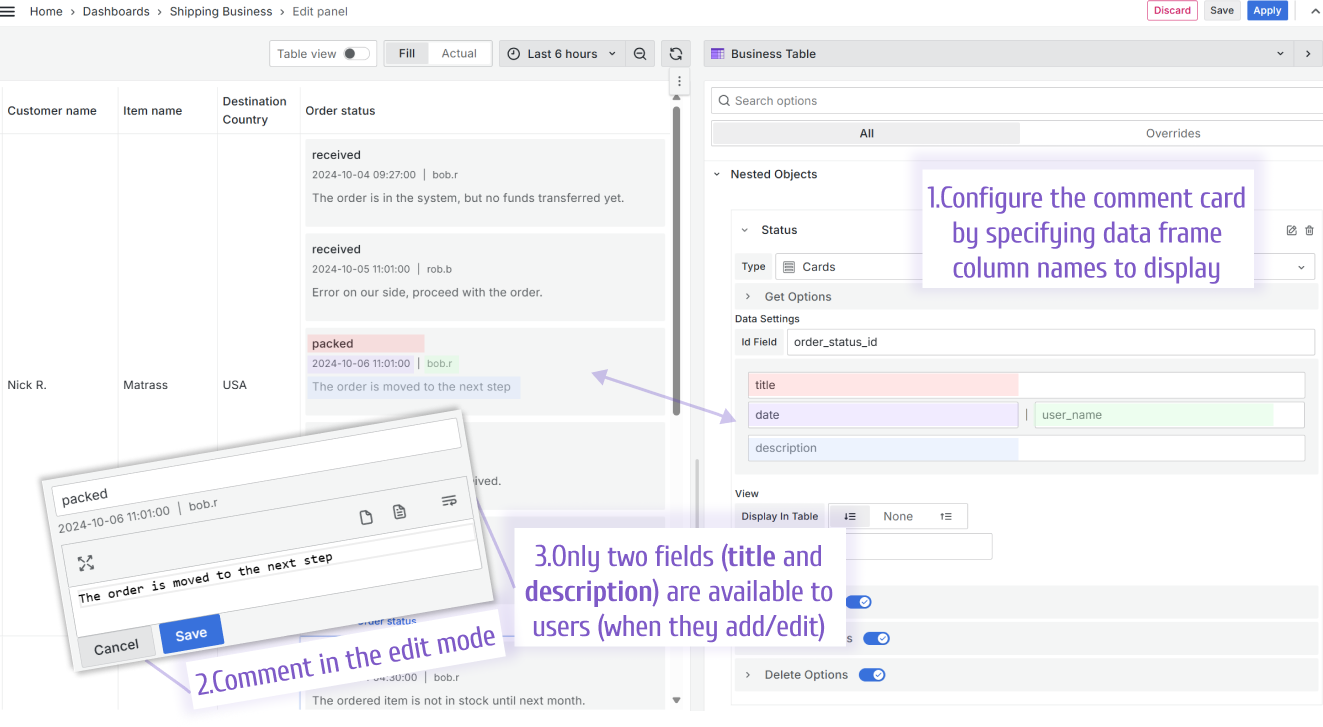
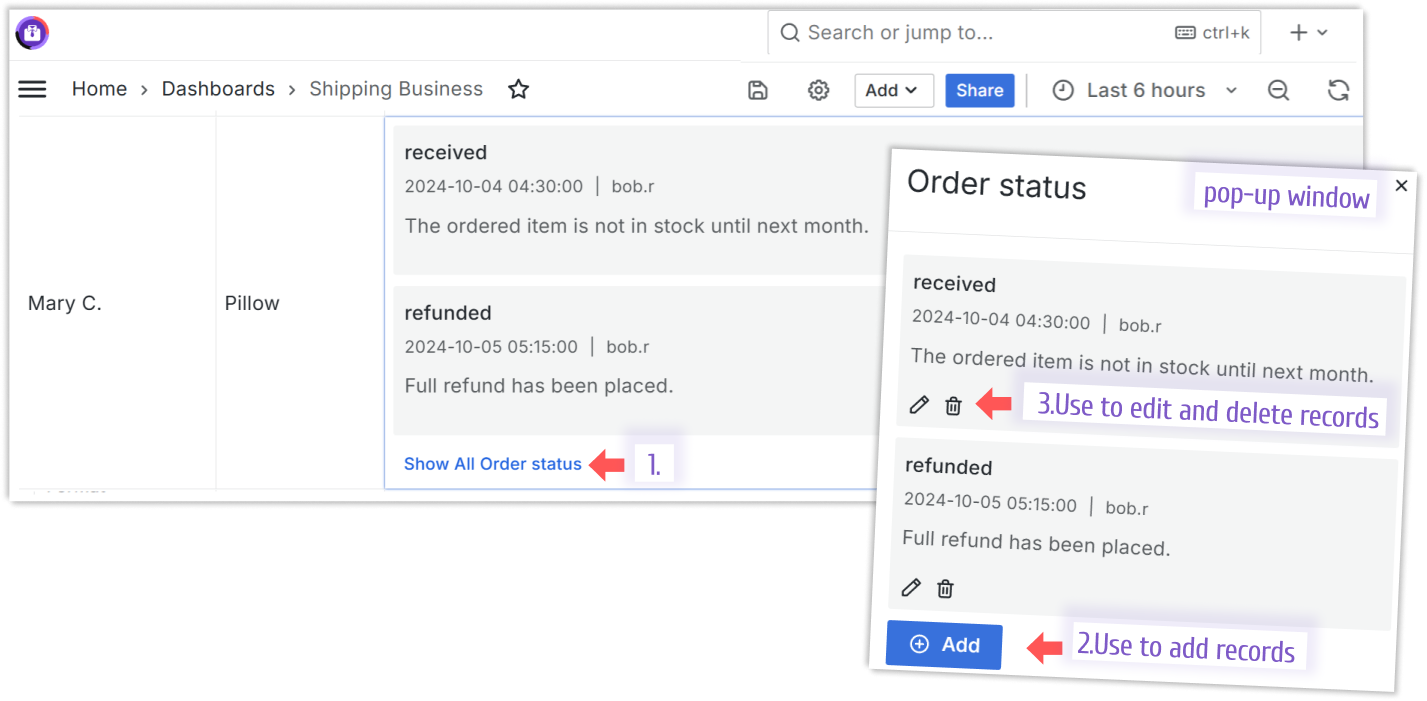
The image below shows the Business Table panel on the dashboard. It has two orders. The order from Nick R. went through five status changes and, therefore, has five records in the order status column. The order from Mary C. has two records in the Order status columns.
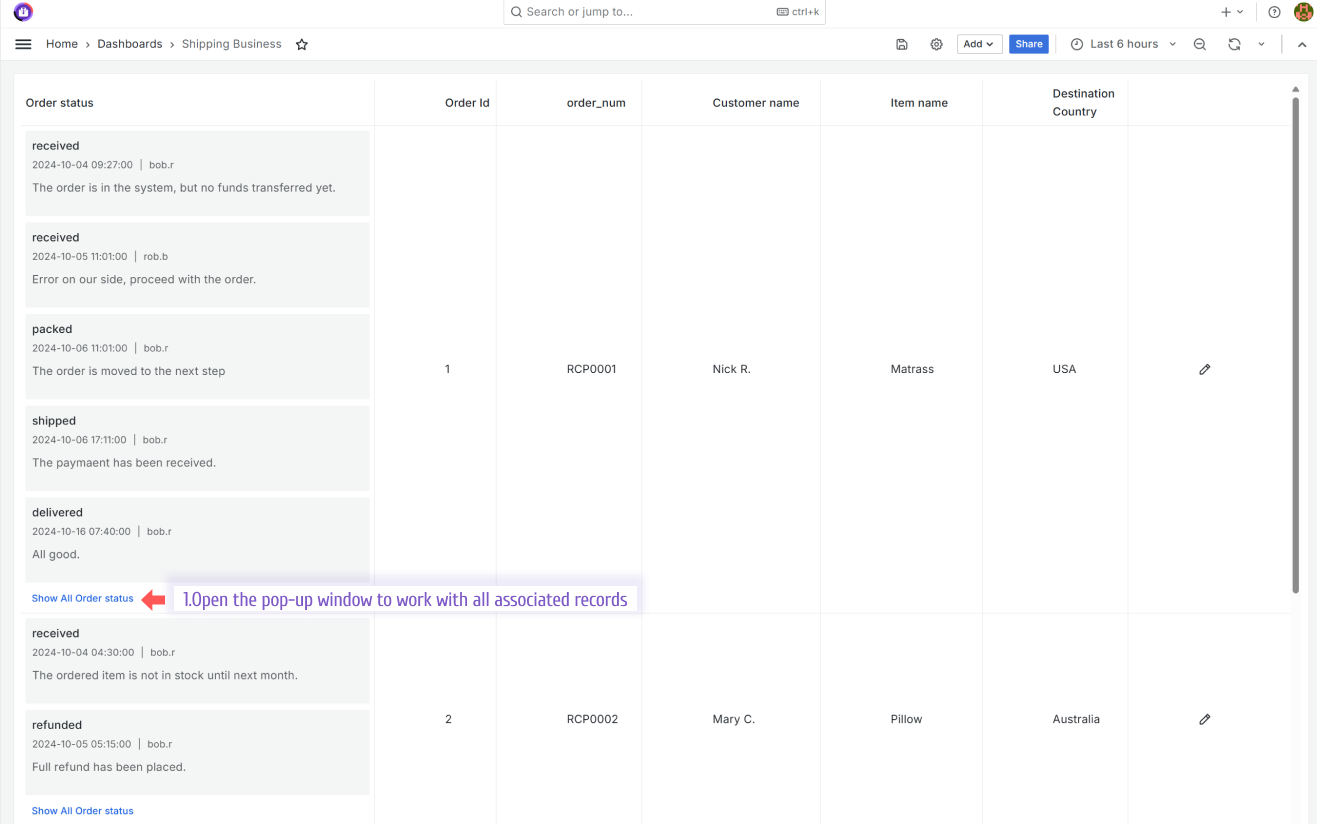
To work with all statuses (all records associated with a specific row), a user clicks the Show All Order Status link (see the image above). That action opens a pop-up window. See the following illustration below.
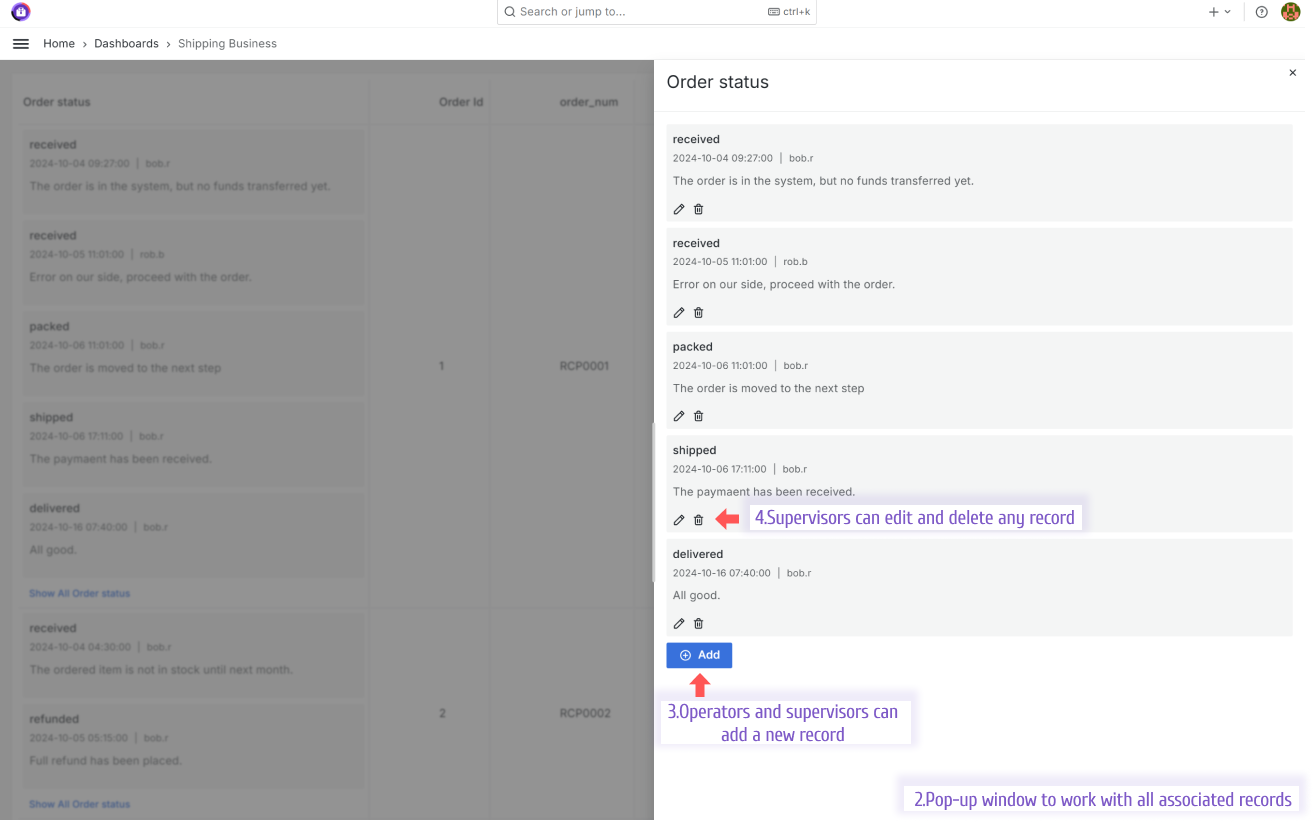
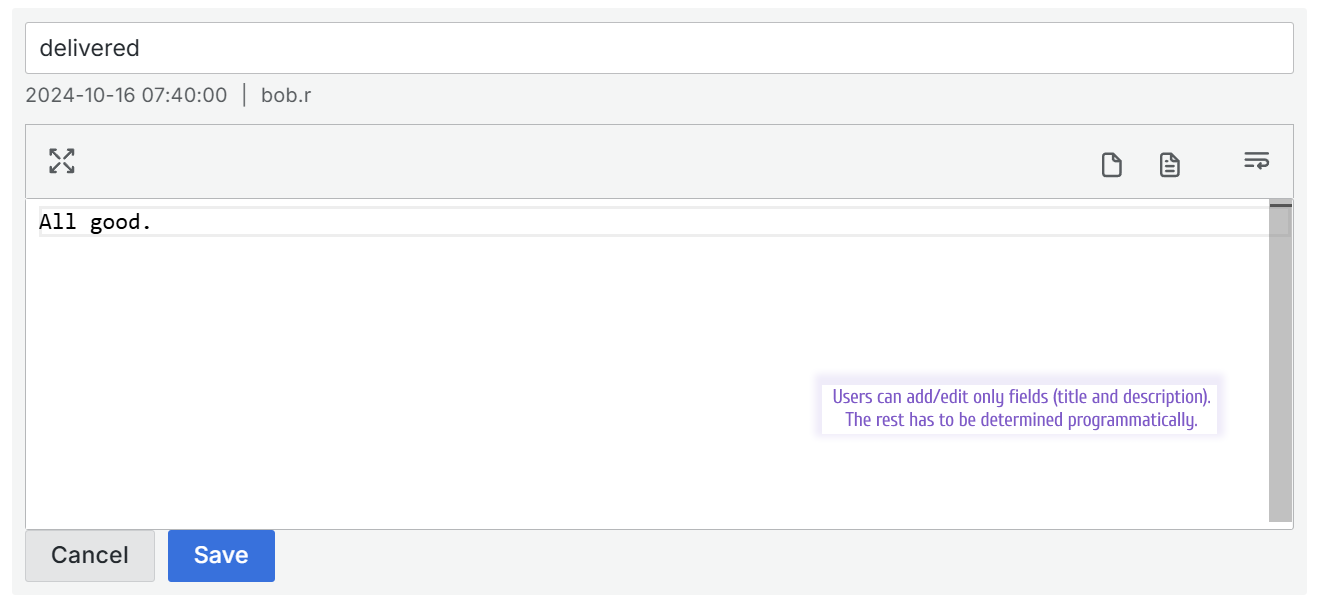
Please note that the user can add/edit only two fields (title and description) in the current feature design.
PostgreSQL database configuration
Below are two tables:
orders. It contains all placed orders.order_status. It contains all statuses as they change over time. Following the terminology I established in the beginning of this article, this table contains the nested objects or comments.
SQL to create the orders table:
create table orders
(
    order_id integer,
    order_num text,
    customer_name text,
    ordered_item_name text,
    destination_country text
);
SQL to create the order_status table:
create table order_status
(
    order_status_id integer,
    order_id integer,
    date timestamp default now(),
    title text,
    description text,
    user_name text
);
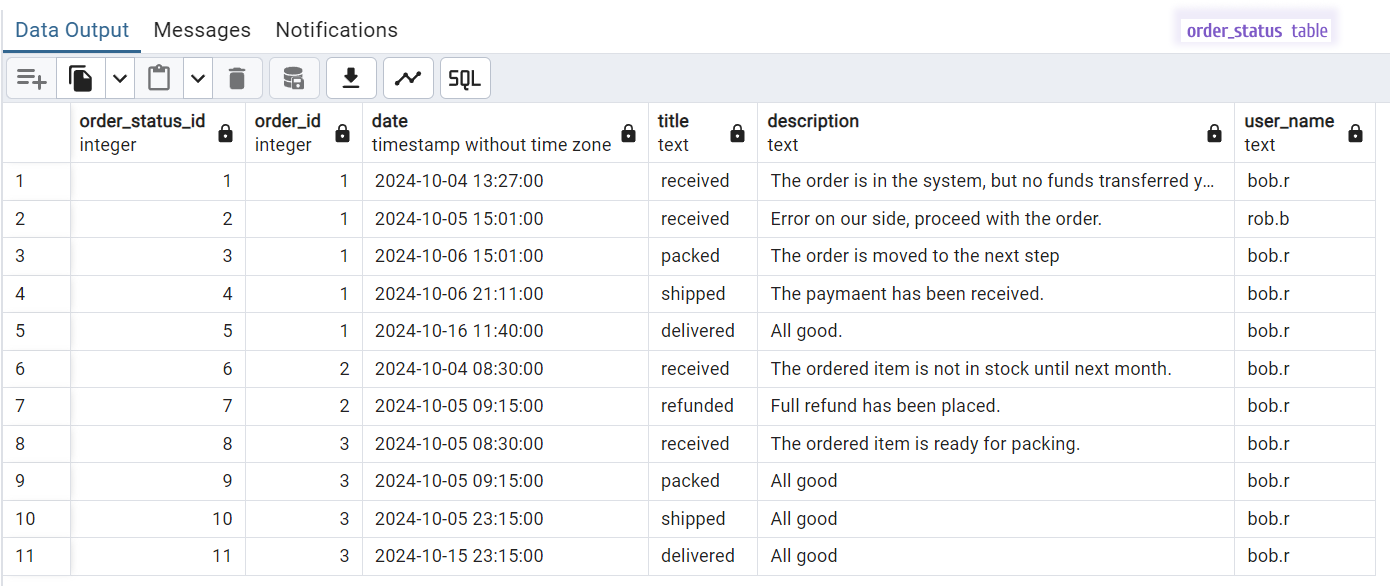
Data example in these tables.
The orders table.

The order_status table.
SQL to populate the orders and order_status tables:
insert into order_status(order_status_id, order_id, date, title, description, user_name) values
                        (1, 1, '2024-10-04 13:27:00.00', 'received', 'The order is in the system, but no funds transferred yet.', 'bob.r');
insert into order_status(order_status_id, order_id, date, title, description, user_name) values
                        (2, 1, '2024-10-05 15:01:00.00', 'received', 'Error on our side, proceed with the order.', 'rob.b');
insert into order_status(order_status_id, order_id, date, title, description, user_name) values
                        (3, 1, '2024-10-06 15:01:00.00', 'packed', 'The order is moved to the next step', 'bob.r');
insert into order_status(order_status_id, order_id, date, title, description, user_name) values
                        (4, 1, '2024-10-06 21:11:00.00', 'shipped', 'The paymaent has been received.', 'bob.r');
insert into order_status(order_status_id, order_id, date, title, description, user_name) values
                        (5, 1, '2024-10-16 11:40:00.00', 'delivered', 'All good.', 'bob.r');
insert into order_status(order_status_id, order_id, date, title, description, user_name) values
                        (6, 2, '2024-10-04 08:30:00.00', 'received', 'The ordered item is not in stock until next month.', 'bob.r');
insert into order_status(order_status_id, order_id, date,  title, description, user_name) values
                        (7, 2, '2024-10-05 09:15:00.00', 'refunded', 'Full refund has been placed.', 'bob.r');
insert into order_status(order_status_id, order_id, date, title, description, user_name) values
                        (8, 3, '2024-10-05 08:30:00.00', 'received', 'The ordered item is ready for packing.', 'bob.r');
insert into order_status(order_status_id, order_id, date, title, description, user_name) values
                        (9, 3, '2024-10-05 09:15:00.00', 'packed', 'All good', 'bob.r');
insert into order_status(order_status_id, order_id, date, title, description, user_name) values
                        (10, 3, '2024-10-05 23:15:00.00', 'shipped', 'All good', 'bob.r');
insert into order_status(order_status_id, order_id, date, title, description, user_name) values
                        (11, 3, '2024-10-15 23:15:00.00', 'delivered', 'All good', 'bob.r');
Grafana configuration
Start with the data frame configuration. In my example, the query returns all orders and the column containing the list of unique order status identifiers.
I utilize Grafana's transformation, Convert field type, to ensure the array of status identifiers can be processed correctly.
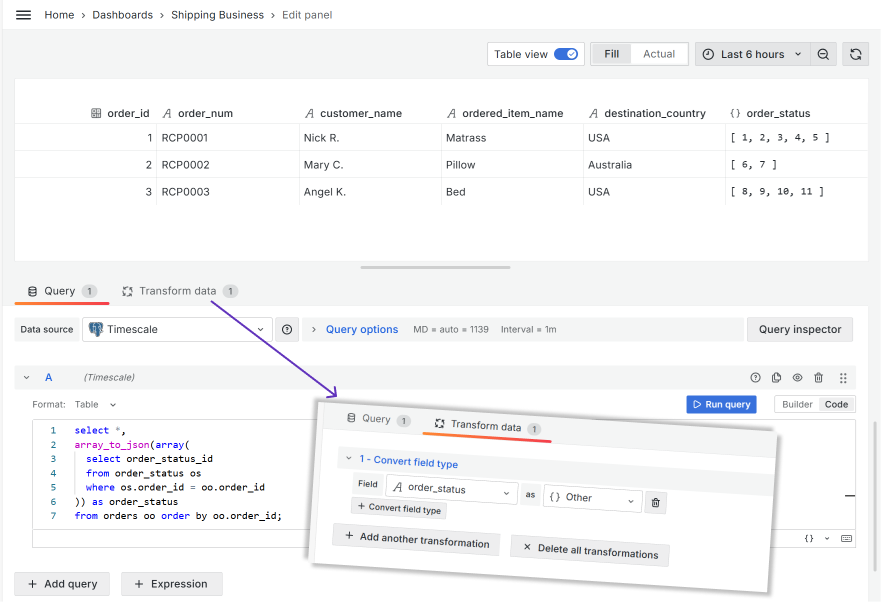
SQL to return data frame for the Business Table panel:
select *,
array_to_json(array(
  select order_status_id
  from order_status os
  where os.order_id = oo.order_id
)) as order_status
from orders oo order by oo.order_id;
In the Business Table options -> Layout ensure to:
- Add a column to display the nested objects/comments,
- Set its type to Nested Objects,
- Select the configured Object from the list.
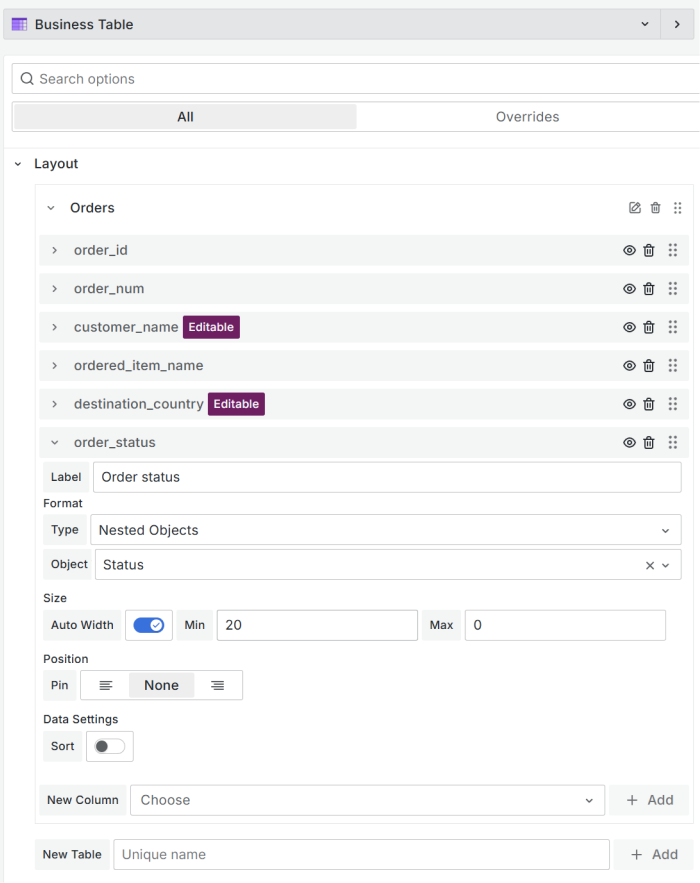
In the Nested objects category:
- Add a column to display nested objects/comments.
- Select a type. Only the Card type exists for now.
- Configure the query to fetch the nested objects/comments initially in the Get options.
- Specify a data source where your nested objects/comments are kept.
- Create a query. In this example, I use the SQL query with predefined
${payload.ids:csv}as a combined list of identifiers. - Ensure that Id Field is populated with the column name containing the unique comment identifier.
- Configure the comment card. See below for more details.
- Set the nested objects/comments sorting: Show first, None, Show latest.
- Specify how many nested objects/comments to show at once.
- Configure the allowed actions and user privileges. See below for more details.
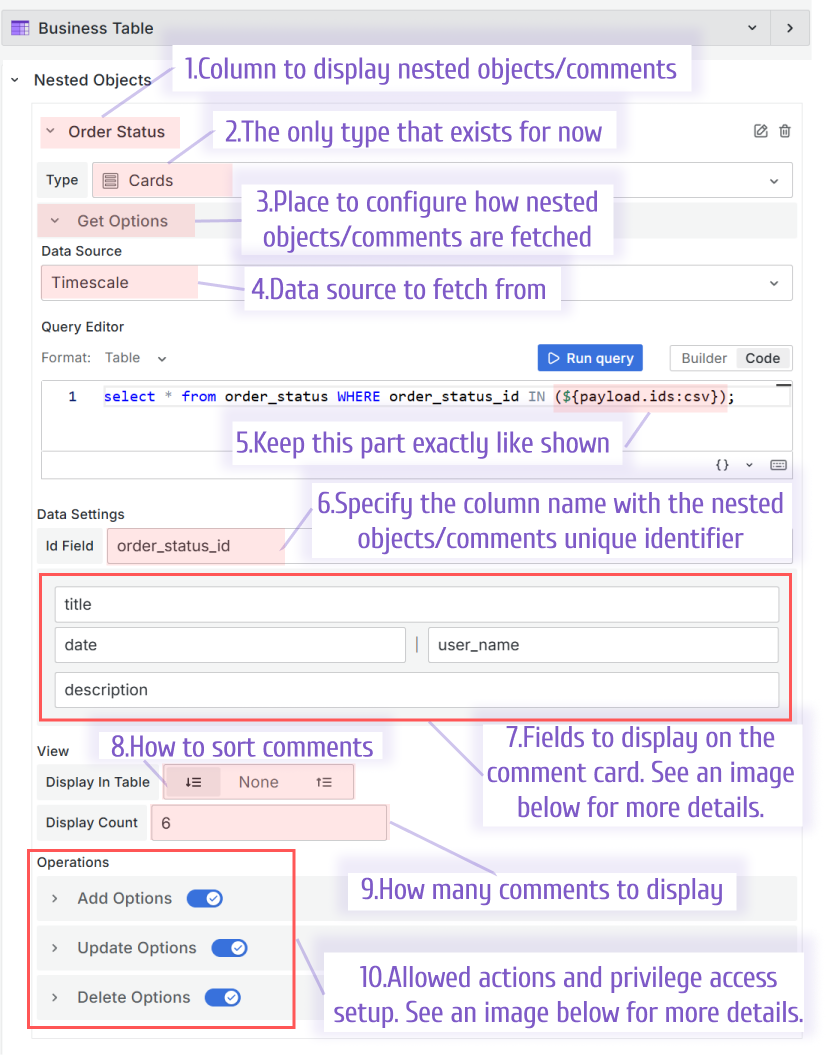
SQL from the Get Options->Query Editor parameter:
SELECT * FROM order_status WHERE order_status_id IN (${payload.ids:csv});
Comment Card
Configuring a comment card means identifying data frame column names for display. In this release, you can specify four column names. An end user can enter only top and bottom title and description when adding or editing objects. Fields in the middle can displays dates, user login who did changes, etc.
Actions and privileges
There are three actions you can allow users to perform on the nested objects/comments. All three actions are availabe in the pop-up window after a user clicks on the Show All link.
To configure actions and access to them, use the Nested objects->Column name->Operations:
- Set the Add Options, Update Options, Delete Optiouns switch to ON.
- Select Check parameter, where you have three options:
- By Org User Role. With that, specify roles that should have access to this action. It is a multi-select drop-down with the following values: Admin, Editor, Viewer, None.
- Always Allowed. Any user will have access to this action.
- By Backend. With that, specify a data frame column name with a boolean type. If the returned value is true, the access is given. If the returned value is false, the access is NOT given.
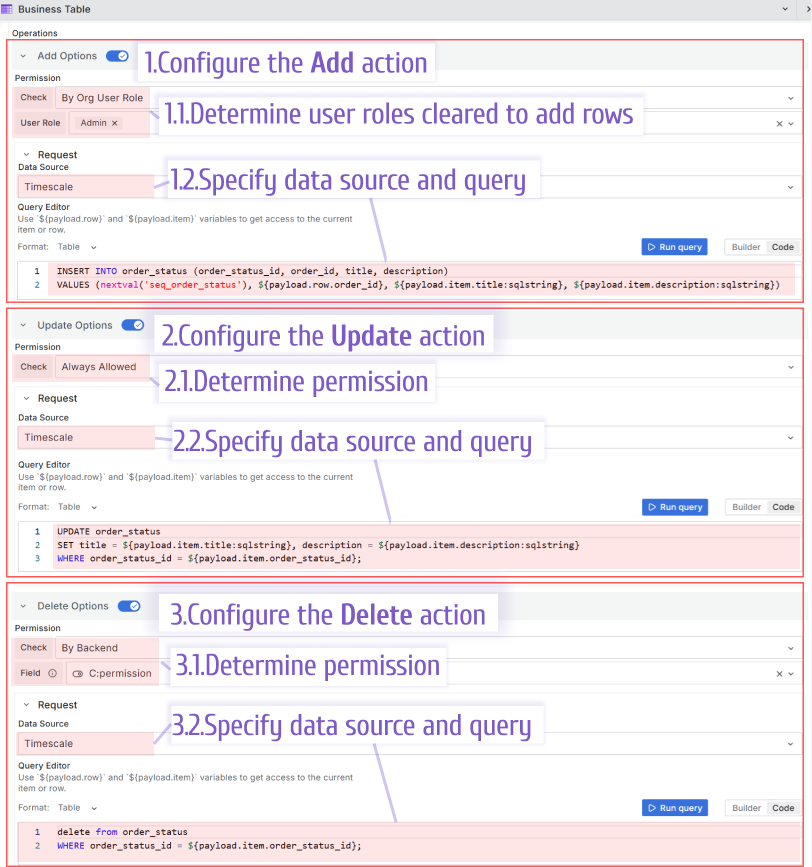
SQL example for the Add action:
INSERT INTO order_status (order_status_id, order_id, title, description)
VALUES (nextval('seq_order_status'), ${payload.row.order_id}, ${payload.item.title:sqlstring}, ${payload.item.description:sqlstring})
SQL example for the Update action:
UPDATE order_status
SET title = ${payload.item.title:sqlstring}, description = ${payload.item.description:sqlstring}
WHERE order_status_id = ${payload.item.order_status_id};
SQL example for the Delete action:
DELETE FROM order_status
WHERE order_status_id = ${payload.item.order_status_id};
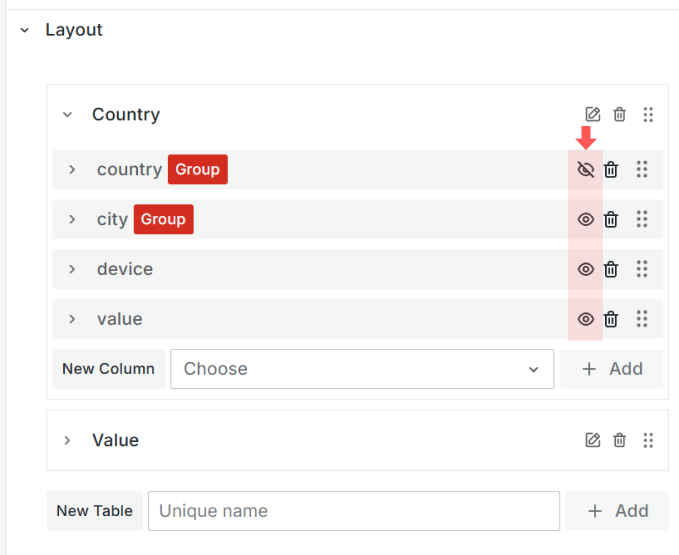
Show and hide columns
This feature allows you to hide/show any column in your Business Table visualization. It is helpful when you need to experiment with the table's visual aspects without removing the column (and all its configuration) to get an idea of what the visualization would look like without it.
Also, the column might be required for the underlying logic but not designed for the end user.
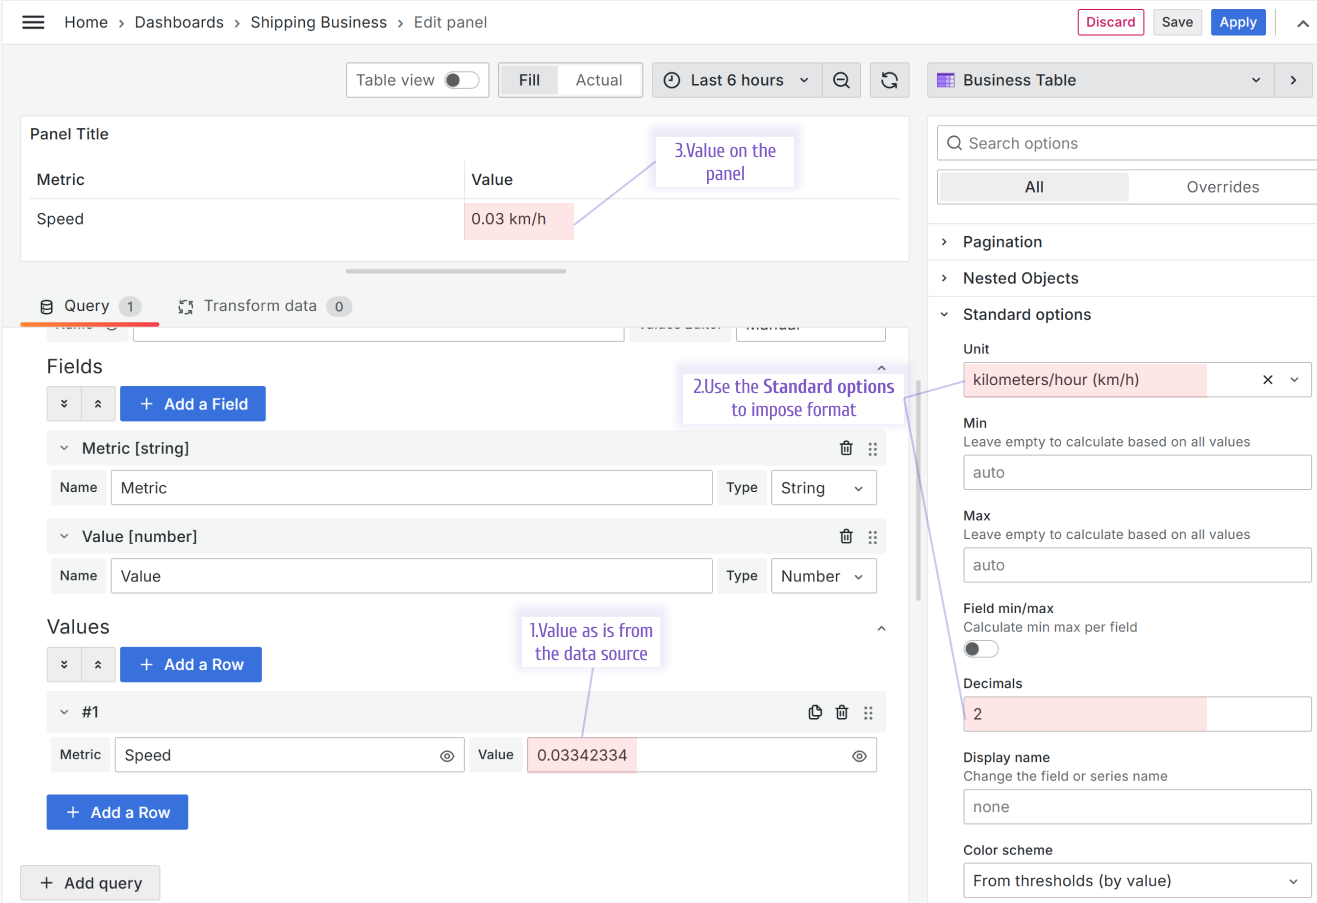
Support of the Standard options
The values displayed in the Business Table visualization can be formatted using the Grafana Standard options.
Added E2E tests
To ensure the Business Table panel compatibility with the latest Grafana version, we added E2E tests to run them daily. This is the best way to confirm that Grafana's modifications do not compromise the panel code.
Getting Started
The Business Table panel can be installed from the Grafana Catalog or utilizing the Grafana command line tool.
For the latter, please use the following command.
grafana cli plugins install volkovlabs-table-panel
Tutorial
The Business Table 1.9.0 for Grafana brings an exciting functionality when a user can add, edit and delete rows from the Grafana dashboard. In addition, the Business Table 1.9.0 features useful functionality such as Grafana Thresholds, displaying images, easy connections with other Grafana panels and more!
We have many other tutorials that you can find helpful. You can review all related to this plugin tutorials here.
Release Notes
Features / Enhancements in 1.5.0
- Updated Autosize Code Editor toolbar (#99)
- Added sanitizing html content (#110)
- Added data for hidden columns to payload (#112)
Bugfixes in 1.5.0
- Fixed escaping new lines for content edit (#111)
Features / Enhancements in 1.4.0
- Updated aggregated cell to support Standard Options (#79)
- Added nested objects cell type (#80)
- Updated e2e tests (#81)
- Moved pagination options to separate category (#87)
- Updated nested objects to show first or last object in the table (#92)
- Updated row data for accessor key with dots (#90)
- Added YouTube tutorial (#93)
- Updated to show/hide columns (#94)
- Added query pagination error with enabled client column filtering (#95)
- Updated e2e to support panel edit in dashboard scene (#96)
Volkov Labs Is Now Closed
Following our acquisition, Volkov Labs has officially ceased operations as of September 26, 2025. We are no longer accepting feedback, support requests, or partnership inquiries. The Business Suite for Grafana repositories have been archived on our GitHub organization, and no further development or support will be provided.
We are deeply grateful for the incredible support from our community and partners over the past four years.