File upload using the Grafana dashboard


The Data Manipulation panel is one of our most popular plugins. By looking at the stats, we registered that the Grafana community downloaded it more than 100,000 times in the first two months of 2024!
Those numbers are not surprising, given that the plugin allows Grafana dashboard users to analyze and interact with data, tremendously extending the core Grafana functionality.
The variety of possible use cases requiring the Data Manipulation panel seems countless. In this article, we would like to share one particular solution that is as useful as illustrative. It has already been employed and tested by many Community members in different environments, solidifying our confidence.
Solution overview
In this article, we provide a step-by-step tutorial on how to create a dashboard containing the following parts. Choose which Data Manipulation panel configuration is best for your needs.
- The Data Manipulation panel configured with the HTTP API server to upload files in the Base64 format.
- The Data Manipulation panel configured with Data Source to upload files in the Base64 format.
- The Business Variable panel is configured to provide a selection of all upload files.
- The Business Media panel displays the selected on the Variable panel file.
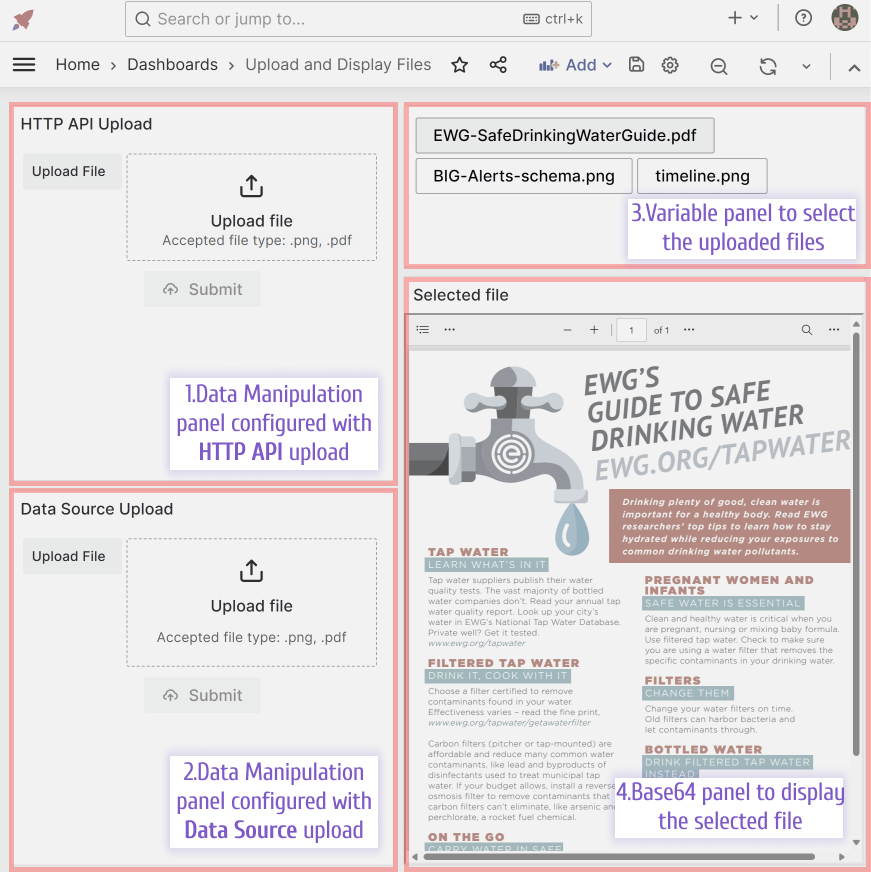
The uploaded files will be saved into the PostgreSQL database in the Base64 format. The Base64 panel supports base64 encoded files with and without format definition.
PostgreSQL Configuration
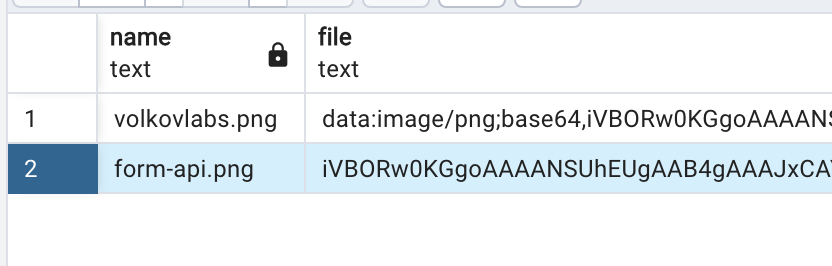
Table
We start with creating a table for storing uploaded files. You can choose any storage as long as it has a Grafana data source. We prefer the PostgreSQL database as a long-standing champ for many of our solutions and demos.
CREATE TABLE files (
    name text,
    file text
);
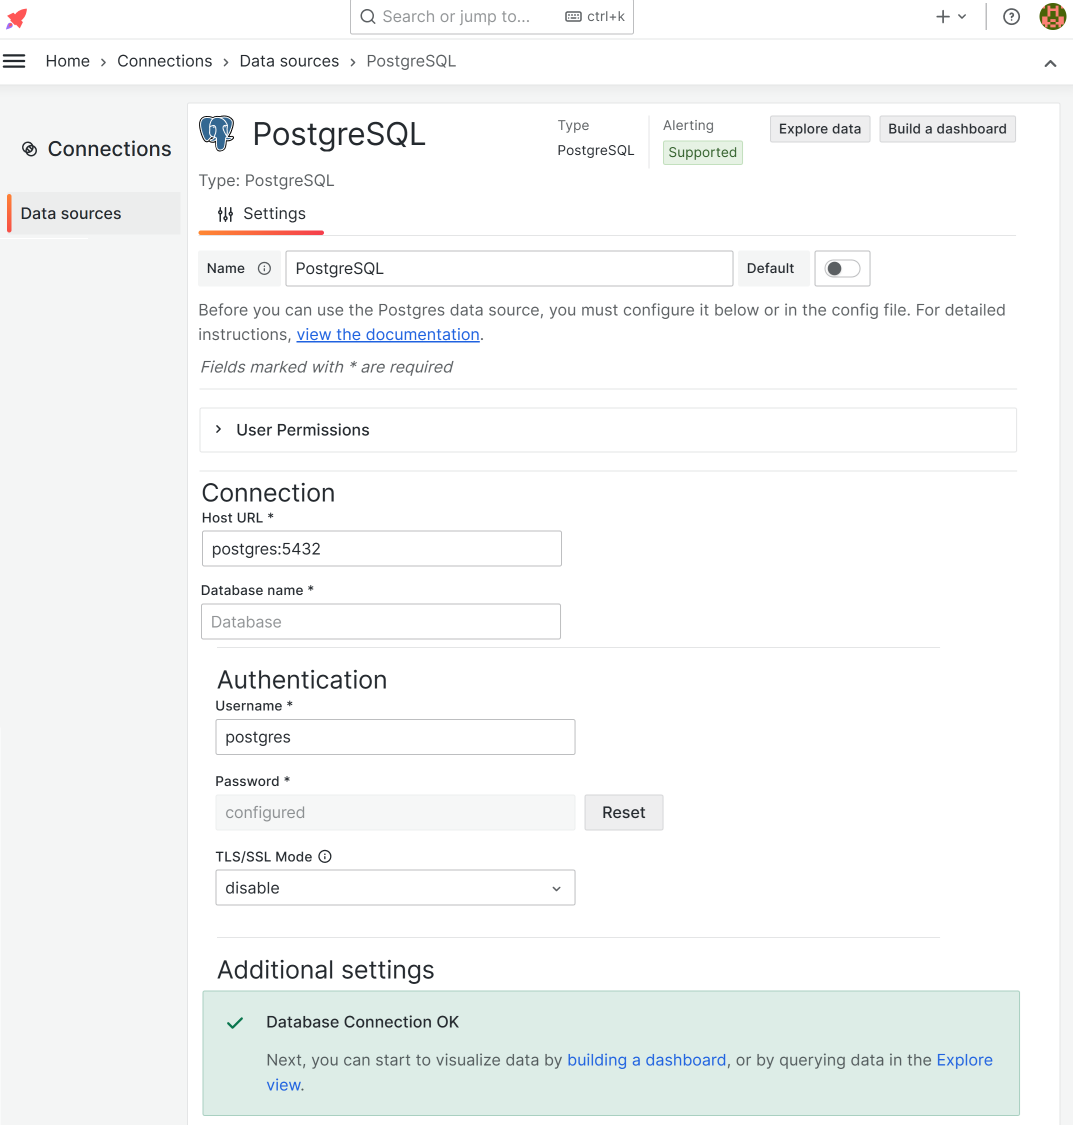
Data Source
Configure PostgreSQL Data Source to upload encoded files to the database.
Data Manipulation options
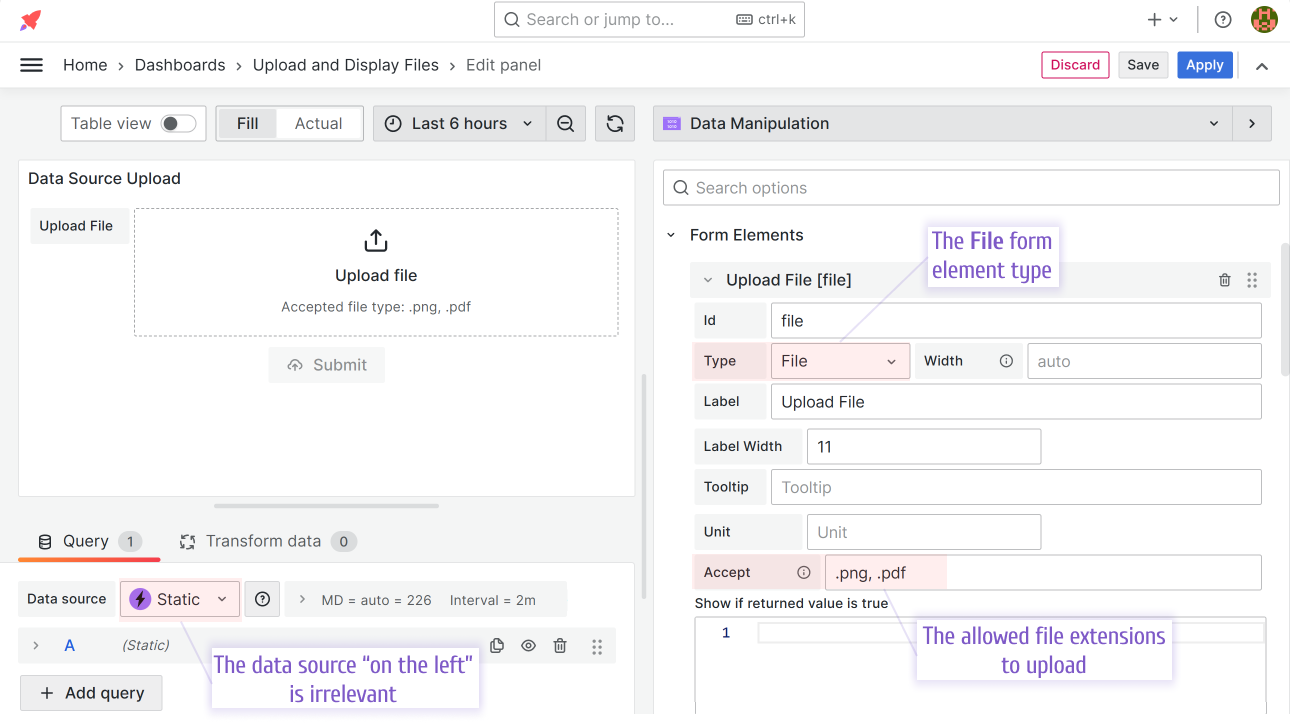
In this example, both Data Manipulation forms contain one form element File, which is identically configured for both panels.
The data source on the bottom left can be anything because it is irrelevant here.
Initial Request
The initial request is responsible for providing data right after the page is loaded. In this example, no data is expected to be fetched into the File form element, so there is no need to configure the Initial Request, all settings are left as default.
Upload Request
The Upload Request is where the configuration of two Data Manipulation forms differ.
Upload Request configuration for Data Source before version 4.0.0
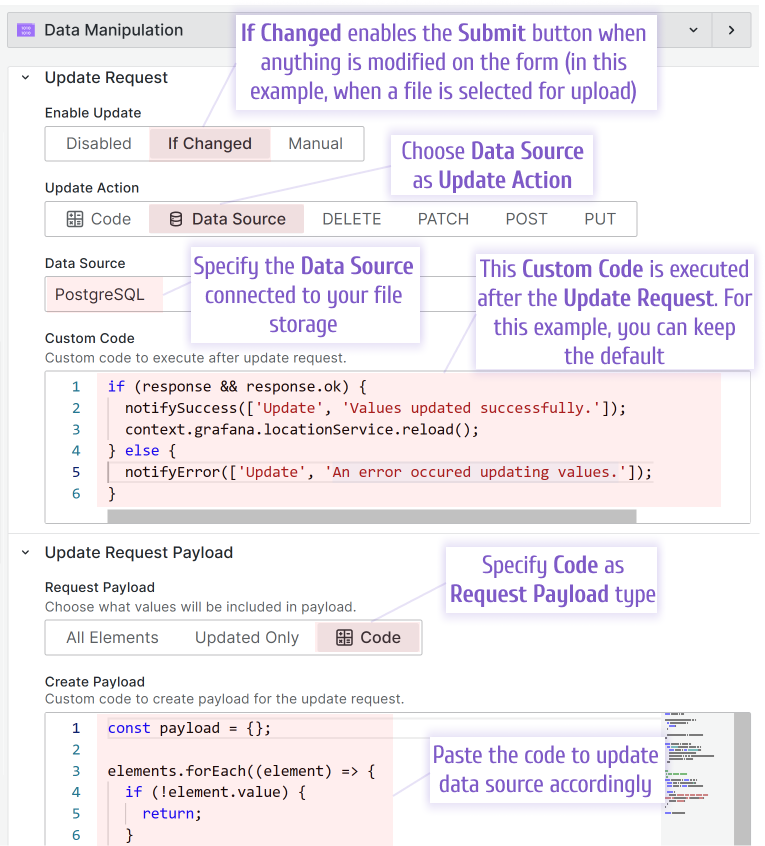
Add Payload Code to convert uploaded file to Base64 format and prepare SQL statement.
const payload = {};

elements.forEach((element) => {
  if (!element.value) {
    return;
  }

  payload[element.id] = element.value;
});

const toBase64 = (file) =>
  new Promise((resolve, reject) => {
    const reader = new FileReader();
    reader.readAsDataURL(file);
    reader.onload = () => resolve(reader.result);
    reader.onerror = reject;
  });

/**
 * Data Source payload
 * Dashboard variables will be replaced automatically.
 * The payload data should be inserted with string interpolation.
 */
const getPayload = async () => {
  const file = payload.file[0];
  const base64 = await toBase64(file);

  return {
    rawSql: `INSERT INTO files (name, file) VALUES ('${file.name}', '${base64}');`,
    format: "table",
  };
};

return getPayload();
Upload Request configuration for Data Source from version 4.0.0
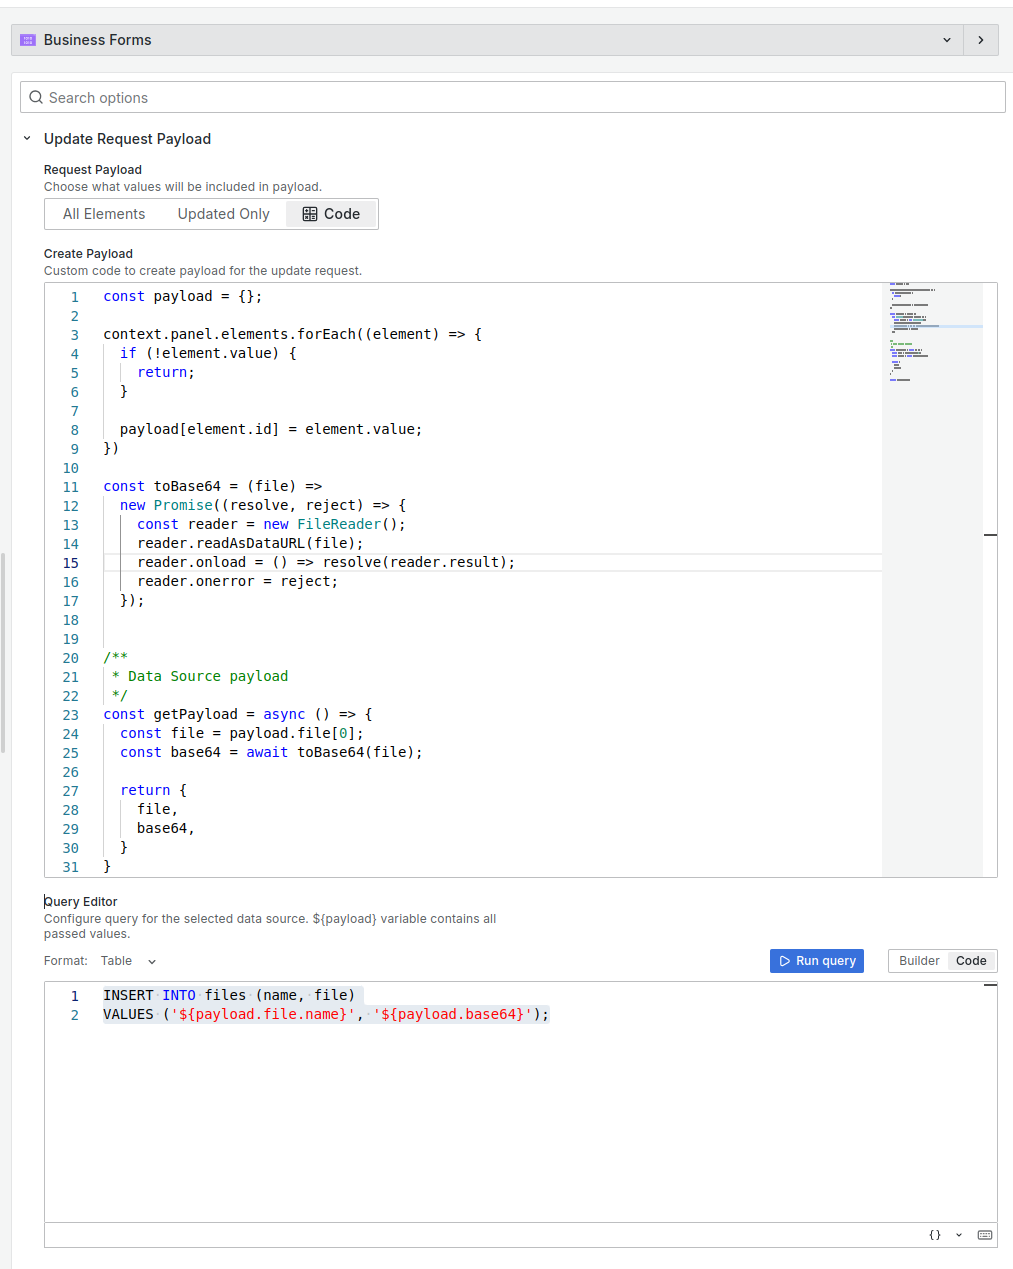
Create Payload:
const payload = {};

context.panel.elements.forEach((element) => {
  if (!element.value) {
    return;
  }

  payload[element.id] = element.value;
});

const toBase64 = (file) =>
  new Promise((resolve, reject) => {
    const reader = new FileReader();
    reader.readAsDataURL(file);
    reader.onload = () => resolve(reader.result);
    reader.onerror = reject;
  });

/**
 * Data Source payload
 */
const getPayload = async () => {
  const file = payload.file[0];
  const base64 = await toBase64(file);

  return {
    file,
    base64,
  };
};

return getPayload();
Query Editor:
INSERT INTO files (name, file) VALUES ('${payload.file.name}', '${payload.base64}');
Upload Request configuration for HTTP API
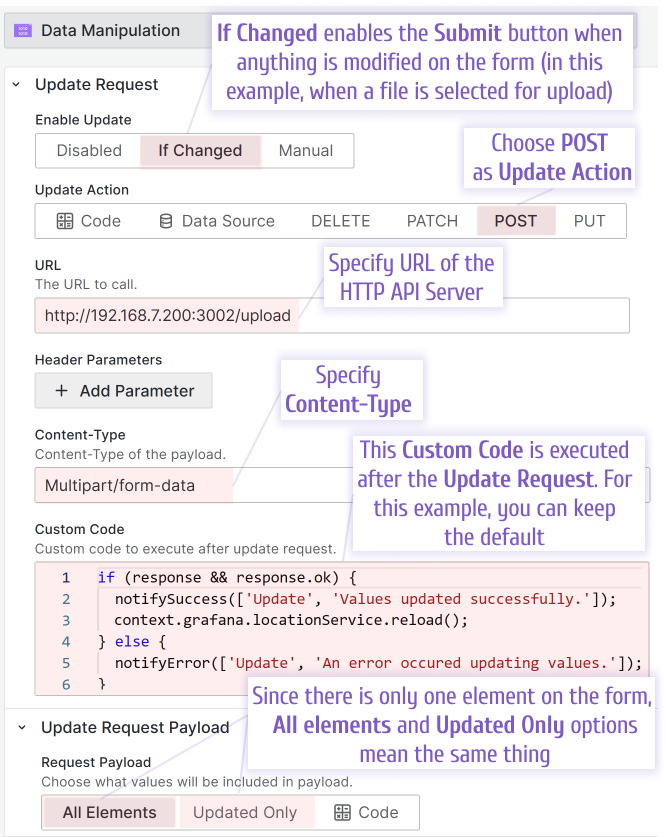
An HTTP API server needs to be created and URL point to the POST request endpoint.
Using the code below, you can create and run a Node.js HTTP API server with a POST /upload endpoint. This server accepts the uploaded files as form data and inserts into your database.
const http = require("http");
const fs = require("fs");
const { Client } = require("pg");
const multiparty = require("multiparty");

/**
 * Server Port
 */
const port = 3002;

/**
 * Connect to Postgres
 */
const client = new Client({
  host: process.env.POSTGRES_HOST,
  user: process.env.POSTGRES_USER,
  password: process.env.POSTGRES_PASSWORD,
});
client.connect();

/**
 * Create Server
 */
const server = http.createServer(async function (req: any, res: any) {
  /**
   * Set CORS headers
   */
  res.setHeader("Access-Control-Allow-Origin", "*");
  res.setHeader("Access-Control-Request-Method", "*");
  res.setHeader(
    "Access-Control-Allow-Methods",
    "OPTIONS, GET, POST, PUT, PATCH"
  );
  res.setHeader("Access-Control-Allow-Headers", "*");
  if (req.method === "OPTIONS") {
    res.writeHead(200);
    res.end();

    return;
  }

  /**
   * Upload File
   */
  if (req.url === "/upload" && req.method === "POST") {
    const form = new multiparty.Form({ autoFiles: true });

    form.parse(req, async function (err: any, fields: any, files: any) {
      if (!files) {
        res.writeHead(200, { "content-type": "text/plain" });
        res.write("Incorrect request");
        res.end();
        return;
      }

      const filesArray = Object.values(files).reduce(
        (acc: any[], files) => acc.concat(files),
        []
      );

      /**
       * Insert files to database
       */
      await Promise.all(
        filesArray.map(async (file) => {
          const base64 = await fs.readFileSync(file.path, {
            encoding: "base64",
          });
          await client.query("INSERT INTO files(name, file) VALUES($1, $2)", [
            file.originalFilename,
            base64,
          ]);
        })
      );

      res.writeHead(200, { "content-type": "text/plain" });
      res.write("Files uploaded");
      res.end();
    });

    return;
  }
});

/**
 * Listen on port 3002
 */
server.listen(port);
console.log(`Server for Postgres is running on port ${port}...`);
Variable panel
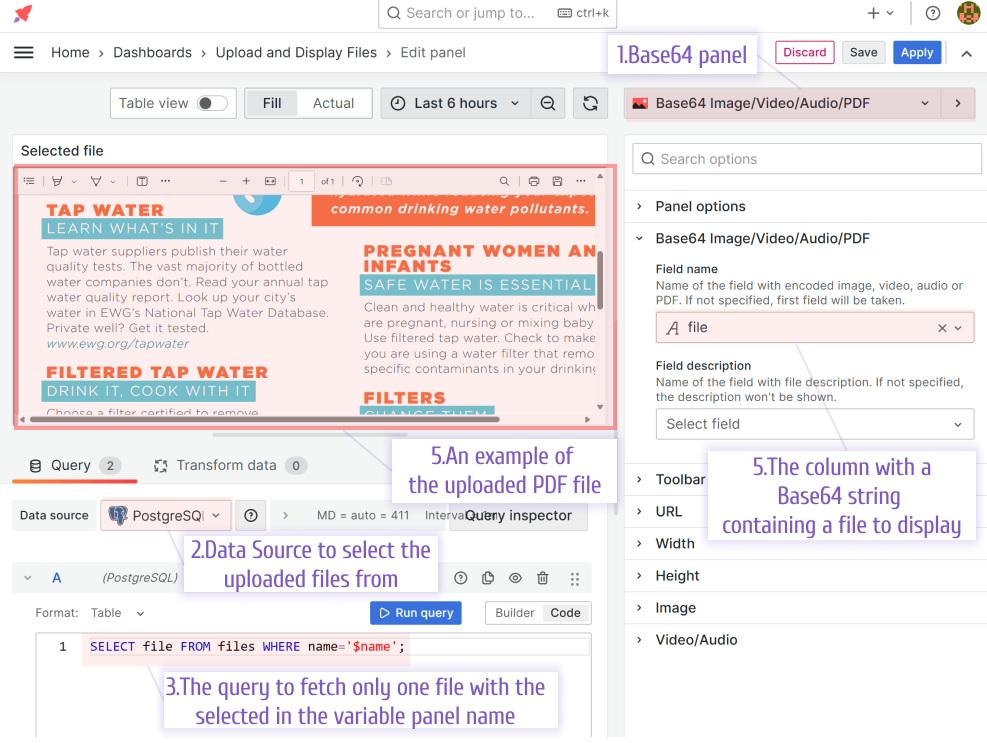
The variable is used to select the specific file to display it on the Base64 panel. Start with creating a new dashboard variable to later reference it on the Variable panel.
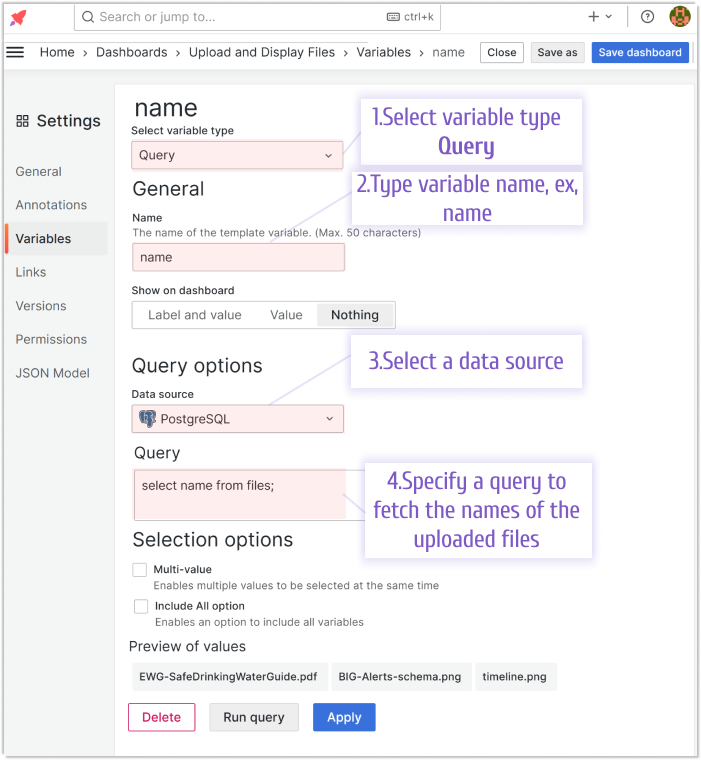
The query to fetch the uploaded files from the database.
SELECT name FROM files;
For the reference, here is the variable JSON:
{
  "current": {
    "selected": true,
    "text": "volkovlabs.png",
    "value": "volkovlabs.png"
  },
  "datasource": {
    "type": "grafana-postgresql-datasource",
    "uid": "PCC52D03280B7034C"
  },
  "definition": "select name from files",
  "hide": 0,
  "includeAll": false,
  "multi": false,
  "name": "name",
  "options": [],
  "query": "select name from files",
  "refresh": 1,
  "regex": "",
  "skipUrlSync": false,
  "sort": 0,
  "type": "query"
}
Panel options
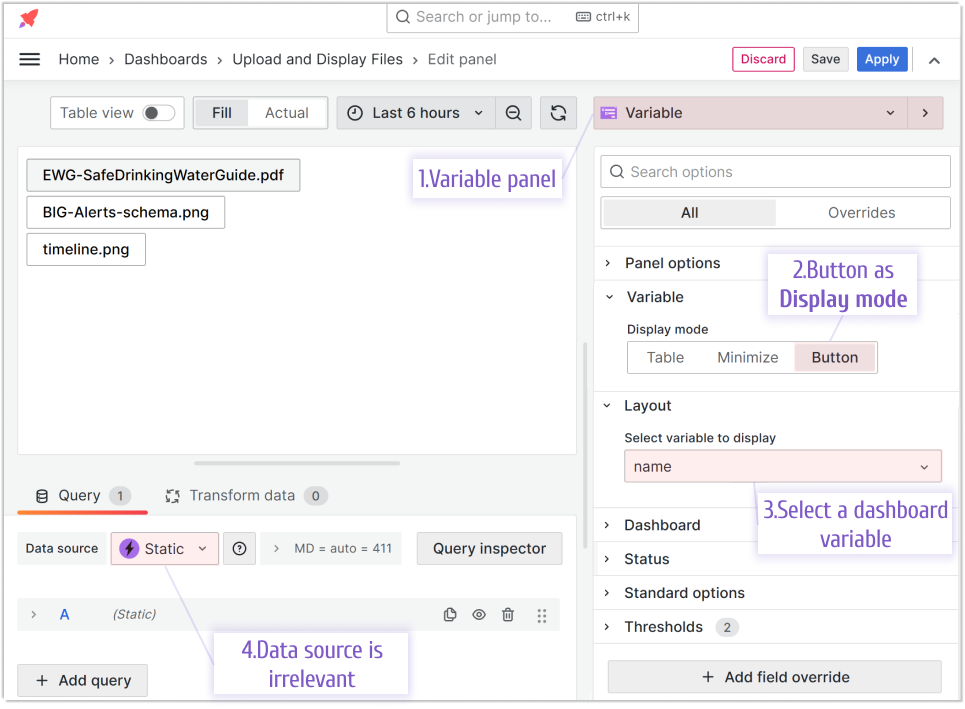
Below is an illustration of how the Variable panel can be configured. We believe that the Button display mode works best instead of Table or Minimize.
Also, a data source is not needed for the basic variable panel setup. You can specify anything there.
Base64 panel
We use the Base64 panel to display the uploaded and selected image or PDF file. It works with many file formats, including image, video, audio, and PDF formats.
Afterword
Following the outlined steps, you should be able to create a dashboard with an image upload feature. You should also be able to select from all uploaded earlier images and display them one by one.
Working dashboard example is available in the GitHub repository.
We're Always Happy to Hear From You!
We value your feedback and are eager to connect with our community and partners. Whether you have a question, an idea, or an issue to report, here’s how you can reach out:
- Community Members: Have a question, want to suggest a new feature, or found a bug? We’d love to hear from you! Please create a GitHub issue to start the conversation.
- Enterprise Partners: Need assistance or have an urgent request? Open a Zendesk ticket for a prompt and dedicated response from our team.
- Join the Conversation: Stay updated and share your thoughts! Subscribe to our YouTube Channel and leave your comments—we can’t wait to hear what you think.
Your input helps us improve, so don’t hesitate to get in touch!