Getting started with Business Suite
Over time, the Business Suite for Grafana might seem like it became a massive, multi-faceted entity with diverse functionality and plenty of nuances. This article is due to clarify the basics and give a quick cheat sheet with clear and easy steps on how to start. Hint: it is easier than you might think!
I will walk you through the following phases of working with the Business Suite collection:
Install
The Business Suite is a collection of open-source plugins for Grafana. Therefore, the installation is identical to any other open-source Grafana plugin. In this article, you can find all possible approaches to installation. I use some of the Business Suite plugins as an example, but it could be any other plugin.
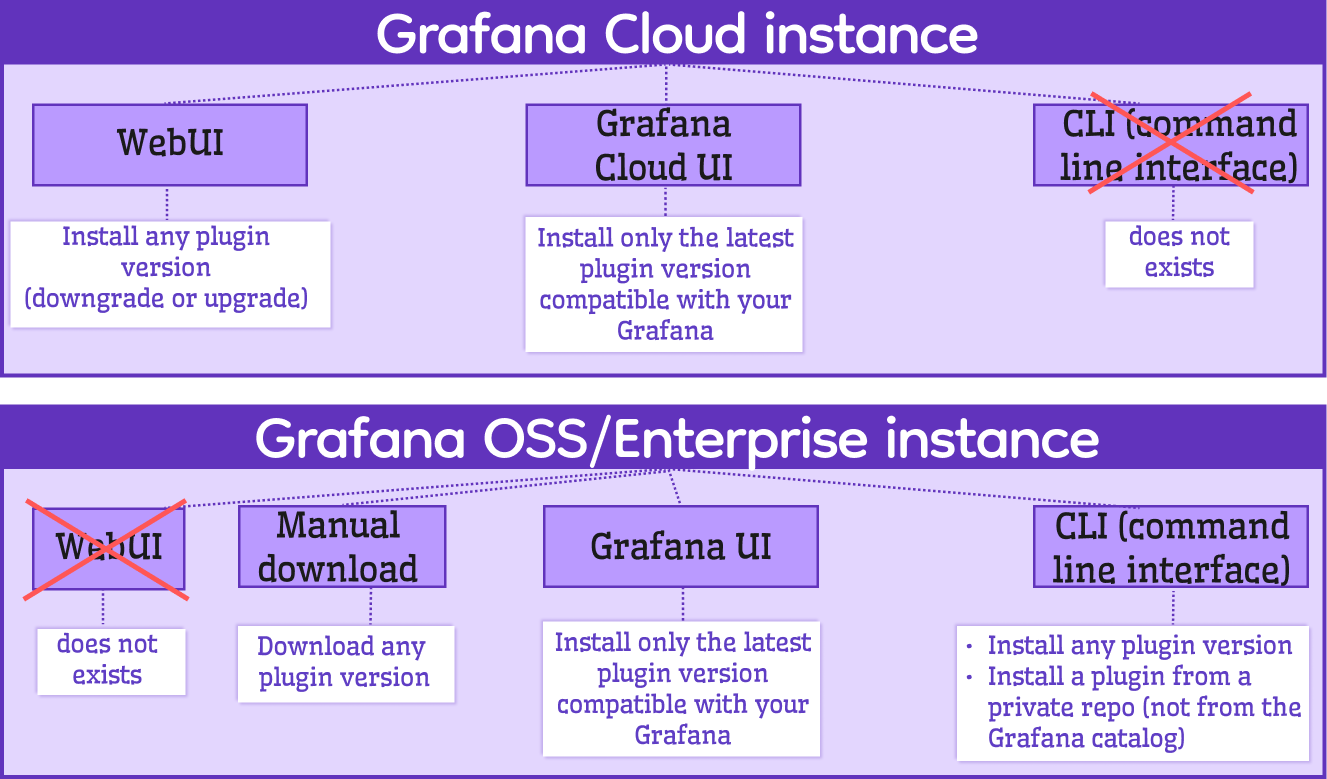
Let me start with the schema summarizing the installation scenarios. I categorized them for a Grafana Cloud account and OSS/Enterprise instances.
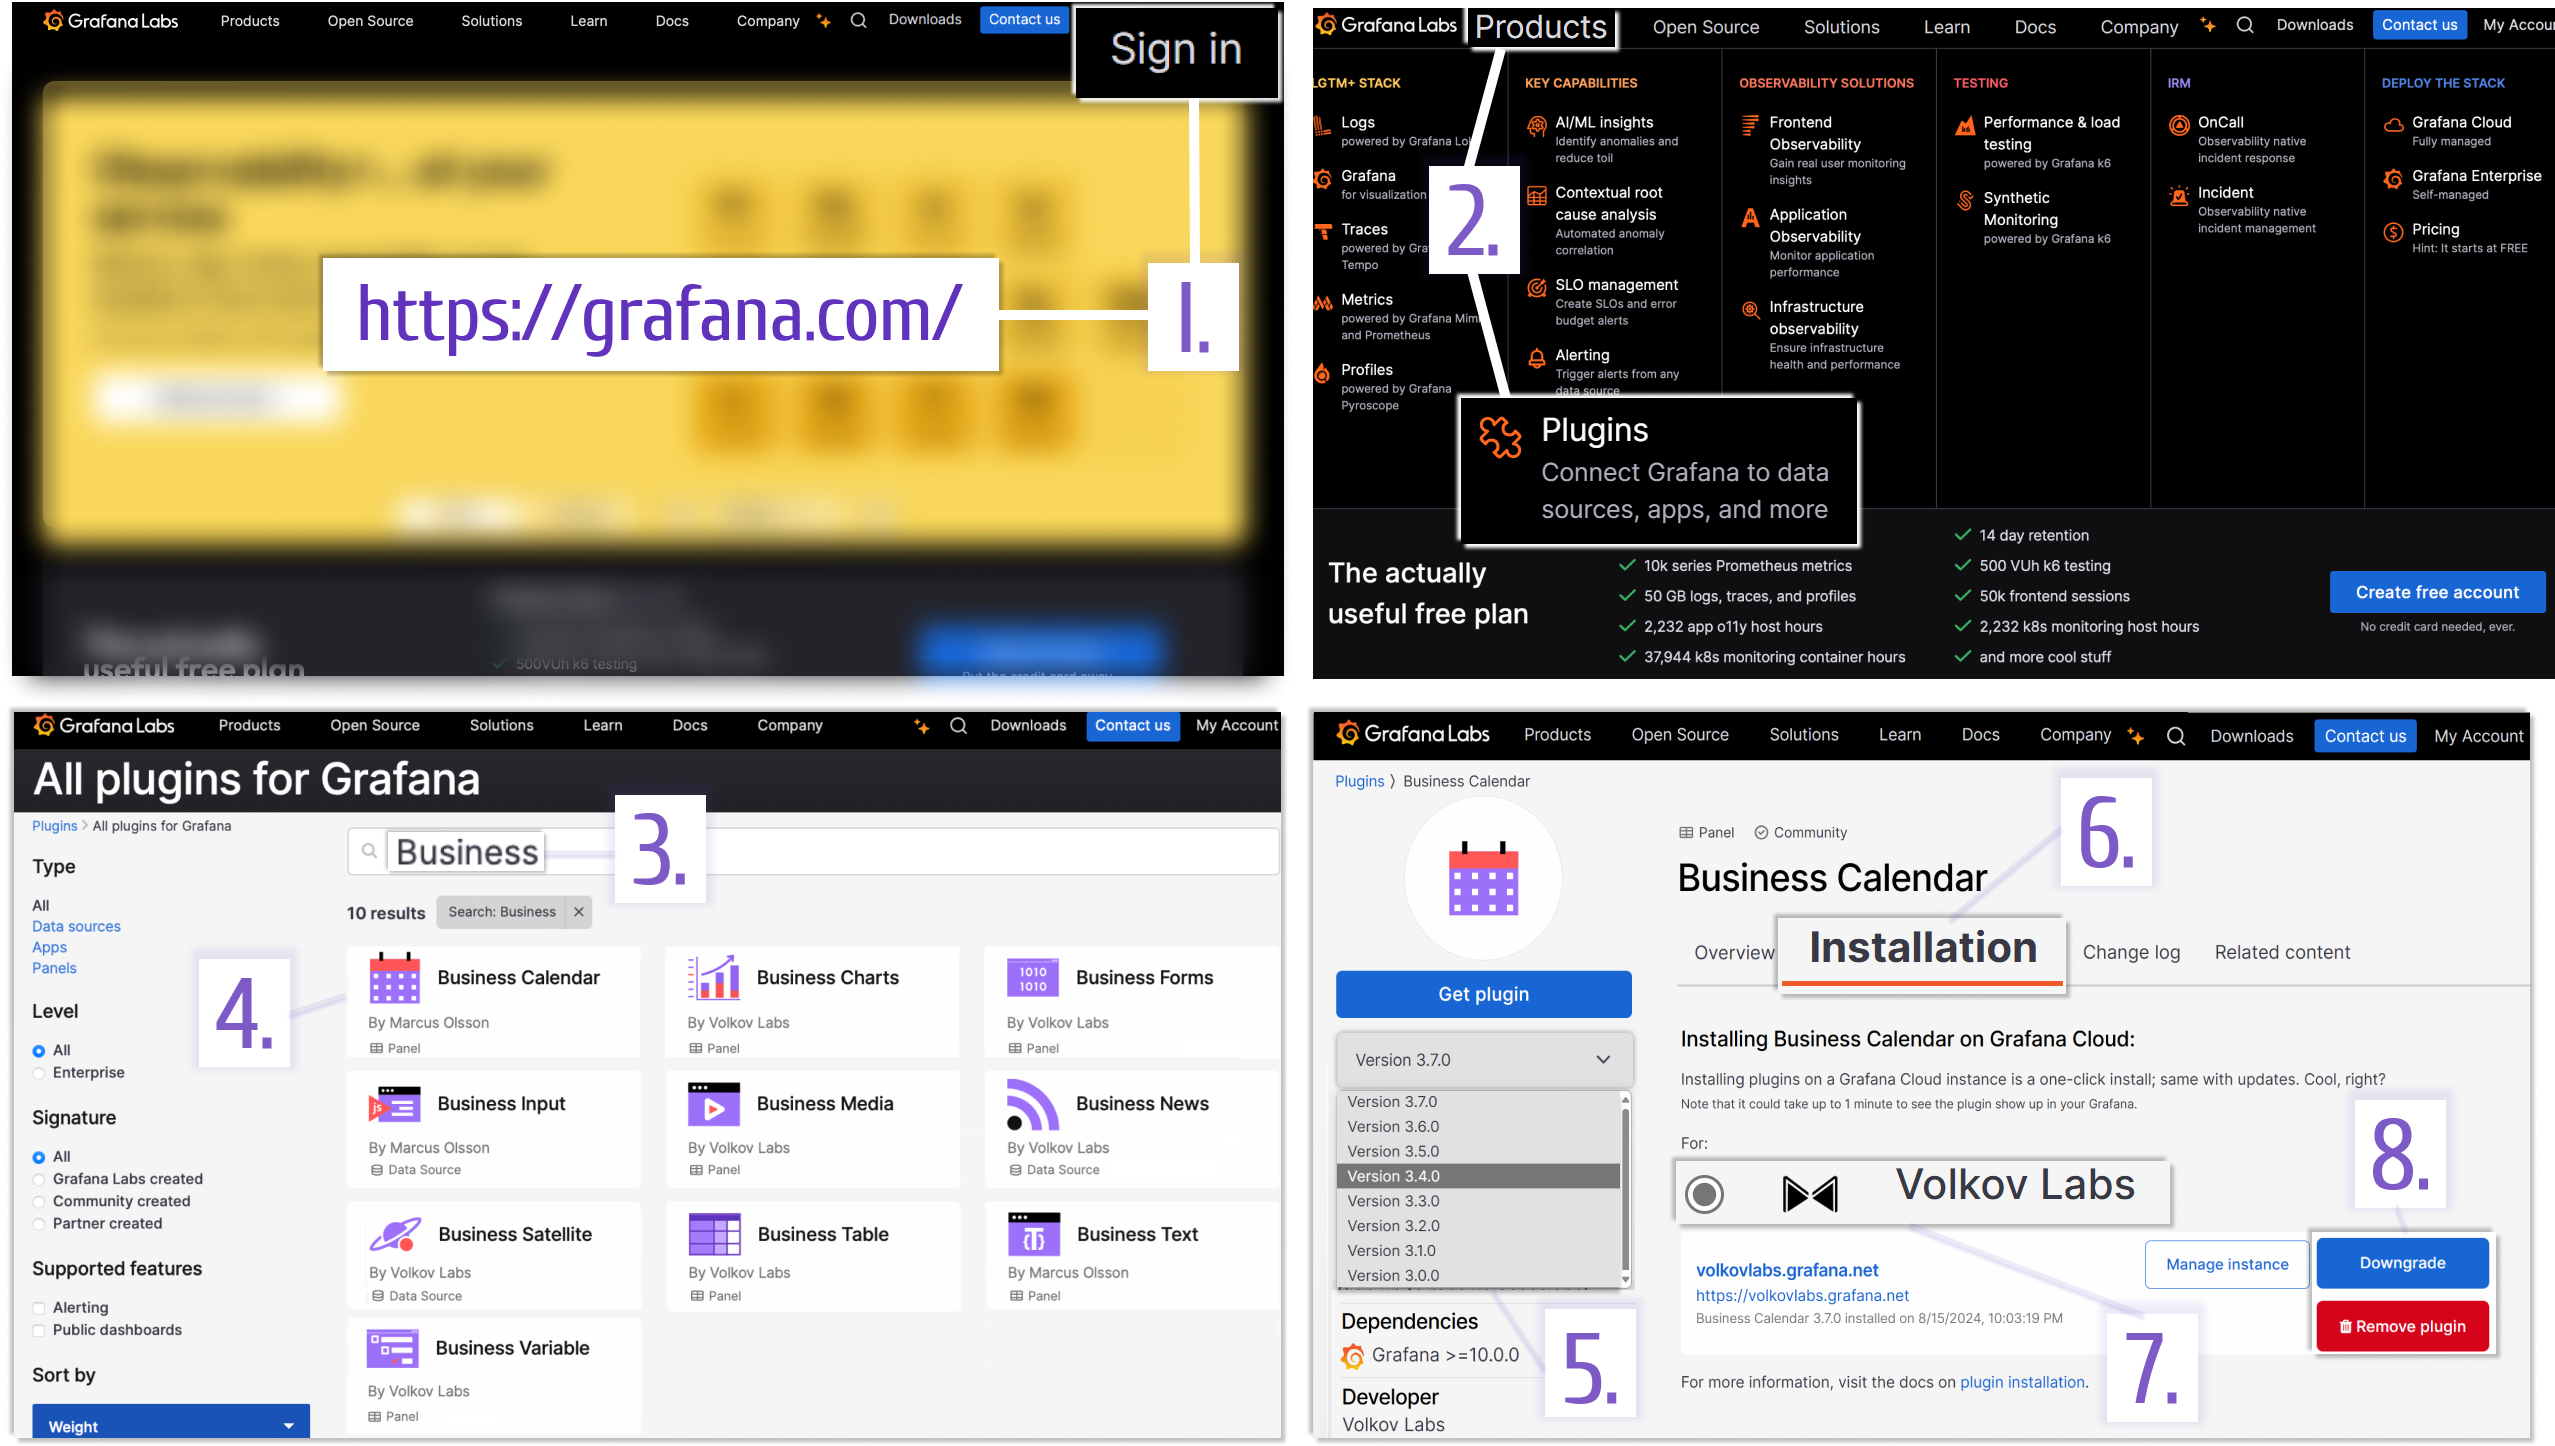
Cloud Web UI
This method is the most flexible. A user can choose any plugin version which means, they can upgrage or downgrade any plugin from the Grafana catalog.
- Sign into your account on the https://grafana.com/
- Go into the Products menu at the top of the screen and select the Plugins category.
- Optionally, enter the plugin name(or partial name) into the Search box. The word Business filters all ten plugins of the Business Suite plugin (as shown).
- Click on the plugin card of your choice.
- Select a plugin version you would like to install.
- Switch to the Installation tab.
- Select an organization (in case you have multiple).
- Use the action buttons to upgrade/downgrade/delete the selected plugin.
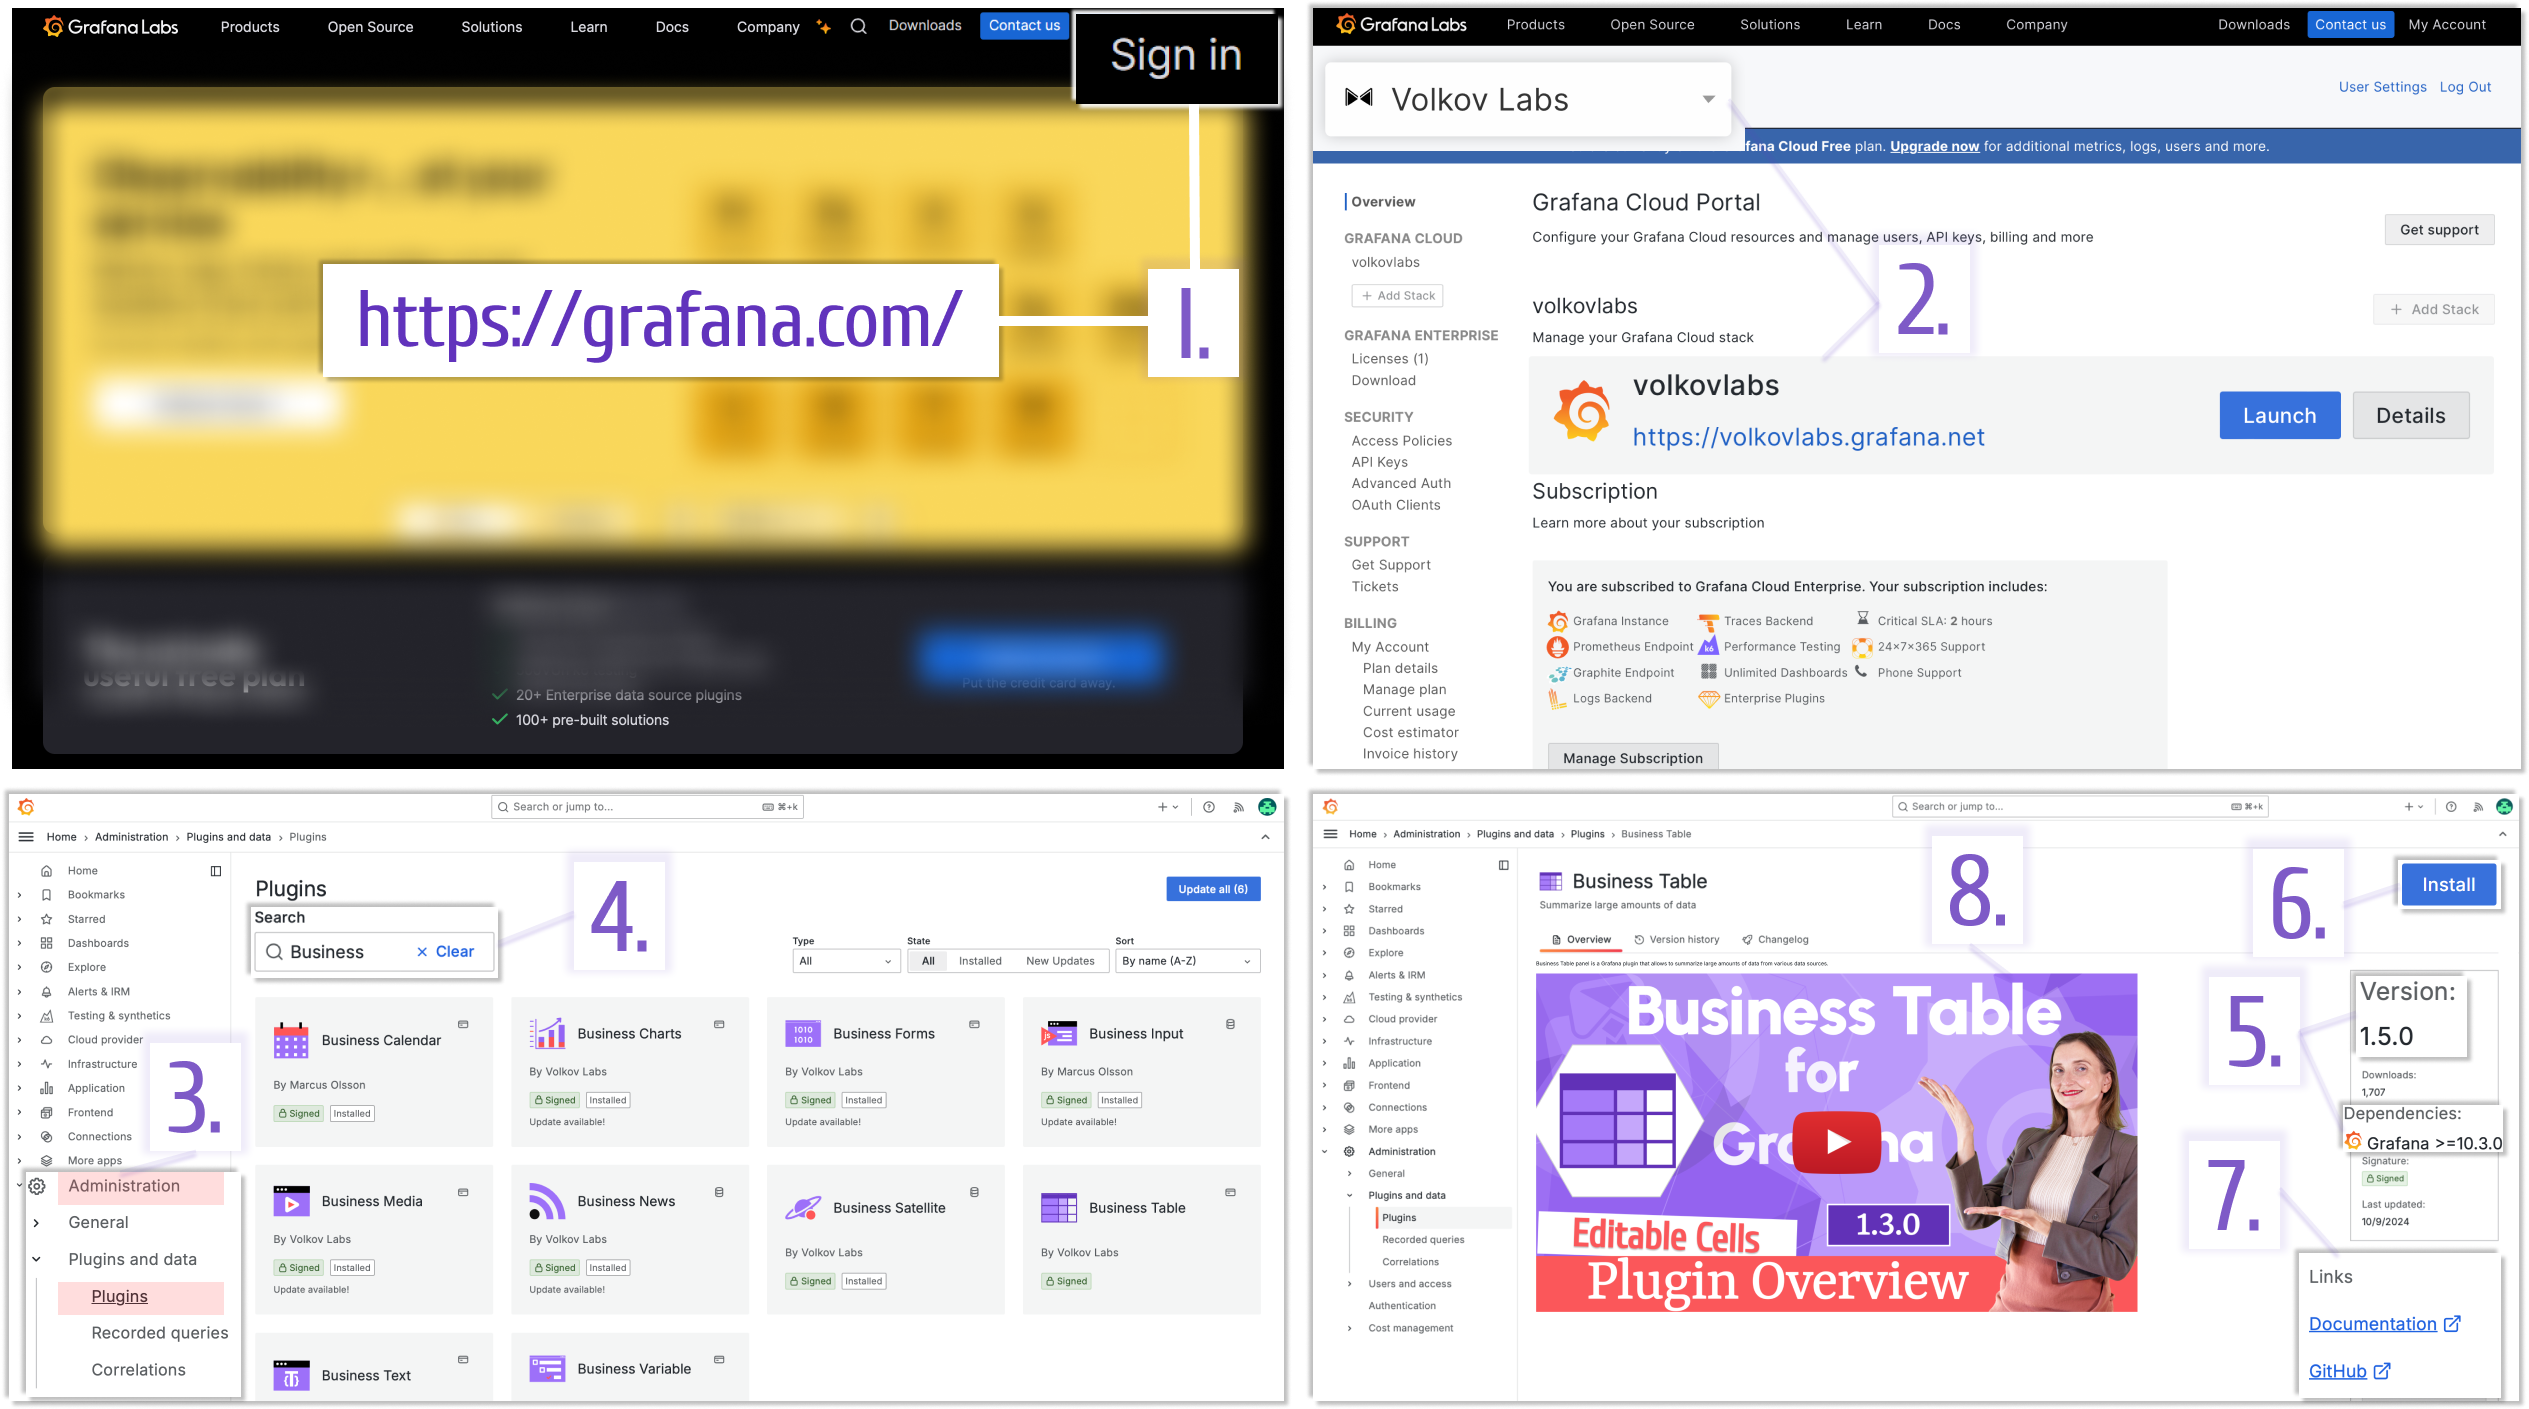
Cloud Grafana UI
With this method, a specific version selection is not possible. Only installation/upgrade to the latest compatible version with the installed Grafana is available.
- Sign in to your account at the https://grafana.com/
- Select your organization from the drop-down located in the top-left corner and launch the available stack.
- Open the Administration->Plugins menu.
- Optionally, enter the plugin name(or partial name) into the Search box. The word Business filters all ten plugins of the Business Suite plugin (as shown). Click on the plugin card of your choice.
- Note the version of the plugin and Grafana version requirement.
- Click the Install button.
- Review documentation and the plugin GitHub repository.
- The YouTube tutorial video enriches every Business Suite collection plugin. Feel free to watch it to learn about the plugin quickly.
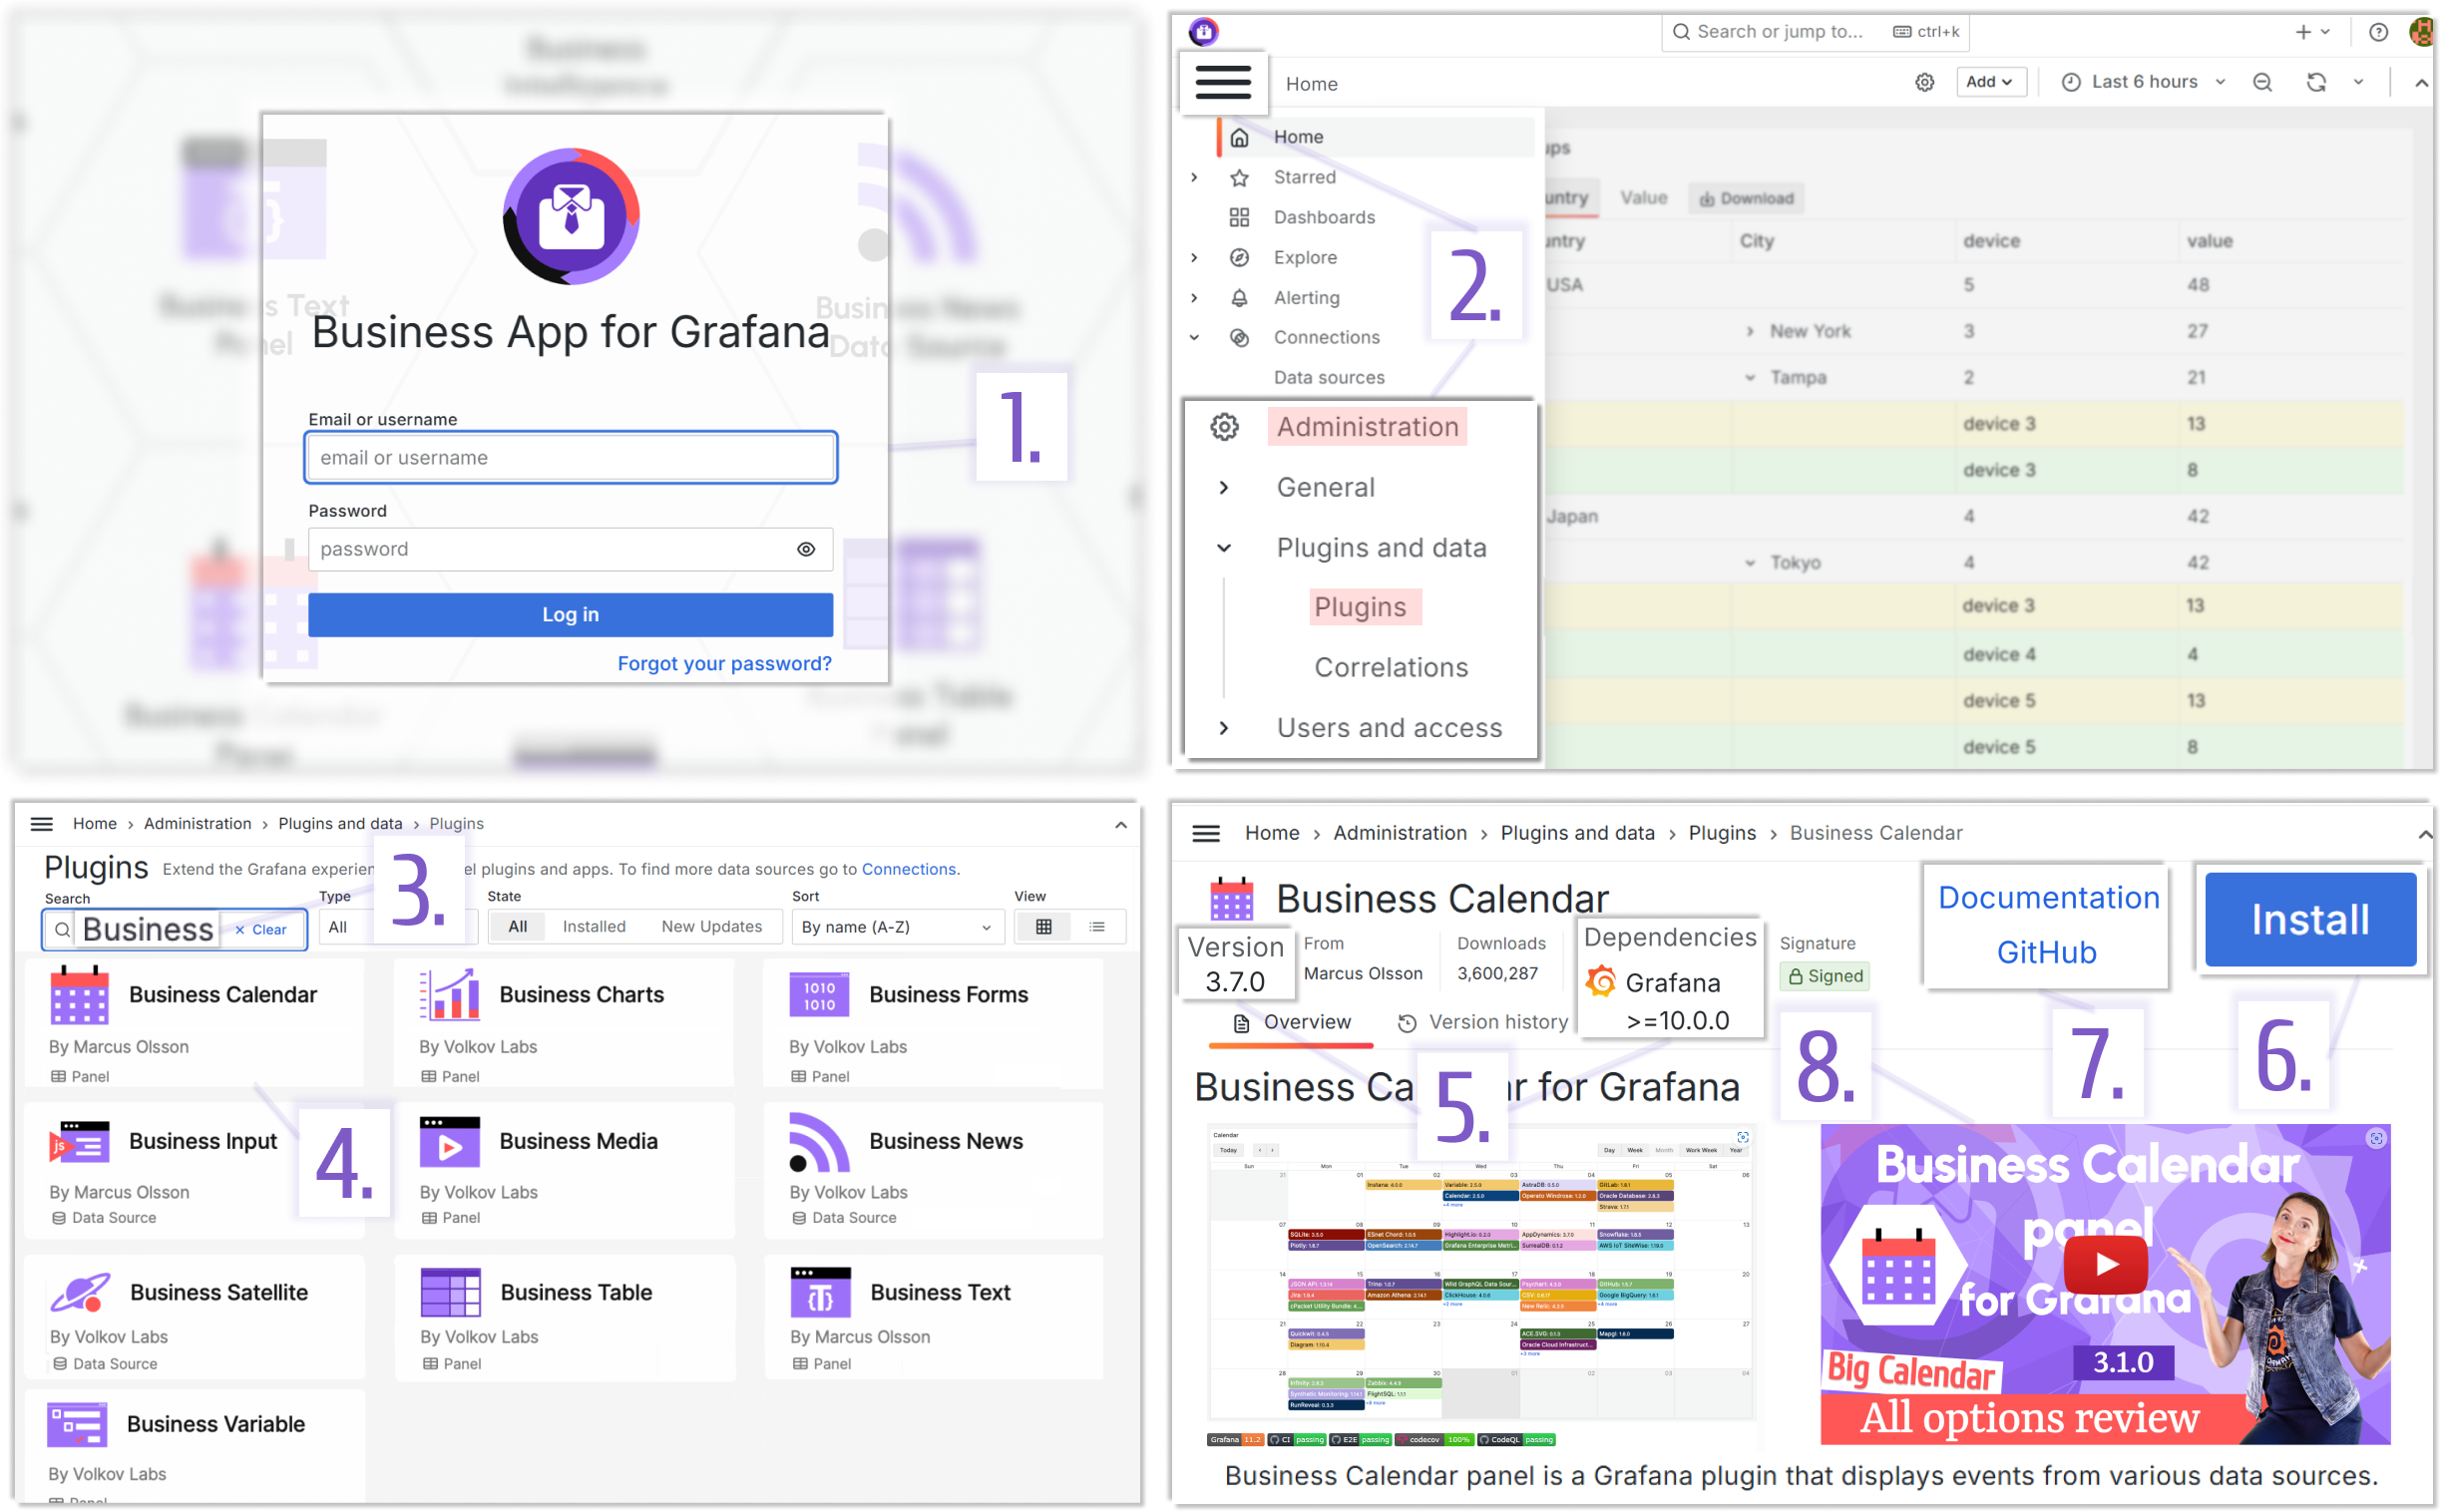
OSS/Enterprise Grafana UI
With this method, version selection is not possible. Only installation/upgrade to the latest compatible version with the installed Grafana is available.
- Sign in to your OSS/Enterprise Grafana.
- Open the hamburger menu on the left and then Administration->Plugins category.
- Optionally, enter the plugin name(or partial name) into the Search box. The word Business filters all ten plugins of the Business Suite plugin (as shown).
- Click on the plugin card of your choice.
- Note the version of the plugin and Grafana version requirement.
- Click the Install button.
- Review documentation and the plugin GitHub repository.
- The YouTube tutorial video enriches every Business Suite collection plugin. Feel free to watch it to learn about the plugin quickly.
OSS/Enterprise manual download
This approach is irreplaceable for air-gapped environments (networks not connected to the Internet due to various security rules). In that event, you manually download the plugin installation package (zip file) from the appropriate GitHub repository or Grafana website.
- Open Grafana web-site. No need to sign-in.
- Go into the Products menu at the top of the screen and select the Plugins category.
- Optionally, enter the plugin name (or partial name) into the Search box. The word Business filters all 10 plugins of the Business Suite plugin (as shown).
- Click on the plugin card of your choice.
- Select a plugin version you would like to download.
- Switch to the Installation tab and scroll down.
- Click the download link.

OSS/Enterprise CLI
Usually, you use the CLI (command line Grafana tool) to install any open-source plugins available in the Grafana catalog. In addition, with CLI, you can install Grafana plugins that are NOT in the Grafana catalog.
To get more information on how to use the Grafana CLI to install plugins from the private repository, please refer to the following blog posts where Mikhail provided installation details.

Configure
The Business Suite collection consists of 10 plugins: 3 data sources and 7 visualization panels. Configuration is a bit different for each type.
Data Source
After a data source plugin is installed, you need to add a data source instance to your Grafana.
- Open the hamburger menu on the left and then Connection->Data Sources menu. That will open the listing of all installed and configured data sources.
- Click the Add new data source button.
- Select your data source from the list. That list includes all installed plugins that have the data source type. You can limit the displayed data sources by using the Search field.
- Populate the configuration parameters. Make sure to have a distinct name to simplify recognizing that particular configured data source further down the line.
- Add a new visualization panel to a dashboard and open it in the edit mode.
- The newly configured data source should appear on the left-hand side drop-down for your selection.
- Specify appropriate queries.
- Switch to the Table View to observe what data frame is fetched from the data source utilizing the specified query.

Visualization panel
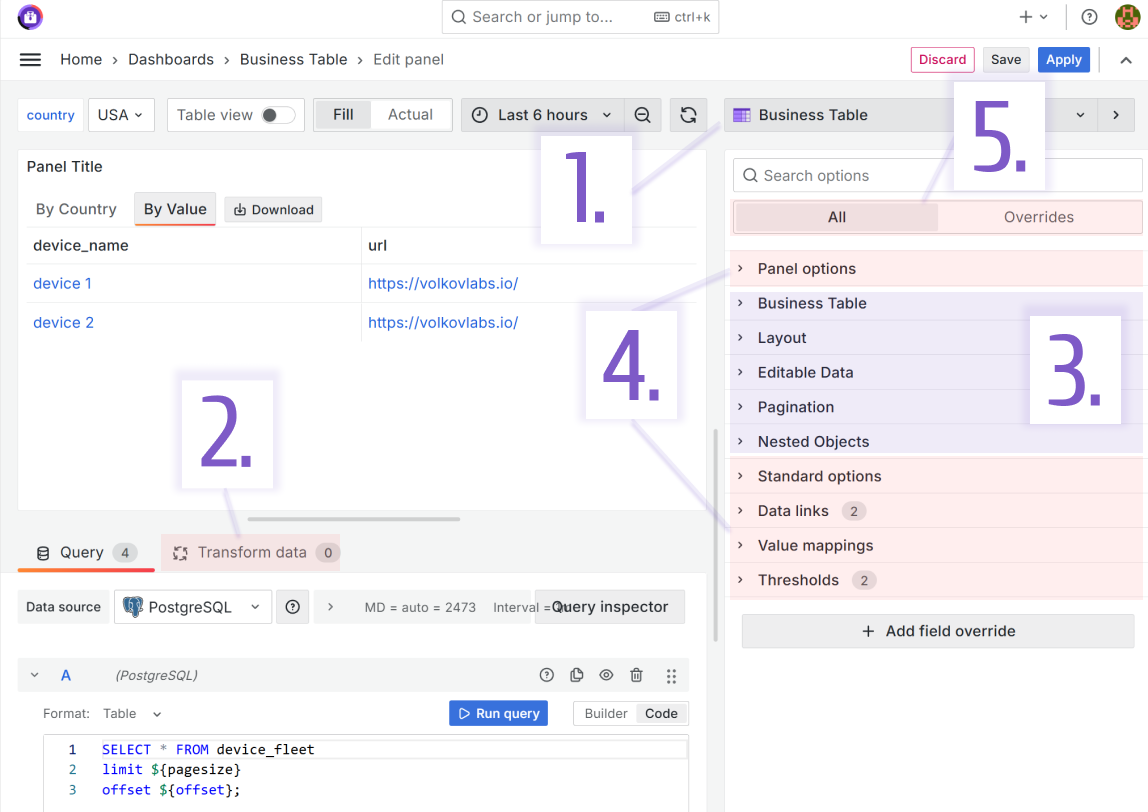
- After installing a visualization panel plugin, you can immidietly select it on the right-hand side drop-down for a visualization panel in the edit mode.
- Every visualization panel expects a specific data frame to work with. You can fine-tune a provided data frame by the connected data source in the Transform data tab if needed.
- All configuration parameters are located on the left-hand side — Configure plugin-specific parameters.
- Configure Grafana core parameters. These are common among most other Grafana plugins, such as Thresholds, Standard options, Data links, etcetera.
- All specified parameters impact all rows/columns of the fetched data frame. Overrides Here, you can specify to apply the parameters following specific conditions. For instance, highlight only a cell instead of the whole row.
To go deeper into the Grafana transformation subject, read the blog post from Grafana Crash Course.

Combine
Grafana's core design allows you to create web applications using the Grafana plugins as building blocks. Some combinations of the Business Suite plugins are an excellent illustration of this approach. Below are examples of how our plugins complement each other, resulting in almost ready-of-the-box solutions.
Business News plus Business Text
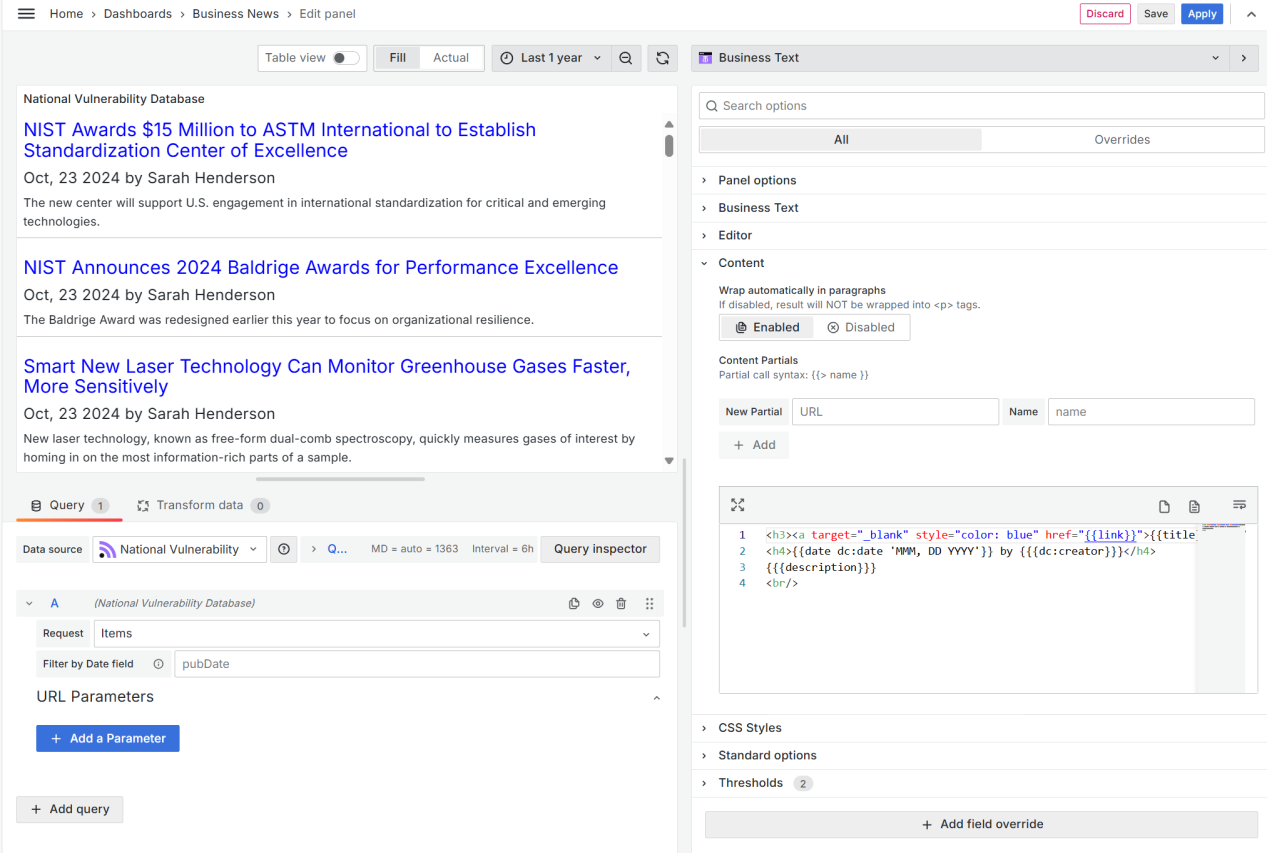
The Business News data source converts the RSS/Atom news feeds into the Grafana data frames. Combining it with the Business Text panel lets you visualize web resource updates on your Grafana dashboard in any CSS/HTML style.
Below is an example where the Business News reads from the national vulnerability database feed and the Business Text displays it using simple HTML formatting.
Business Variable plus Business Table
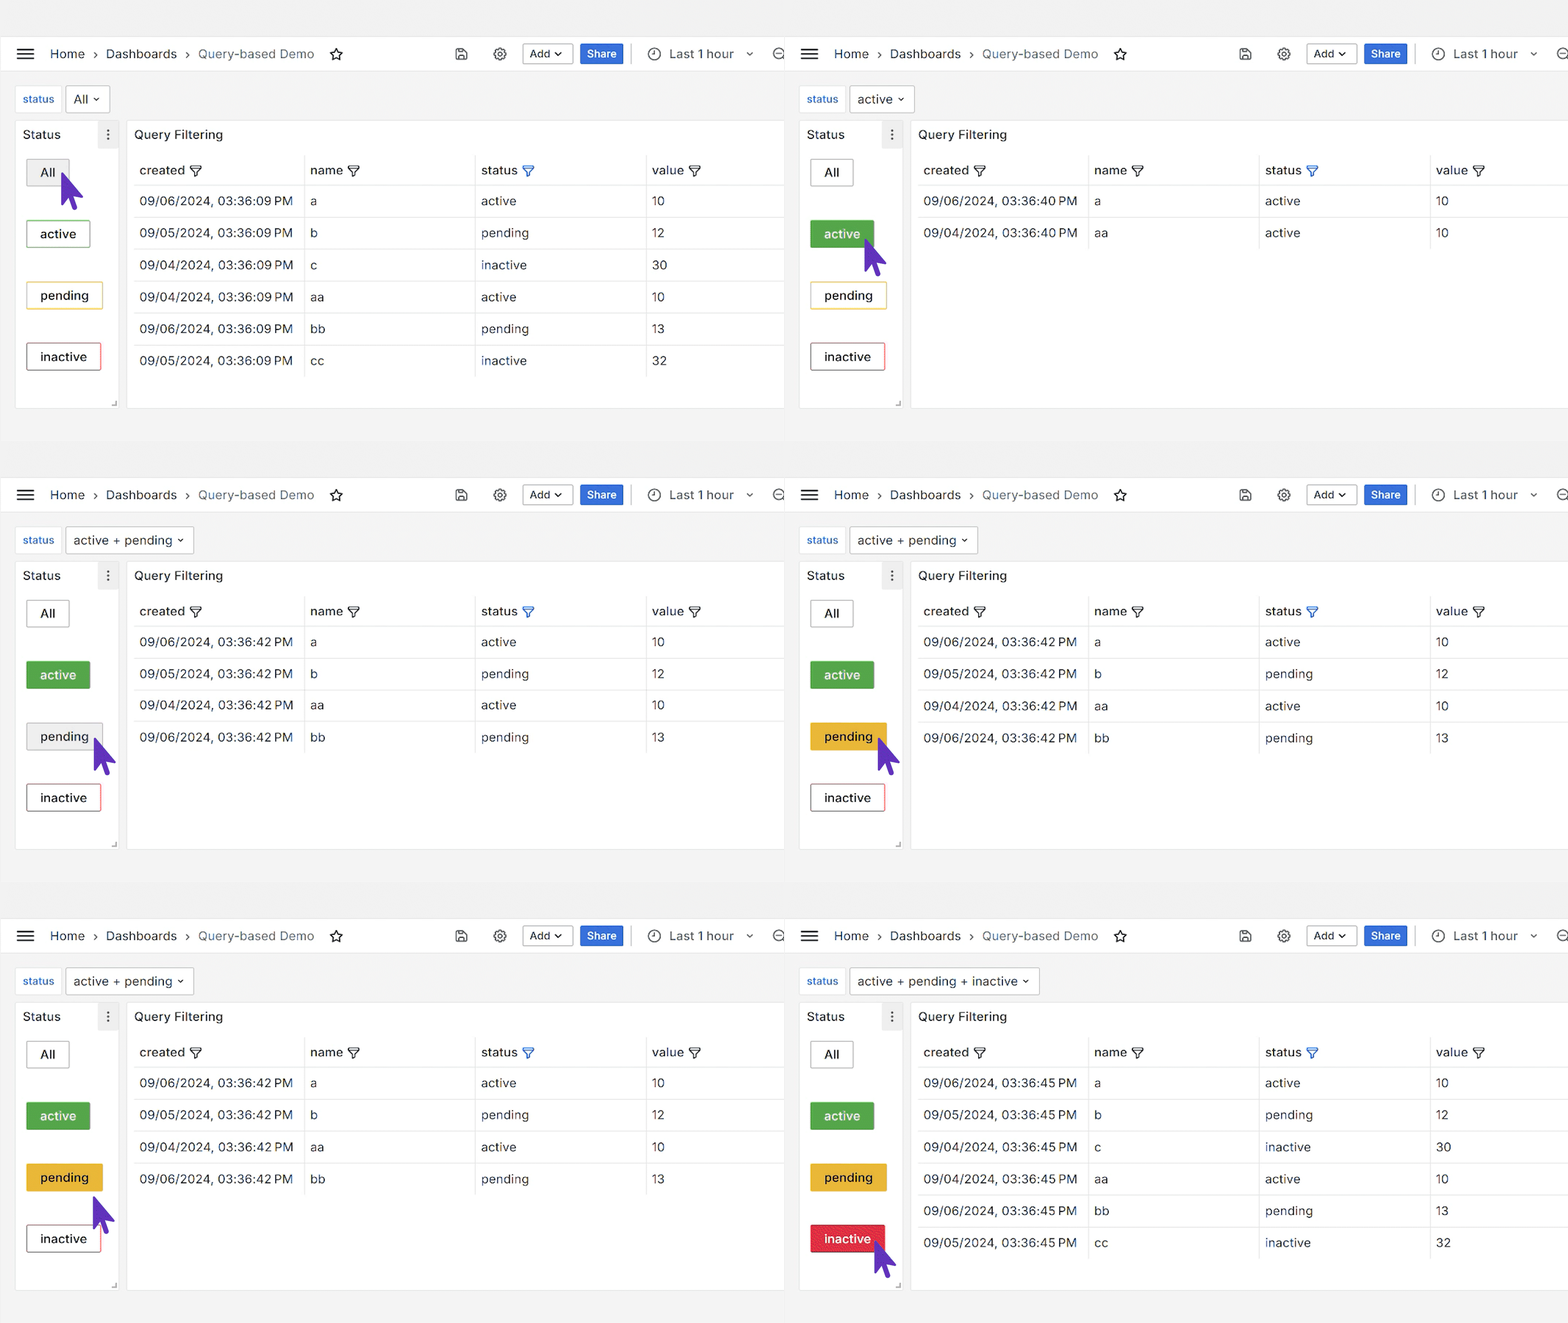
Even though both plugins (the Business Variable and Business Table) are visualization panels, they can work together in creating beautiful workflow for your users.
Business Media plus Business Forms
Uploading a file from a computer via the Grafana dashboard into the connected data source is one of the most common tasks. Using the Business Media panel along with the Business Forms makes it possible in minutes. To simplify this method and help its adoption, we posted an article walking through all the necessary steps.

Follow release schedule
We use the Release dashboard to track the Business Suite collection plugin releases. The project is open to the public, so anyone can join us in monitoring the number of plugin downloads, open issues, daily downloads, days until the next release, and many other illustrative metrics.
We target a new release for each plugin at least every 100 days, allowing all our plugins to be compatible with the latest Grafana releases and all necessary change request incorporation.
Request changes
If you notice something that can be improved in our plugins or believe you need a particular change, you can request it in the related GitHub repository.
We prioritize topics that could benefit a broad audience. If you have anything specific or need an answer quickly, feel free to join our partnership program Business Suite Enterprise.
Volkov Labs Is Now Closed
Following our acquisition, Volkov Labs has officially ceased operations as of September 26, 2025. We are no longer accepting feedback, support requests, or partnership inquiries. The Business Suite for Grafana repositories have been archived on our GitHub organization, and no further development or support will be provided.
We are deeply grateful for the incredible support from our community and partners over the past four years.


